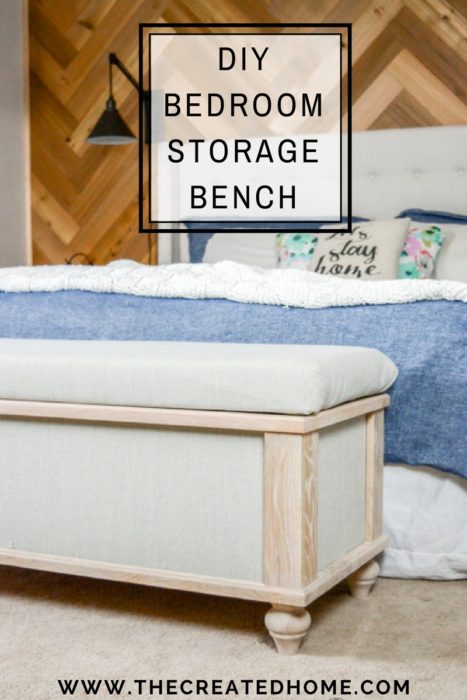
Have you ever purchased a cheap piece of furniture, only to have it fall apart? I picked up a super cheap bench at Home Goods last year. It was wobbly when I bought it and as you can imagine, things haven’t exactly improved. Some time ago my four year old jumped on it and left a kid sized hole in the top. Pieces of it have fallen apart ever since. The necessity for getting something in the space quickly is what led me purchase one rather than build, but now we have toss it in the garbage because none of the cheap particle board and mdf material is exactly reusable.
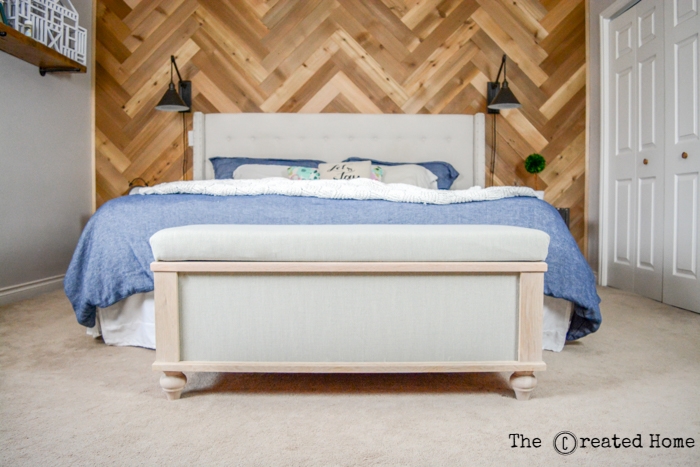
This time around I wanted a solid storage bench. One that would look great, be super strong, and function both for seating and storage. I liked the design of this one from Wayfair, but the fact that it is 45lbs and has a weight capacity of 100lbs should give some indication of it’s likely longevity. I haven’t attempted to heft this one on a scale, but my entire family can sit on it together if we like. As far as a price breakdown, you can expect to spend on materials about what you would spend to buy the smaller Wayfair bench, if not a little bit more, assuming you do not already have any of the materials listed.
Choose your own adventure build plans
I’m trying something new with this tutorial. These instructions include both an option A, beginner-oriented plan, and an option B, slightly more advanced plan. Feel free to follow whatever path works best for you, and challenge yourself a little! The materials list is the same for both options.
Materials List
*This site utilizes affiliate links. If you have any questions or want to learn more, click here.
1 – 45 7/8 x 18 1/8″ 1/4″ plywood (lid)
*2 – 44 3/8″ x 11 1/2″ 1/2″ plywood (box sides)
**2 – 16 7/8″ x 11 1/2″ 1/2″ plywood (box sides)
2 – 46 5/8″ x 9 9/16″ x 1″ wood of choice (base)
8 – 10 3/4″ x 2 1/2″ x 1″ wood of choice (outside supports)
4 – 10 3/4″ x 2 3/4″ x 1″ wood of choice (inside supports)
4 – 10 3/4″ x 2″ x 1″ wood of choice (inside supports)
2 – 46 3/4″ x 2 1/2″ x 1″ top ledge, both sides 45 degrees, length is long point to long point – don’t cut in advance!
2 – 18 3/4″ x 2 1/2″ x 1″ top ledge, both sides 45 degrees, length is long point to long point – don’t cut in advance!
*For simplified build modify to 44 3/8″ x 10 3/4″
**For simplified build modify to 16 7/8 x 10 3/4″
Tools
I have included links to show what I used. Obviously, the best tool is the one you already have, but since “what tool is that you are using?” is a common question, I’m including affiliate links for your convenience.
My base is 19 1/8″ wide. You’ll need to rip your 1×12 pieces down to 9 9/16″ to match that, but obviously you also don’t need to make it exactly that measurement, either.
You can join the two boards in any way that works for you. Pocket hole them together, use a domino or biscuit cutter, or simply glue and clamp. If you cut them a little long you can use a circular saw to cut off the ends of the joined pieces so they match up perfectly.
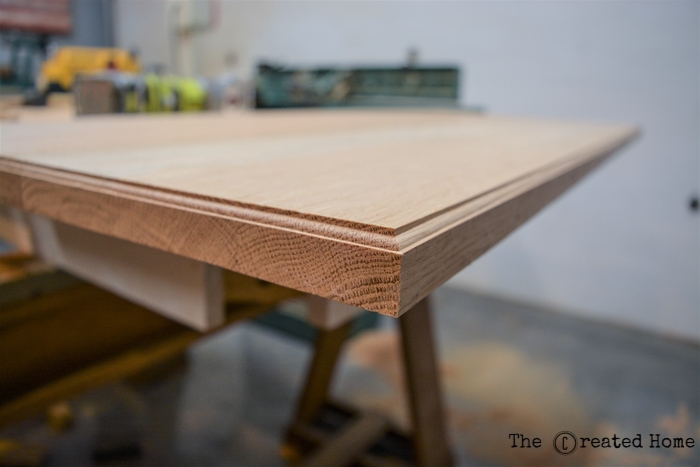
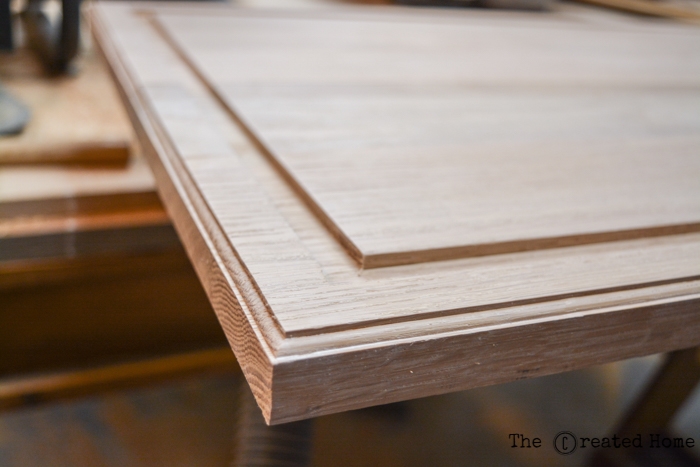
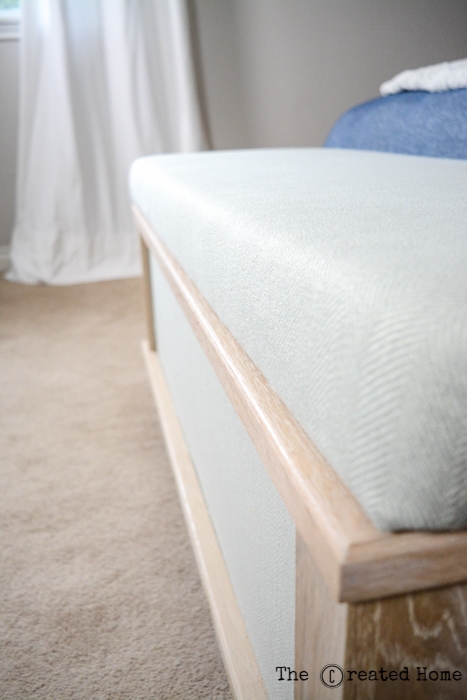
If you would like to up the wow factor, try adding a profile to the base piece. I used this beading bit in my trim router. Doesn’t it look so much better?!
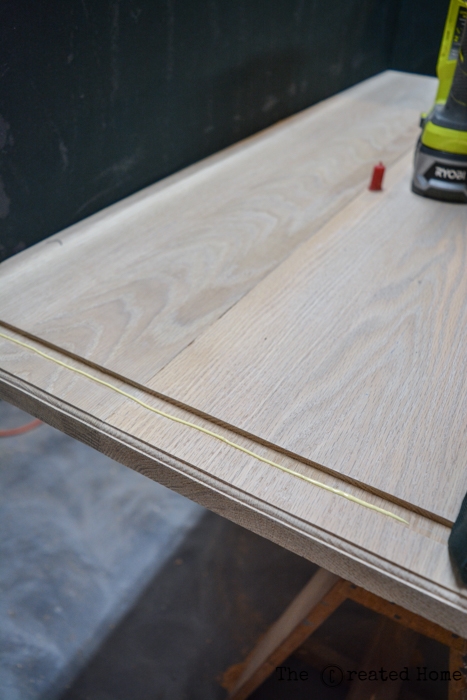
Step 2: Groove spot for plywood sides (skip for simplified build)
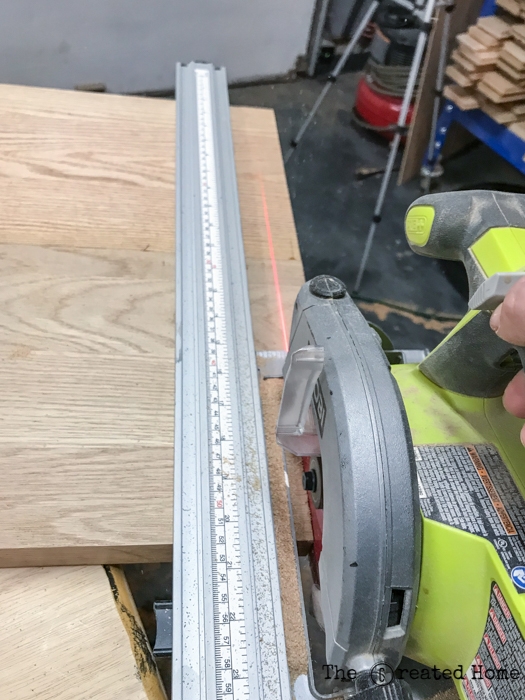
Use a 5/8″ straight bit to cut a groove around the board, inset 7/8″ all around. I used a simple clamping guide, then measured the distance in to where the bit would cut, in my case 3″, then simply ran the router down the side of the guide. My router bit the dust just as I went to build this bench, and after deliberating a lot of options I sprung for a really solid choice, the Bosch 2 1/4 hp combination plunge and fixed base router. Zero regrets here, unless it is that I didn’t get it sooner. I could go on about how awesome it is, but will let the number of times you see it used in future projects speak for itself.
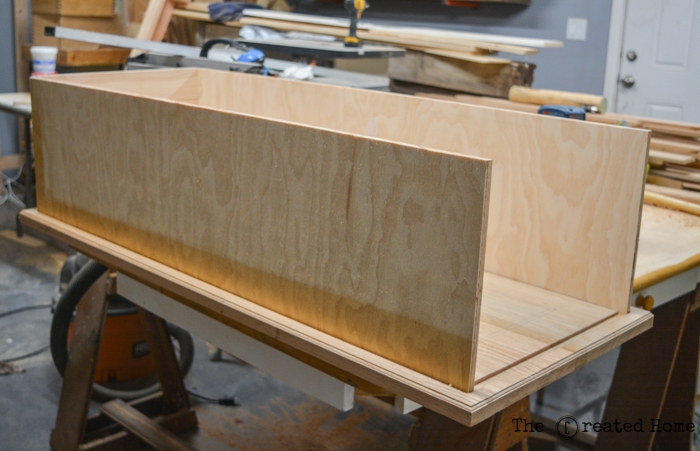
Step 3: Cut plywood sides and remainder of wood frame pieces, finish
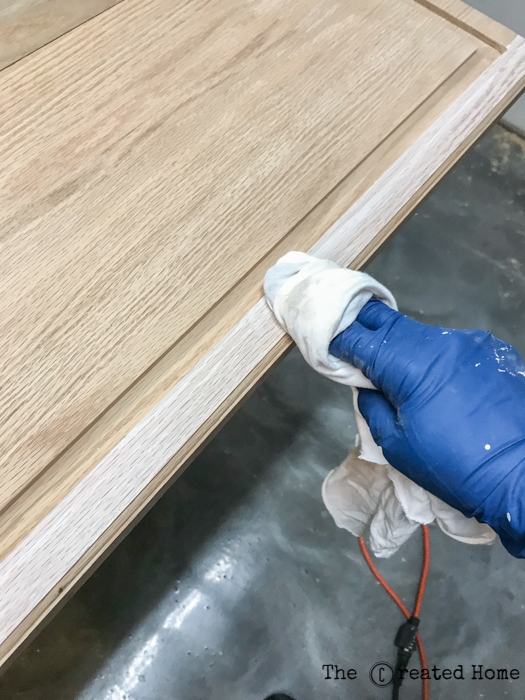
Cut out all of the pieces on the cut list, but cut them just a bit long so you have some room to work. You can make adjustments as you get to each piece, but you’ll need them roughly cut first to apply any finish. The reason for this is that the upholstery will be difficult to work around if you wait to finish, and you won’t be able to get stain out of the material. The white oak I used looked great with a little white wash stain, so I simply wiped on some Varathane Antique White and wiped it back.
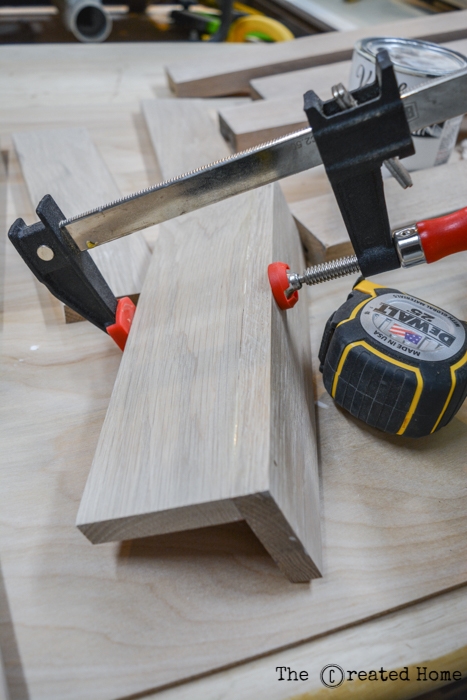
Glue and then nail the side support pieces together with brad nails. Finish them with stain before attaching.
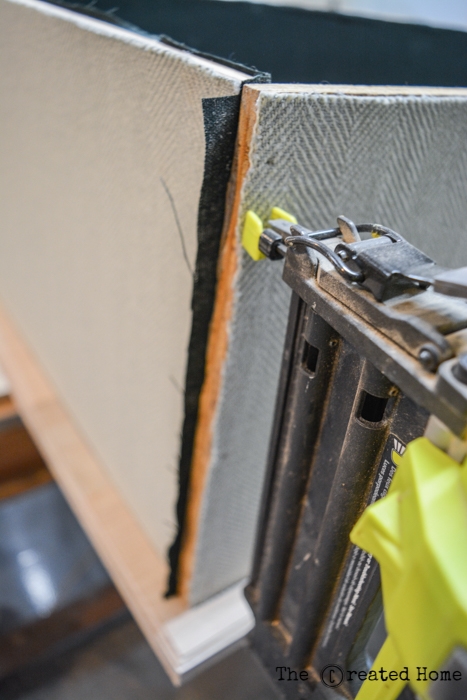
Step 4: Cover plywood with upholstery and liner
You can use whatever upholstery fabric you like, though if your experience level is anywhere near mine (aka, not a lot), I would resist the urge to get anything too geometric that would look off if stretched too much or too little when wrapping that top pad. I used this material from Joann Fabric, and it was relatively forgiving. For the liner cloth I used a simple black utility fabric, also from Joann. If you are using the simplified build instructions do not attach the black liner at this point, as you will need to run pocket holes to join the plywood to the base and to the top ledge first.
I tried a couple different methods of attaching the material to the wood, and the best method was Aleene’s Tacky Glue. Spray adhesive was a big fat fail.
Step 5: Attach plywood
If you are building option A you will want to run pocket holes in the top and bottom of the plywood and attach the bottom side down to the base plywood. Try clamping a level or some other straight edge to keep the plywood from wandering on you. Glue the material on starting at the bottom. You may need to finish the bottom edge first. Glue only up as high as the top set of pocket holes and leave them exposed for attaching to the top ledge in the next step.
Whichever option you are following, go ahead and nail the box sides together. Use glue and brad nails.
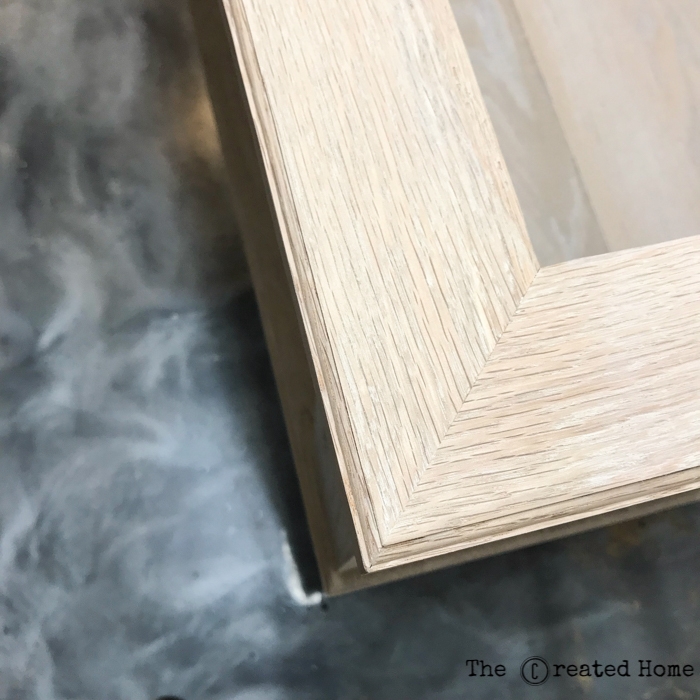
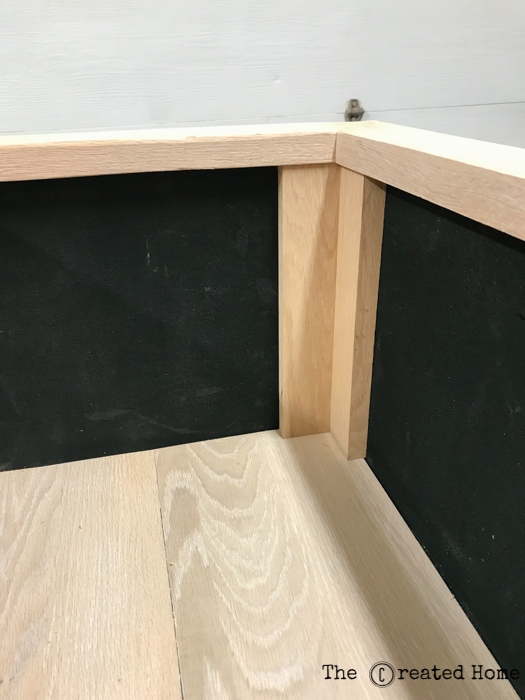
Step 6: Cut and attach top ledge
If you are building option B, you will need to use your router with the same 5/8″ straight cut bit to run a dado along each of the ledge board pieces. The easiest way to do this is with a router table and fence, so I simply moved my router from the plunge base to the fixed, hooked it up to the table, and powered these out in now time. I did this before cutting any of the boards to final width for simplicity’s sake. The 5/8″ groove allows for just a tiny bit of flex, which helped me get those 45 degree corners matched up really nice.
If you prefer to take the more basic approach, you will need to pocket hole the plywood to the top ledge. My tip is to cut the 45 or 90 degree angles first, then clamp the top ledge pieces firmly to the plywood to insure the holes don’t wander at all.
I’ve included cut lengths, but my advice is to cut one 45, then sneak up on the other side a thin cut at a time to make sure it joins to the next piece precisely. If you are going for a simplified build you can certainly use 90 degree corners here and save yourself some work. However, if you have dadoed the boards in place, 45s are the only way you are turning that corner.
Some tips for getting those corners perfect: First, be sure your miter saw is adjusted precisely. I used a speed square to draw a line and then followed it with the miter saw leaving the line so I could check that it was cutting dead on. Tip number 2 is to make the cut a bit long, then slowly cut back to where it needs to go, as mentioned. Finally, use clamps to hold each corner together. There will be a bit of play here that will help bring all of those corners together. I’ll be perfectly honest here, three of my four corners are enough to make the angels weep, but the forth caught up to me and needed a bit of filler. The pursuit of perfection, eh?!
You can add another profile with the trim router once the ledge is secure. I matched the base with a beading bit.
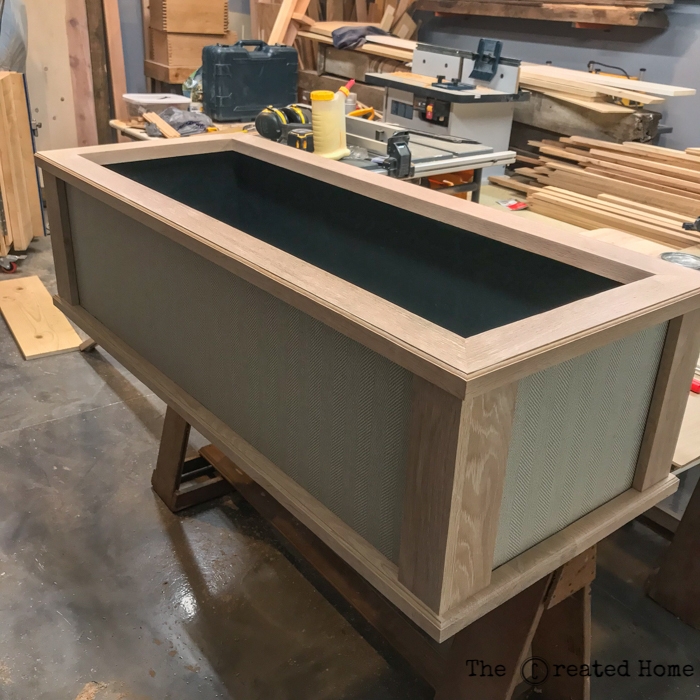
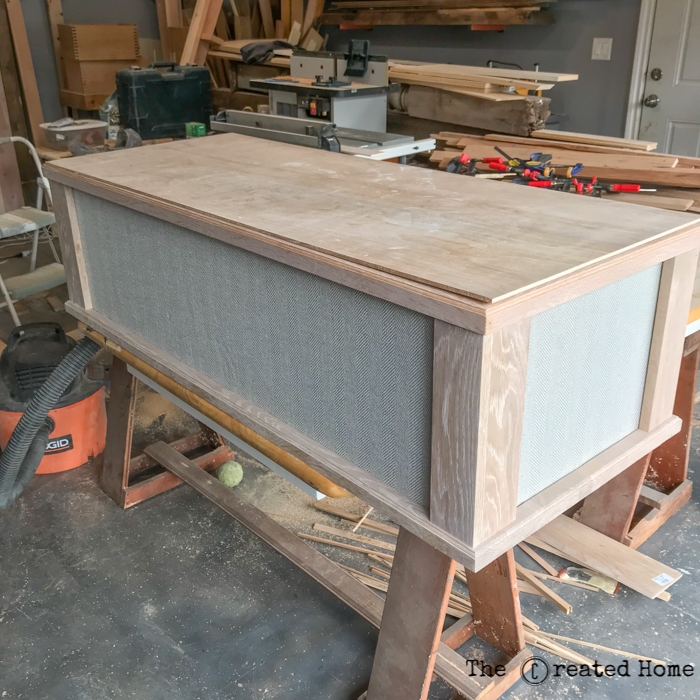
Step 7: Attach outside and inside supports
Cut the inside supports so that they fit snugly under the ledge. I ripped one side a little short so it would match the other side when it overlapped. Be sure to whitewash or stain these before attaching.
Step 8: Cut top lid
Cut the top lid out of 1/4″ ply, just shorter than the top all around. I left a gap of just under an inch.
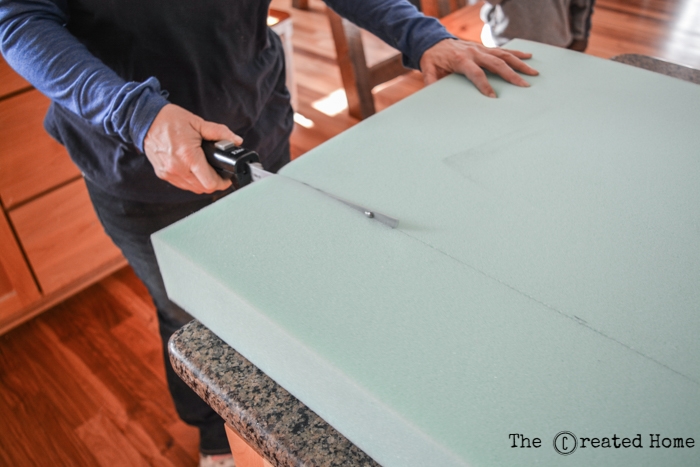
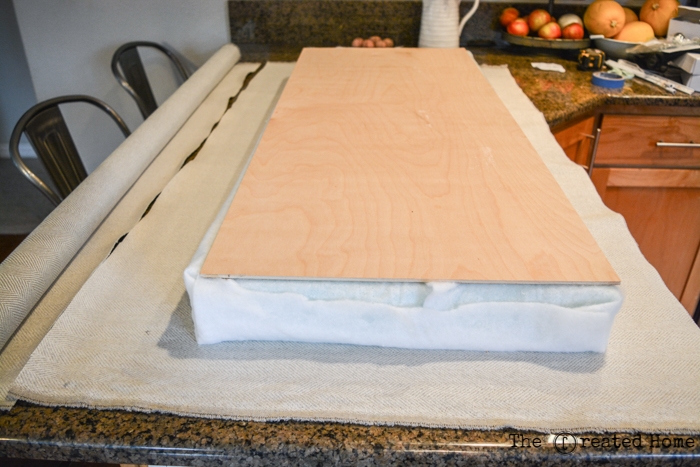
Step 9: Prepare cushion
Okay, stick with me here. I’m no expert at upholstery. You can either take the lazy way out and not sew (the way I did it), or up your game and sew the cushion. I used 3″ high density foam from Joann’s because it was 50% off and I had a coupon as well. It goes on sale fairly regularly, so check that out, or order it from Amazon.
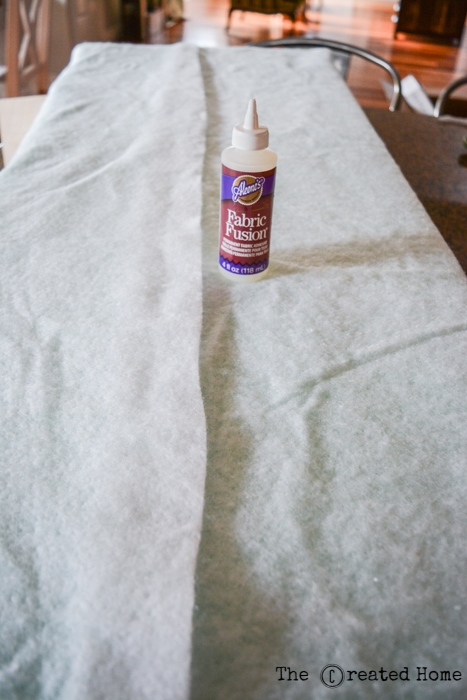
Wrap the foam in padding to take down that square shape just a bit. I chose to leave it a bit on the square side. It’s totally personal preference. Glue in place with fabric adhesive.
Lay the wrapped cushion upside down on the upholstery fabric and cut around it, leaving enough to wrap it up onto the wood.
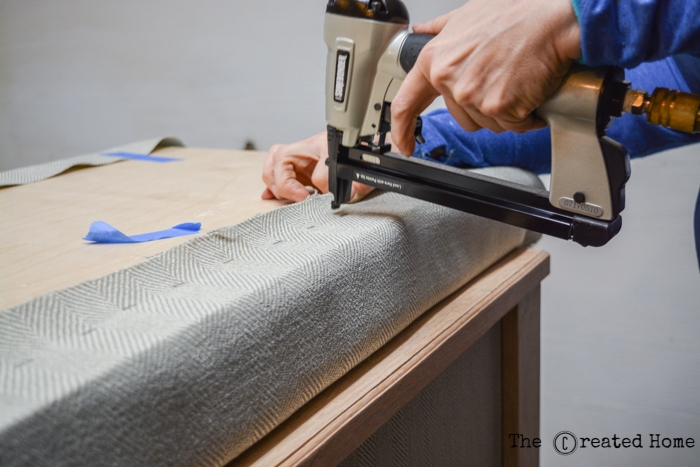
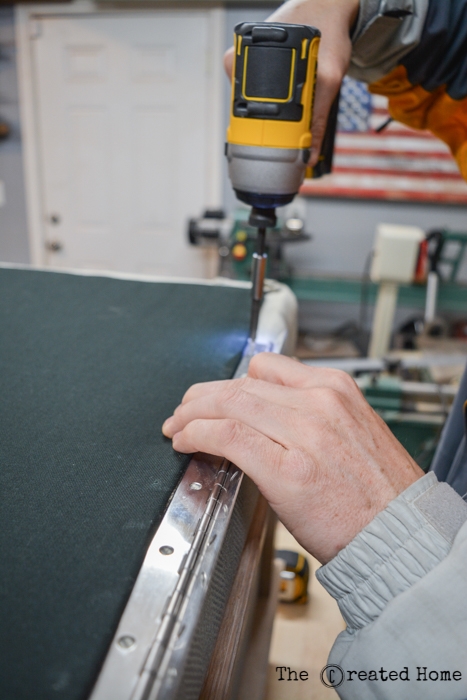
Gently pull the material until it is taunt but not overstretched and staple in place. I used this upholstery nailer, which is only $38 on Amazon, and it saved me much more than that in frustration and hurt fingers.
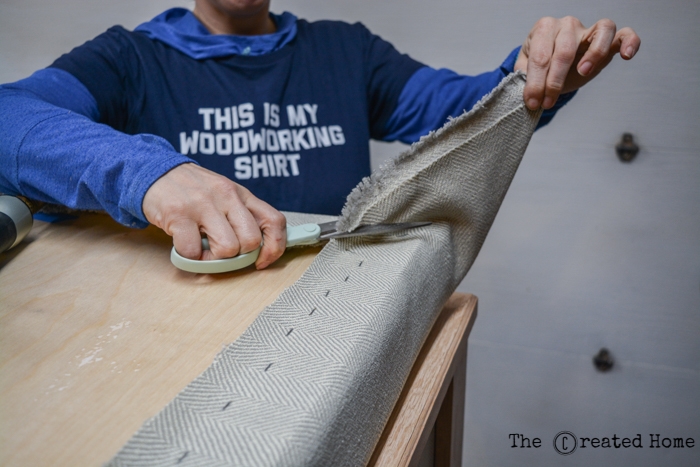
The corners are kind of a pain. Full disclosure: I’m not really a fan of them, and they would definitely be better if I had sewed it. I stapled them into 45 degrees, then trimmed off the extra material and tucked it up.
This is what they look like.
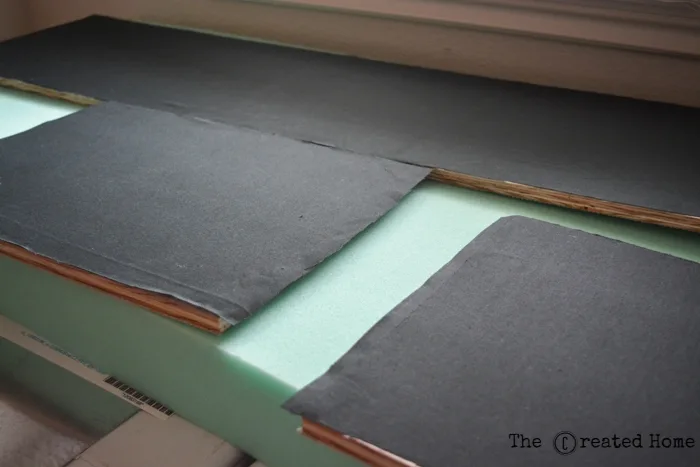
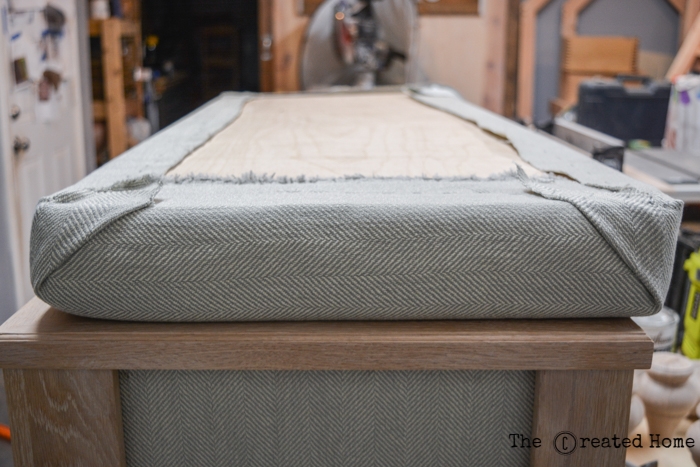
To attach the liner to the back cut it to size, about an inch or two less than the overall measurements and staple the top edge. If for some reason your material has two different sides make sure you are stapling the underside. Use the upholstery strip that comes in a row (without the tacks) to create a solid edge here. You can skip this step, but it won’t be as clean a line.
You will use the upholstery tack strips to attach the other three sides. place the 1″ foam under the liner, then roll the edges under with the tack strip and use a hammer or mallet to pound the tack strip down, latching down the sides of the liner material.
That probably doesn’t make any sense, so watch this:
Step 10: Add hinges and supports
Attach the bench top with a piano hinge or other hinge of your choice. Soft close hinges are also a great option for the lid.
Step 11: Add hardware and feet
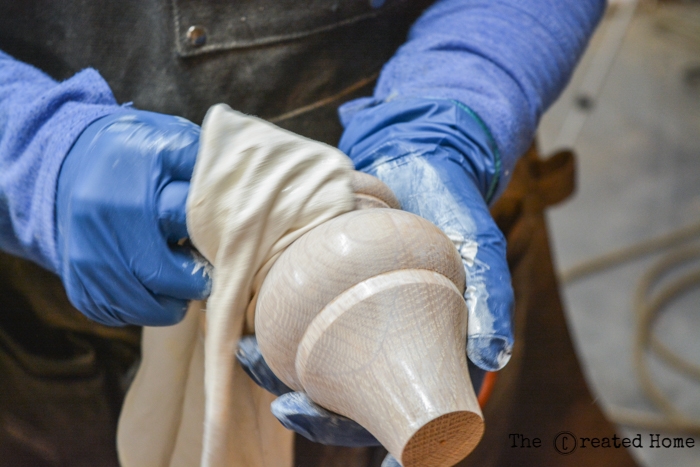
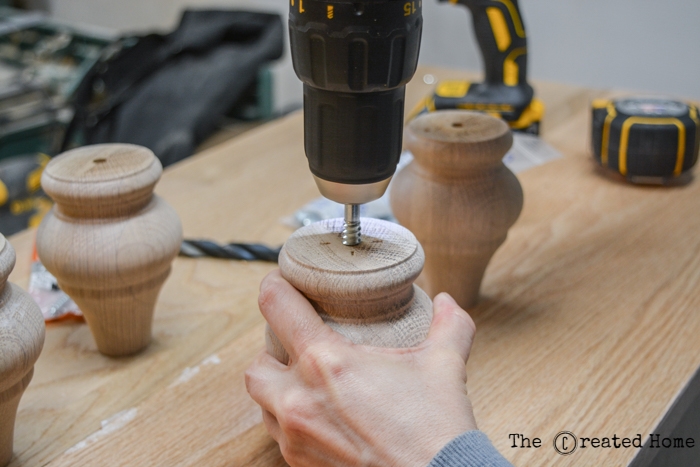
I used these gorgeous English country style turned feet from Osborne Wood Products, Inc. They are beautifully made, and the maple or pine will only run you $6 or $7 per foot. Osborne was kind enough to send these lovely white oak feet for this build, which I whitewashed along with the rest of the oak.
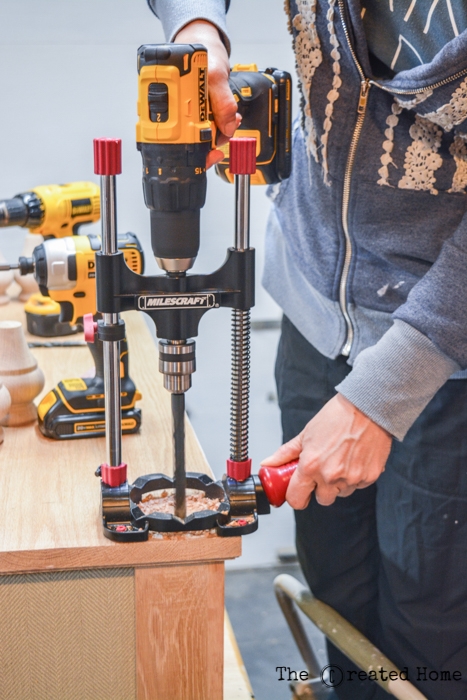
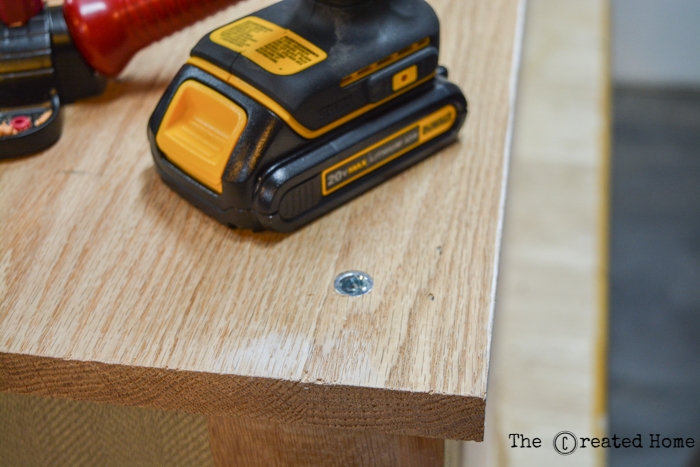
The best way to attach the feet is to screw metal inserts into the base of the bench, and hanger bolts into the feet. You can then screw and unscrew the feet as needed. I used 5/16″ threaded inserts, along with this handy portable solution by Milescraft.
Use a 1/2″ drill bit to create a hole for the insert.
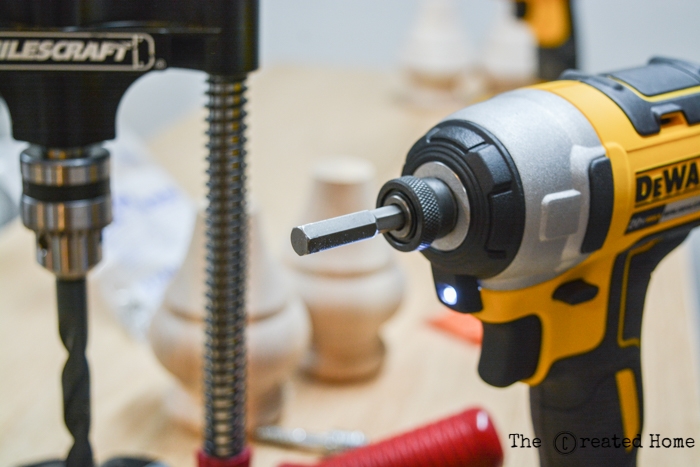
Then use this attachment to drill it flush to the surface of the bench.
To attach the feet you’ll need to use a 3/8″ drill to fit the 5/16″ hanger bolts.
It is important that your hole is straight up and down, so use a drill press or a portable option. Chuck the bolt in a drill to screw it into the hole you created in the foot, being sure to leave the end that fits into the insert exposed.
You will be able to thread the short end that sticks up out of the foot into the bench base to attach the feet. This creates a solution that can disassemble as well.
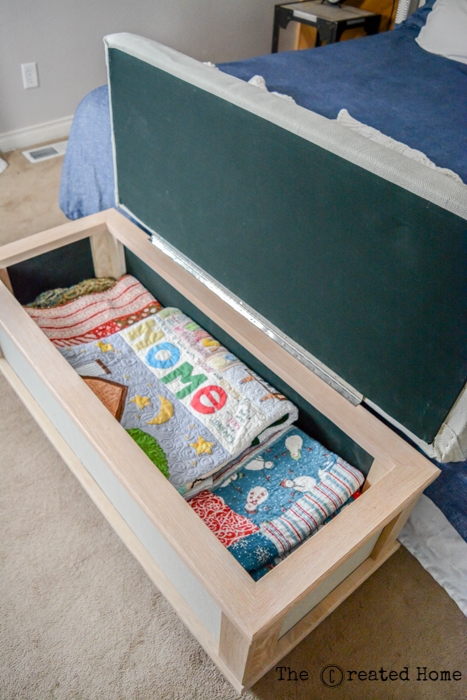
Step 12: Fill with blankets and enjoy!
That’s it! Lug that baby in the house and fill it with blankets or shoes or snacks you hide from the kids. Just kidding, that’s a terrible hiding spot.
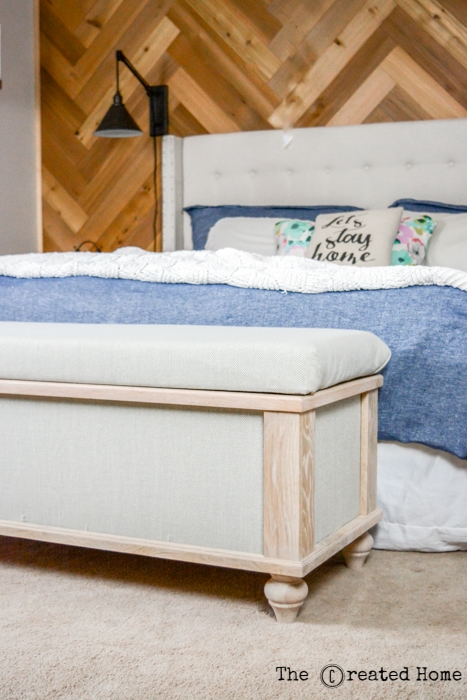
Confession: I’m a bit horrified that I had to photograph this without our area rug in place. Pretend that carpet isn’t there. But isn’t the bench just fabulous?!
I was able to build this storage bench out of reclaimed flooring material, along with feet by Osborne Wood Company. It’s always a thrill for me when I can create something out of reclaimed materials. Think outside the box when reusing lumber. It doesn’t always have to be pallets! (Check out my reclaimed oak coffee table for another great example.)
As always, if you have any questions, please ask! And if you build this storage bench be sure to share a photo!
16 Beautiful Homemade DIY Benches- A Cultivated Nest
Tuesday 16th of February 2021
[…] Upholstered Storage Bench from The Created Home […]
Shirlee Smith
Tuesday 10th of March 2020
What is the fully assembled LxWxH? I have a feeling that I would need it a little longer and not so wide.
Sarah
Thursday 1st of April 2021
46 1/2" long, 18 3/4" deep, and 21" high.
Bethanie Taylor
Friday 27th of December 2019
I was looking for a solution to my kitchen seating problem (big family plus holidays) and found your storage bench. I am new at this, but I increased the length by 20 inches and brought in metal, a thicker base and expensive oak plywood for more support. Just would like to thank you for the instructions!
*Would post pictures of how it turned out (Christmas was wonderful!), but I cannot figure out how to. :-(
Sarah
Tuesday 16th of June 2020
I'm so happy to hear that! Apologies for the delay in responding. You can share a photo through the "Ask" link in the top menu. That's my email address. I would love to see!
Rebecca
Sunday 15th of September 2019
How long did this take you?
Sarah
Monday 23rd of September 2019
Ooooo, that's a tricky question. Honestly, all I recall about this one is that it was one of those projects that I worked on a little at a time, likely at the same time as other projects. For that reason, I seem to remember spending a good number of weeks with it, albeit in short bursts of time. Sorry, that's a terrible answer.


16 Beautiful Homemade DIY Benches- A Cultivated Nest
Tuesday 16th of February 2021
[…] Upholstered Storage Bench from The Created Home […]
Shirlee Smith
Tuesday 10th of March 2020
What is the fully assembled LxWxH? I have a feeling that I would need it a little longer and not so wide.
Sarah
Thursday 1st of April 2021
46 1/2" long, 18 3/4" deep, and 21" high.
Bethanie Taylor
Friday 27th of December 2019
I was looking for a solution to my kitchen seating problem (big family plus holidays) and found your storage bench. I am new at this, but I increased the length by 20 inches and brought in metal, a thicker base and expensive oak plywood for more support. Just would like to thank you for the instructions! *Would post pictures of how it turned out (Christmas was wonderful!), but I cannot figure out how to. :-(
Sarah
Tuesday 16th of June 2020
I'm so happy to hear that! Apologies for the delay in responding. You can share a photo through the "Ask" link in the top menu. That's my email address. I would love to see!
Rebecca
Sunday 15th of September 2019
How long did this take you?
Sarah
Monday 23rd of September 2019
Ooooo, that's a tricky question. Honestly, all I recall about this one is that it was one of those projects that I worked on a little at a time, likely at the same time as other projects. For that reason, I seem to remember spending a good number of weeks with it, albeit in short bursts of time. Sorry, that's a terrible answer.
Corey Snapp
Tuesday 6th of February 2018
This is such a nice project turned out so great
Sarah
Saturday 10th of March 2018
Thank you, Corey!