

A miter saw is often the first, big tool purchase of a diy workshop. It’s also voted “the tool you would choose to save from a fire if you could only choose just one” by most DIYers. Okay, I just made that up.
Just got a miter saw and want to find a way to make it more effective? This post is for you.
Thinking about getting a miter saw and want some ideas before you do? This post is for you.
Been using your miter saw for a while but wouldn’t mind spending less time cleaning sawdust? Yep, it’s definitely for you.
Just randomly found your way here and have no idea what a miter saw is? Welcome!
About that miter saw…
If you want to learn the basics of miter saw function, you need to check out this post by Brittany of Pretty Handy Girl. She breaks it all down and even includes a video. Go, I’ll wait…
If you haven’t already purchased a miter saw you may be wondering what to get. A friend recently asked me what saw I recommend, which is always a fun question. Here were the three options I gave him, plus a good budget pick.
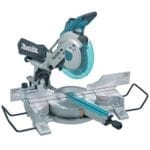
Makita LS1016L
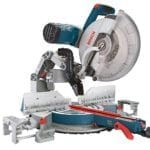
Bosch GCM12SD
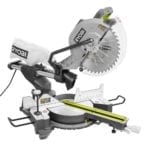
Dewalt DWS780
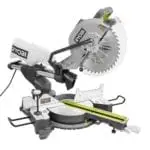
Ryobi 15 amp 12 in.


Which one will I buy?
That’s really what it comes down to, right? The part where you say “Yaaaa, but which one do you really recommend?” I have been using the Kobalt (sold at Lowes stores) for the past three years, and on the whole, I am very pleased with it. However, the fence frequently needs adjustment to get perfectly square cuts, and in the end, that’s just not going to cut it. (See what I did there?)
So when it is time for the Kobalt to be replaced I will purchase….either the Dewalt, the Makita, or the Bosch. I don’t know yet, but rest assured, I only recommend things I would put in my own shop.
Now about that dust collection…
If you have a tricked out shop with a full size dust collection system just pat yourself on the back and move on. If you are looking for a good way to control the dust from your miter saw without spending your life’s savings (because let’s be real, the saw cost enough as is, right?), then watch this:
Part 2: An up close look
I love how self contained this system is. My miter saw gets moved around the shop quite a bit, and it only takes plugging in a single cord to run everything.
If you want to set up a similar system, here is what you will need:
*Be sure to check that these dimensions will work for your particular saw.
*This blog utilizes affiliate links. You can read my disclosure statement here.
iVac Automated Vacuum Switch
Fernco 4 inch to 3 inch coupling
Fernco 2 inch by 2 inch coupling
Big gulp dust hood
Fernco Y splitter (for some reason this thing is outrageously priced on Amazon, so I’m linking to Home Depot)
Rigid shop vac
Mobile Miter Saw Station by Fix This Build That
utility knife (for splitting the hose)
screwdriver or drill (to tighten the connections and attach the gulp to the stand)
C-clamp
The Details: Connecting your miter saw to dust collection
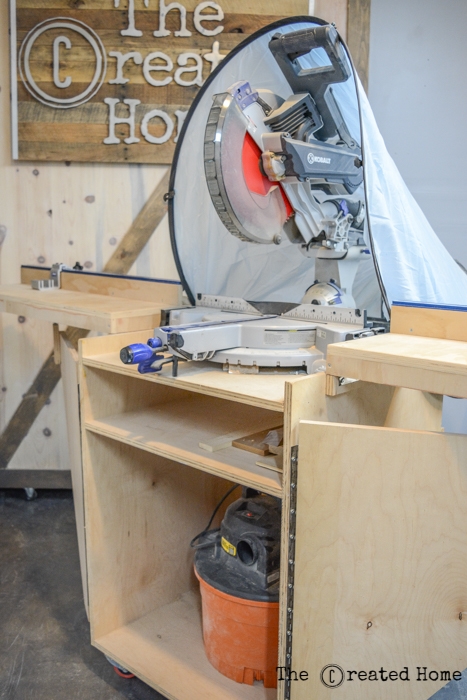
I use the miter saw stand by Fix This Build That. You can download his plans for $9, and they are worth every penny. I also tricked my stand out with the Kreg Trak and Stop system, and highly recommend it.
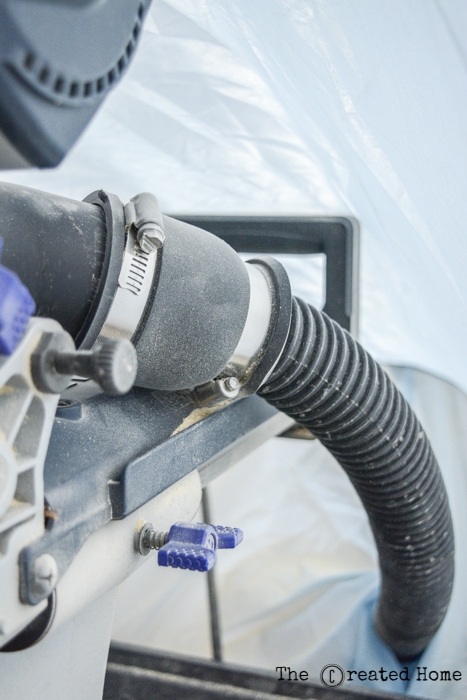
The saw port in back is connected using a flexible coupling that I came across in the plumbing section at Home Depot. The 2×2 inch coupling fits super tight over the saw port, but forms a great seal, especially once you tighten the band with a screwdriver.
The next part is the dust hood. I attached mine to the miter stand by simply screwing through the lip into the stand itself.
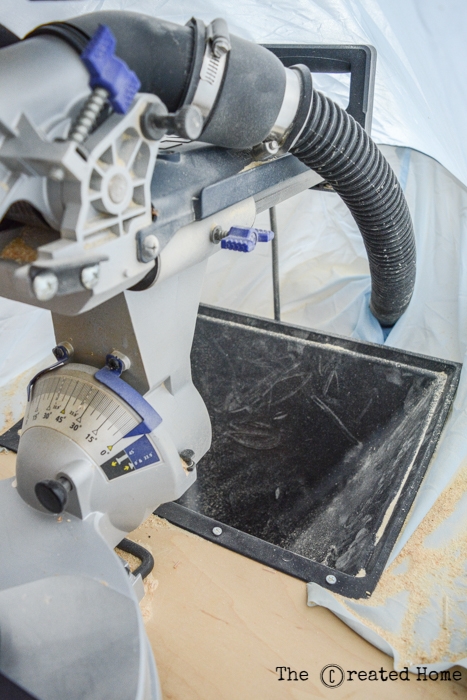
The hose runs around behind the dust hood and down to a 2″ flexible Y connector.

The dust hood has a 4″ port. I reduced it to a 2″ using another flexible connector, which then connects to the Y connector.
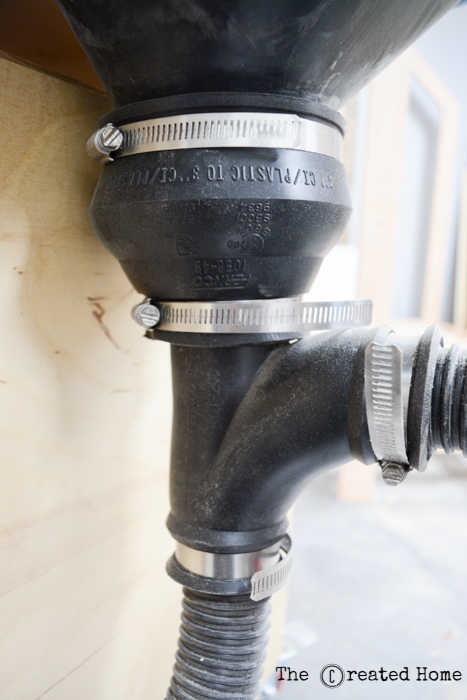
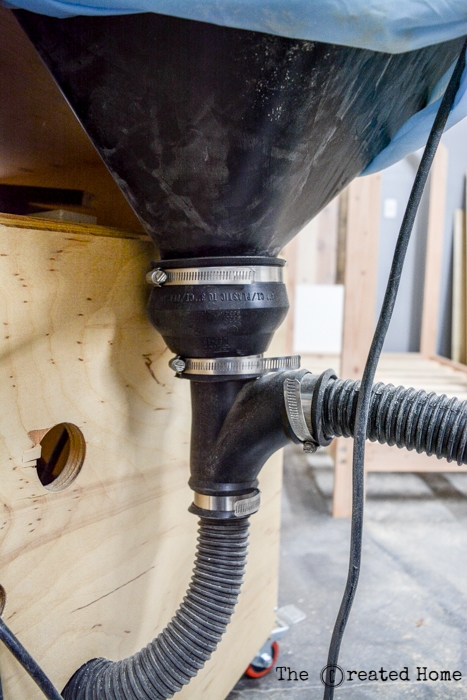
I cut the hose so that there wasn’t a lot of extra running from the saw’s dust port down to the Y port. The remaining section of hose connects at the bottom and runs to the vacuum in the bottom of the miter saw. You can see that there are extra holes because I needed to relocated it from its prior configuration so it would run to the vacuum without kinking.
Inside the miter stand is both the vacuum and the iVac switch. The saw plugs into the “Tool Power” outlet, and the vacuum into the “Vacuum Power” outlet. The main iVac cord runs through another hole in the miter stand and is your main power source to run the saw and vacuum. The remaining cord from the iVac (the shorter one) plugs into the bottom outlet.

That’s it! You can add a dust bonnet for extra sawdust control. The Handyman’s Daughter details how she used a baby tent to create an inexpensive version of this, or you can purchase one from Amazon, though I’ll tell you they are pricey. If you use the baby tent you’ll need to cut it apart and just use the top portion for this arrangement, as the mobile stand is compact.
This setup has been a game changer for me. I am just starting to assemble a larger dust collection system for the shop, but the miter saw will remain connected to this simple, mobile solution. As always, please let me know if you have any questions, and happy building!
Tom Touzel
Saturday 13th of March 2021
very nicely done. you're hard on yourself. i'd say it is an elegant and intuitive design fix for a common problem. well done. thank you.
Sarah
Wednesday 31st of March 2021
Thanks, Tom! It is definitely one solution, but I am always looking for ways to improve it. Thanks for your kind words!
Sarah
Wednesday 31st of March 2021
Thanks, Tom! It is definitely one solution, but I am always looking for ways to improve it. Thanks for your kind words!
Lee stokes
Sunday 3rd of May 2020
Given local weather and climate conditions, much of my miter saw use must be indoors. A dust hood isn't a luxury for someone with severe upper respiratory allergies and mild asthma.
I don't even have room for a mobile cabinet saw station. I need to break it down into easily stackable or hangable pieces. So an inexpensive, foldable tent is perfect for a saw station.
Sarah
Tuesday 16th of June 2020
I hope this was helpful! You are right, breathing dust is terrible for the lungs.
Carina
Saturday 18th of January 2020
Thanks for such a lovely solution to the dust problem! With this setup are you able to use the beveling function on the miter saw?
Sarah
Tuesday 16th of June 2020
Yes!
Rogue River Ron
Saturday 23rd of March 2019
I have been making sawdust for over 60 years, sometimes by the garbage can, and have fought containing it forever. What a great solution you and the Handyman's Daughter have come up with. Very creative. Will also adapt some of the stands features to mine. Many ideas from one place. Thanks!
Terry
Thursday 17th of January 2019
Of all the plans for miter saw dust collection that I researched, I think yours and Vineta's are the best. Did you use a Pluto Baby Tent like Vineta did or did you use one of those small spray booth tents?
Sarah
Wednesday 30th of January 2019
I used the same tent. :)