
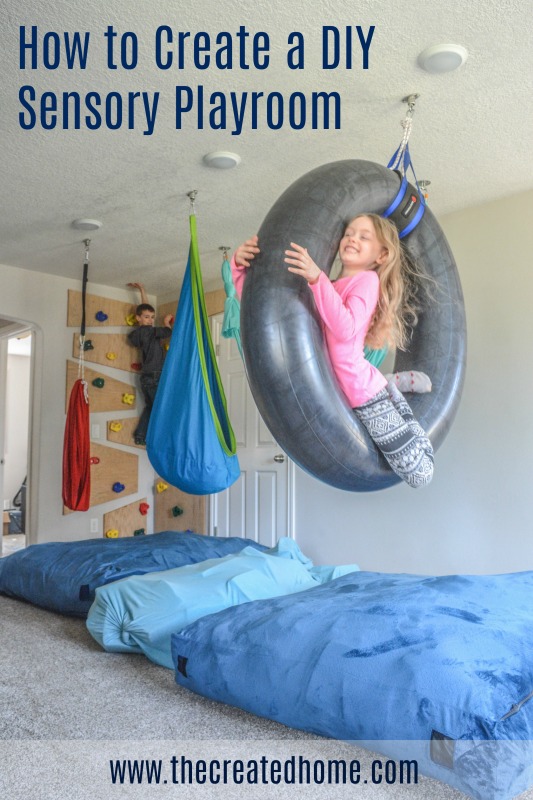
Right off the top let me point out that this particular post was not supposed to come out yet. I intended it for after I completed an art area that will go next to the cabin. However, with the recent confinement of many families to their homes due to the virus, I felt the timing might be right to share how I created a playroom specifically dedicated to meeting the multiple sensory needs of young children.
Whether your child has specific challenges, or is just plain needs the ability to burn off some energy as kids do, this sensory playroom is perfect for energetic young ones who need to get their energy out, and at the same time have somewhere that can help them calm their bodies.
Let’s make this clear – because I know it will come up. A dedicated playroom may be the greatest things since sliced bread, indoor plumbing, and food delivery services, but it is not a replacement for the great outdoors. I am a huge advocate of playing outside, of exploring, getting dirty, and otherwise encouraging kids to discover their world. What I am not a big fan of is screen time. So I created this space as an alternate place for my kids to expel energy, use their bodies, and even self-soothe.
It took a good amount of trial and error to set up this area, and my hope is to save you a lot of that work so you can create a space that works with what you have. I will list each of the products you see here and talk just a bit about how we set them up.
As an Amazon affiliate I earn from qualifying purchases. This disclosure pertains to all the links in this post. You can learn more about affiliate links here.
Materials
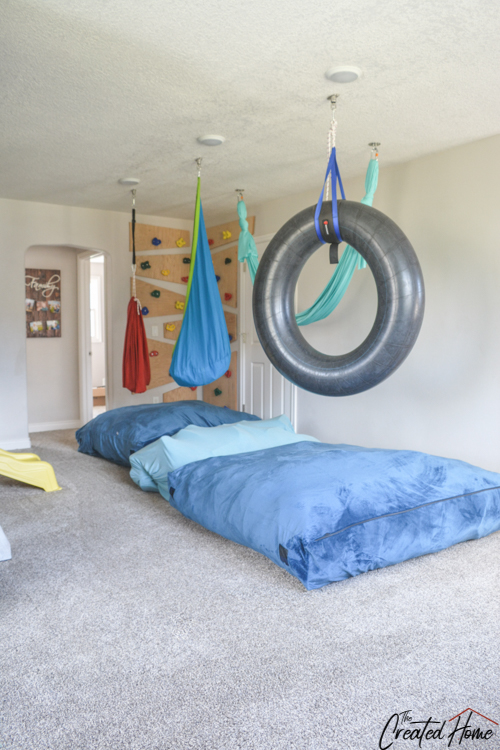
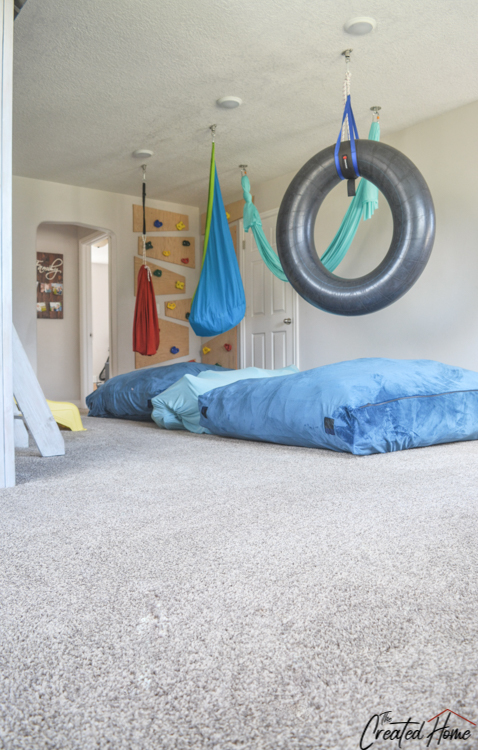
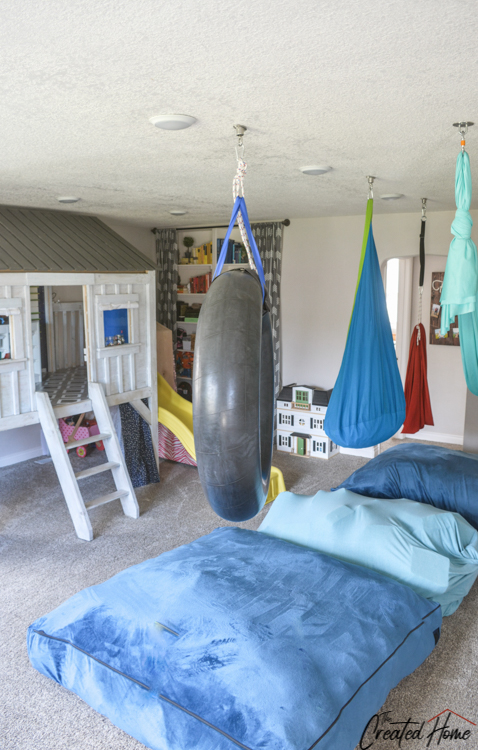
Crash pads
homemade crash pad (will discuss below)
pod swing
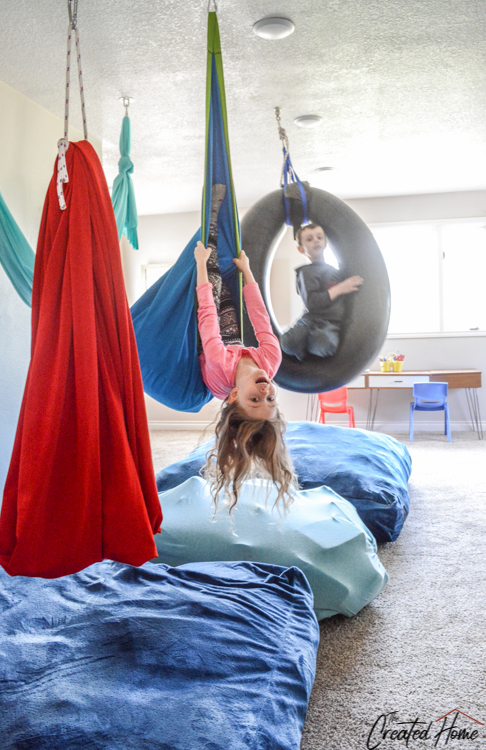
sling/swaddle style swing
hammock
tube swing
ball bearing swing hangers
ceiling hooks (for hammock)
Other playroom materials:
carpet tiles
downlight ceiling lights
Why swings?
I’m going to quote this because it says it well: “Children develop their vestibular senses by swinging, spinning, twirling, and rolling around on the ground. Children gravitate toward these movements naturally. Vestibular movement is in fact considered critical to brain development.” (source)
Swings = brain development.
As such, different swings offer different types of vestibular development based on how they allow the child to move, the rhythmic or arrhythmic nature of the swinging motion, and the intensity of movement.
Swing Selection:
There are a lot of different swings to select from. I chose these based on what each offered.
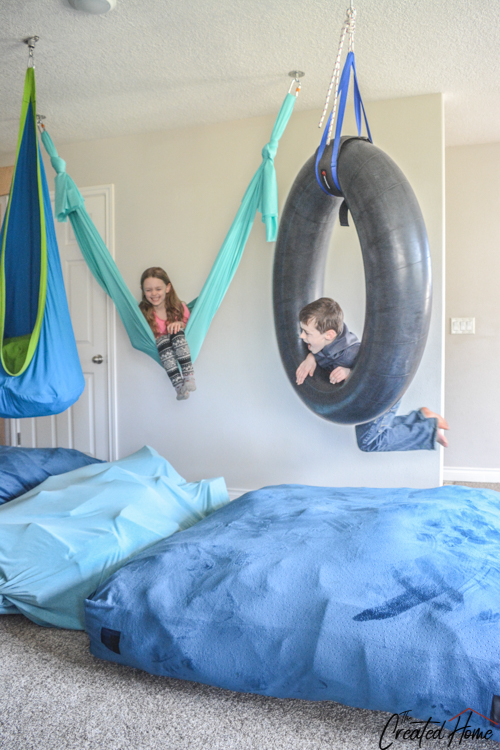
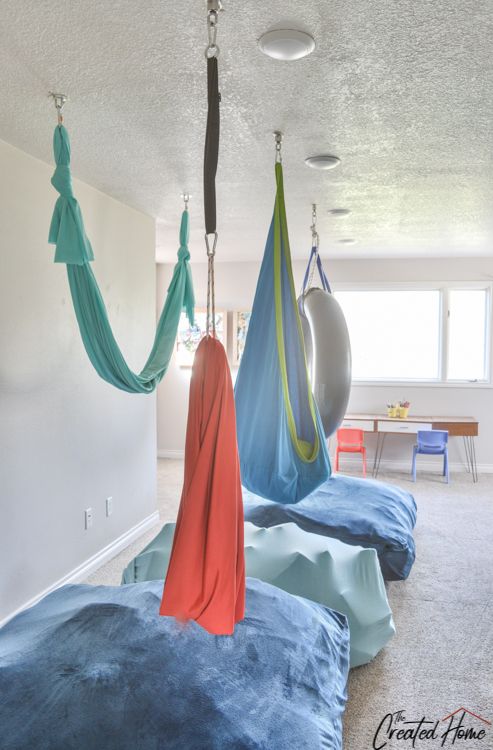
Swaddle Swing
The red swaddle style swing is made of a stretchy lycra and polyester material that means a kiddo can swing in it or crawl entirely inside. My kids love to play “chrysalis” in it and emerge as butterflies. This swing is good for playing, but also calming as it is basically a giant swaddle. Because it does not have a huge range it also works in relatively close proximity to another swing.
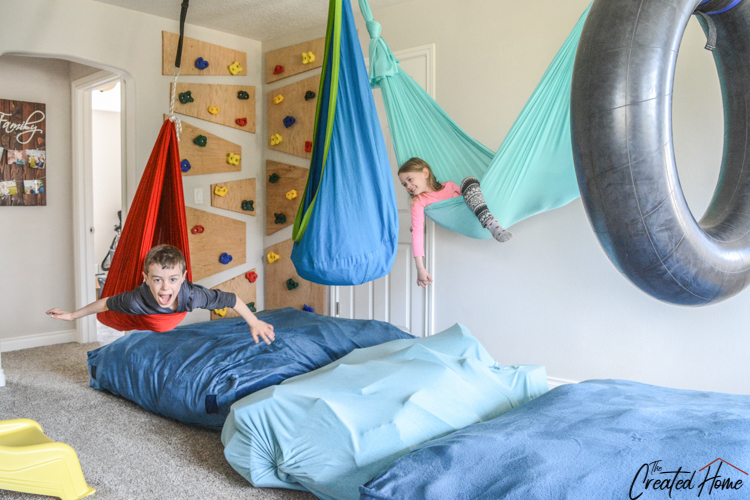
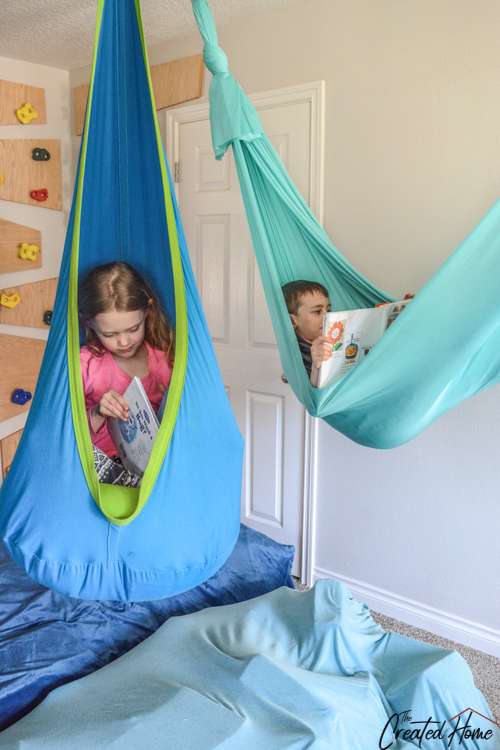
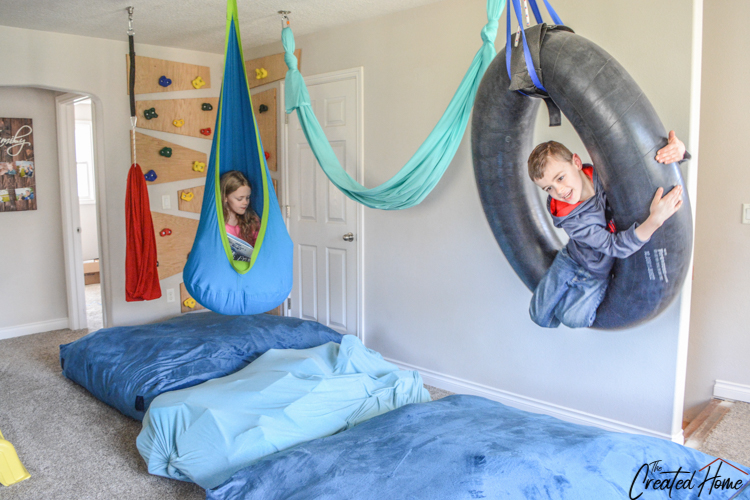
Pod Swing
The blue and green pod style swing can also be used as a place to crawl into and read a book or relax. Like the swaddle type swing this one can be sensory limiting as the child can close up inside of it. Or they can climb on it and swing. It’s also the friendliest option for the budget, so if you can only spring for one this is the one I would recommend.
The hammock
The aerial yoga hammock does swing a bit, but this one is the ultimate calming machine. Think of it like a weighted blanket in that it offers a variation of deep pressure stimulation. My goal was actually to get something more stretchy, but I like how this has worked out. It is the go to place for my kids when they are seeking a cool down spot.
Here is a photo I grabbed when my son wasn’t paying attention. I’m not going to lie, the rest of the photos are staged as all get out, but this one was just a moment when he was relaxing in the hammock.

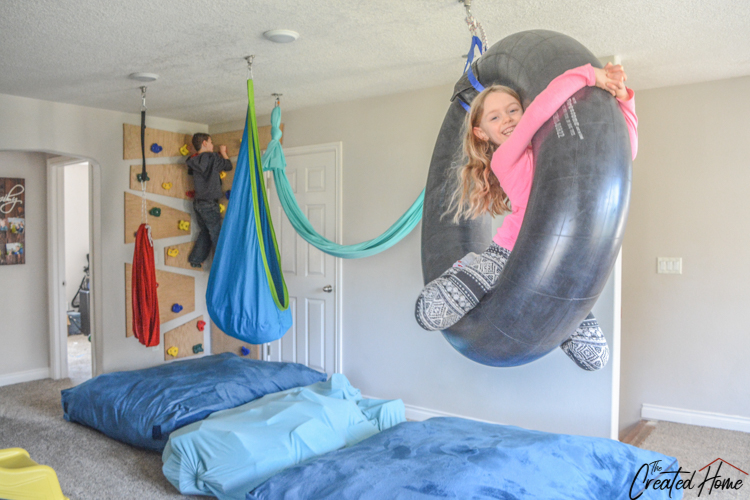
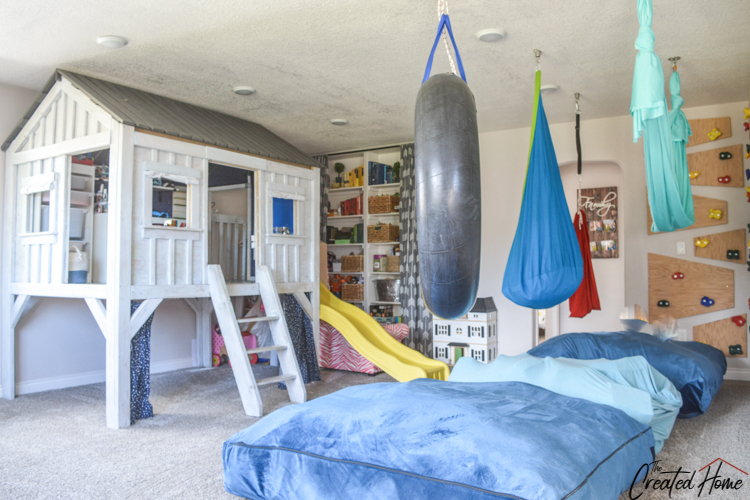
Tube Swing
Finally, the tube swing. This is definitely a favorite in our house. This swing is different because unlike the hammock or even the pod or swaddle style swings, the movement it allows is much more varied and intense. The stimulation is great for development, but let’s be honest, as a parent the goal here is simply to let them have a ton of fun and to wear themselves out just a bit in the process.
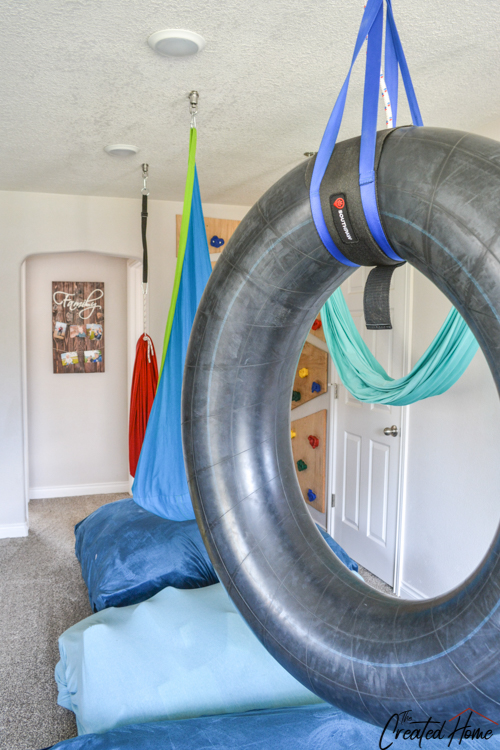
You can pick up a tube on Amazon, which is what we did at first. But ultimately we liked the larger size of this tube, as well as the sling with the double supports. So I got this one at Southpaw. It’s a bit more pricey, but it gets some pretty hard usage so I eventually determined that it was worth it.
Hanging the swings
If you are like me, you might be tempted to overthink this one. Let me simplify your life a little: Get these ball bearing swing hangers from Amazon for all of the swings except the hammock. We simply screwed them into the ceiling joists and hooked them to the swings with a carabiner. I do recommend locking style carabiners for added safety.
The hammock is not hung with the same hangers, as obviously it does not need to rotate. For that we used these ceiling hooks.
Crash Pads
The two large dark blue crash pads are these ones from Amazon. Full disclosure: The price for these fluctuates wildly. At the time of writing they are actually not available at all except through third party sellers, and I don’t know how long that will be the case. There are other less pricey versions, but having two of these I can attest to their quality.
Extra full disclosure: We actually bought the two we have from a couple that bought them to use as couches in their “alternative lifestyle living room.” I didn’t make that up. According to her, they had them for less than two weeks and decided they didn’t like them as couches. So we were able to buy them for a song. Funny story, though. They reeked off marijuana when we got them. We stored them in our guest bedroom until I could get to removing the covers and washing them, but I let a bit too much time elapse, and the room still smells faintly of pot to this day.
So, what I’m saying is. If you can spring for these, they are terrific. But you see the pad in the middle? That’s made out of a large sheet I bought for $3 at a thrift store and cut up foam from a $30 memory pad I bought off of craigslist. Honestly, I like the blue pads more, but the homemade one is no slouch and works just fine.
The Climbing Wall
I don’t call this a sensory playroom just because of the swings. The idea is that this room provides my kids with the opportunity to move and work their bodies in lots of different ways. Here’s a great example of that.
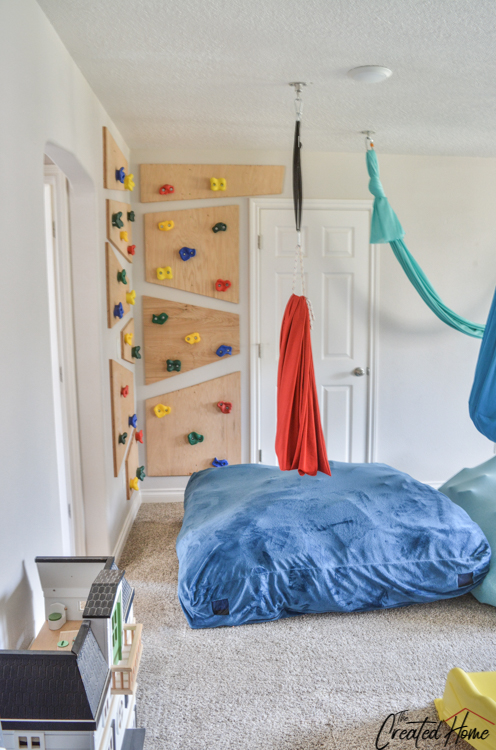
The climbing wall has been in place for a few years now. You can read more about that here. I get a TON of questions about it, so let’s recap quickly:
-No, no one has ever been hurt on it or fallen from it.
-It is secured to the studs and holds plenty of weight. How much, I can’t say precisely. But it will hold adults of unmentionable size.
-Yes, they do “cheat” and use the plywood sometimes. Or rather they used to. They are kind of getting too big now.
-No, the door is not an issue. It’s a closet.
-No emergency room visits have occurred as a result of the wall, and despite several threats, CPS has never had to intervene for my salacious parenting choices in allowing my kids to climbing our eight foot high walls.
-Yes, the holds are secured to the plywood only. No, we have never had a problem with them. Here’s a link to what we used.
-Finally (and this is my personal favorite): No one has ever stuck their toe into the outlet and electrocuted themselves. This probably has something to do with the fact that toes don’t fit in outlets…
Other safety/convenience measures for the ultimate sensory playroom
I hate to bury these so far down, because they are kind of huge for me. But if you are going to have a functional, amazing playroom there are two other things worth considering.
Flooring
The carpet that was up in this playroom wore out bad. I didn’t replace it for a long time because we built an ever-loving cabin on top of it. Ugh, problem.
Wood, laminate, vinyl – all no goes. But then I heard from the lovely folks at EZCarpet and the heavens opened and angelic choirs sang.
Carpet tiles.
So I teamed up with EZCarpet to install their tiles (we used Fossil Gray) in this room, trusting that somehow, some way I would get them under those cabin legs. And because this isn’t sponsored you can take my word for it that it all went according to plan and better.
Okay, whatever you say. But I don’t have a cabin to work around. I mean, you can, but let’s not get stuck on that. Here’s what makes carpet tile a great choice for a playroom. It’s durable, it’s inexpensive, but most of all – it’s easy. If something gets on a tile you can simply pull it up and replace it. We had the chance to test it when our puppy had a wee little accident in the playroom. Instead of trying to scrub the smell out (which never really works with dogs anyway), we pulled up the tile and popped down another. Très simple.
If you have kids, you need this.
Oh, and I nearly forgot – It only took a day to install. By myself. Winning.
Lighting
Last, but not least, is lighting. We recently replaced the old recessed lights in the playroom with LED ceiling lights from Kichler Lighting.
They are the same lights that we installed in our kitchen and living room. The new lights are safer, as they don’t have an exposed bulb that can be broken in a rambunctious playroom. They are energy efficient, which is a huge draw for us. This part of our house does not heat and cool as well, and our hope is that the lights provide some energy savings. Finally, they eliminate the need to constantly replace the bulbs that were always burning out.
There you have it – our sensory playroom. Part 1. I’ll revisit this space after the art area is in place. If you have any questions, please do not hesitate to reach out. A big thank you to EZCarpet and Kichler, who helped make this space possible. And to my husband, who embraces ideas such as building a cabin and a rock wall inside our home, and who doesn’t bat an eye at the idea of hanging swings from the ceiling and picking up marijuana soaked crash pads to use in our kids’ playroom.
Gina
Wednesday 4th of November 2020
Love this room! Thank you for all the details. May I ask how big is the room?
Sarah
Thursday 1st of April 2021
Thanks! I believe it is roughly 20 x 16ish, off the top of my head.