Kids climb walls. So why not give them one they are allowed to climb? A DIY climbing wall is a simple project that will have your kids climbing the walls with joy. Sorry, that was just bad.
Now, before someone brings this up I’ll tell you that we are big fans of the outdoors here. We are blessed to live in a knock-your-socks-off gorgeous place here in the Pacific Northwest. But sometimes, just sometimes, we go indoors, too. So while it remains a definite possibility that having mom and a dad who like to build can lend itself to spoiled kids, we like to think we are simply creating good times as a family. And who doesn’t love a climbing wall?!
But first, let’s talk about safety, eh?
This is, bar none, the most popular project on this blog. The vast majority of comments are pretty darn cool and encouraging. There are, however, a contingent of people who seem to think it is my aim to send my children to the ER. Obviously, as with any DIY project, kid toy, or, well, heck, anything, safety should be considered. As of this writing the wall has been up for nearly a year. Neither my kids nor any others have taken a tumble from the wall. And I assure you, there is nothing docile and mild about my children. If you are too lazy to read to the bottom I’ll tell you now that there are mats at the bottom and those mats are rigged up to lock over the wall as a safety measure when there is no adult supervision.
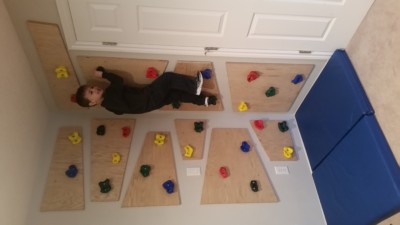
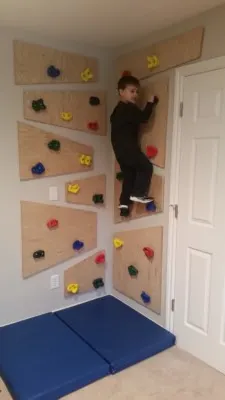
I took this cell phone shot to give some perspective to the height of the wall. I don’t know why it’s sideways. He looks like Spiderman now. Guys, it’s not exactly 20 feet up. In fact, my son would be even higher than he is in this photo if he were to climb a bunk bed ladder. No, there are no helmets and no harnesses. No, there are no covers over the electrical outlet. Our electrical is up to code, and and you cannot actually push a finger, a toe, or any other body part into the outlets. The door to the right is a locked closet. Finally, the wall is into studs. An adult can climb it and it will not budge. But you will have to take my word on that one because I’m not going to provide photographic evidence for you. Haha.
Finally, if you feel that having a climbing wall is dangerous, don’t build one! But if you, like my husband and I, grew up climbing trees and sliding down steep hills on oversized inner tubes at breakneck speeds, then this may just be for you.
How to build a diy climbing wall
Materials
*This post contains affiliate links for your convenience. See my full policy here.
3/4 plywood (I used a full 4×8 sheet, plus another 2×4 sheet)
*lag screws (if the holds don’t come with the size you want)
floor mats (optional, but I’ll show you something cool you can do with them.)
Tools
level or straight edge of some sort
pencil or pen
table saw, circular saw, or jigsaw (any of them will work)
drill (love, love, love this set from Dewalt – we use them constantly)
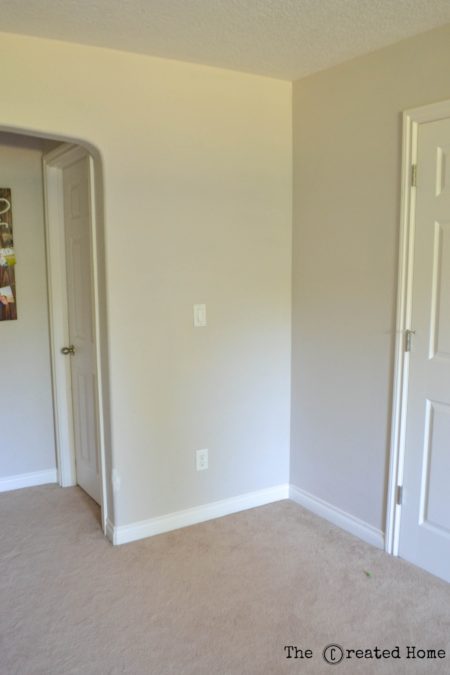
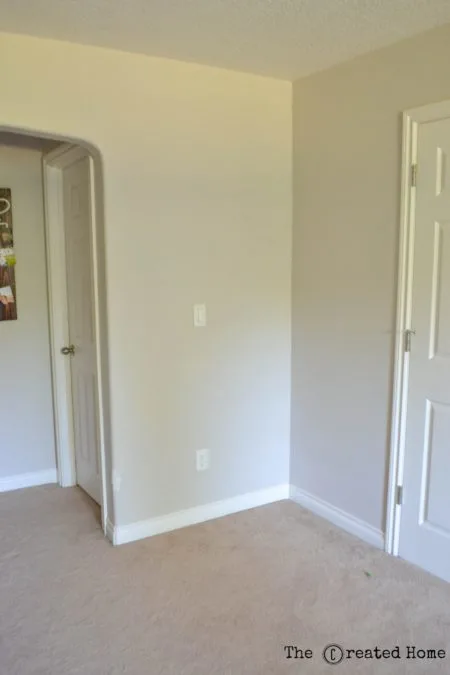
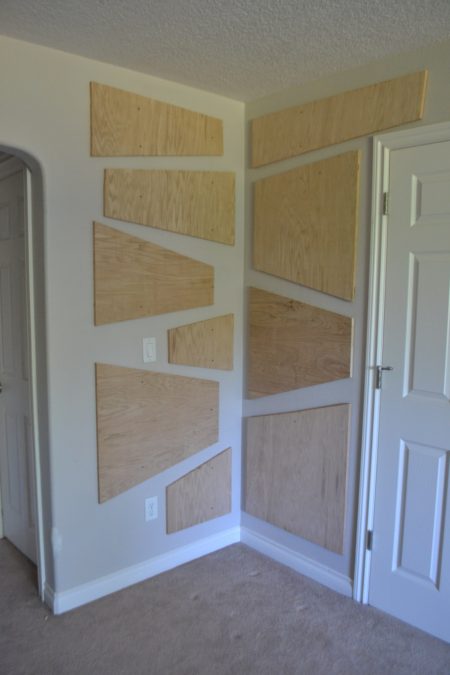
Plan and sketch the climbing wall
I use Google SketchUp to plan most of my designs, and it is a great program if you care to give it a go. However, a pen and paper will also do. The idea for the design of the wall actually came from some images I found on Google, and would attribute if I could find a source. Kudos to whoever first came up with the idea of doing the wall in sections, because it is brilliant. Not only is it visually interesting, it is the perfect solution to a corner such as this, and for working around outlets.
What I love about SketchUp is that it makes it simple to figure out the dimensions of the pieces. I sound like an ad for the program, but believe me, there is nothing in it for me on this one. It’s just a cool free thing, and I like to pass on cool free things.
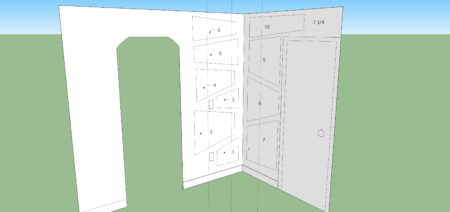
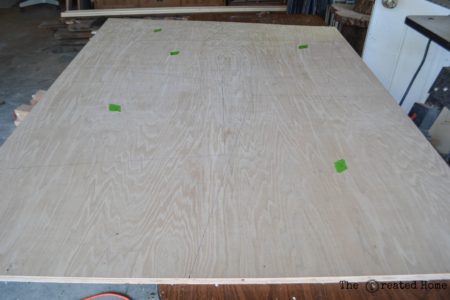
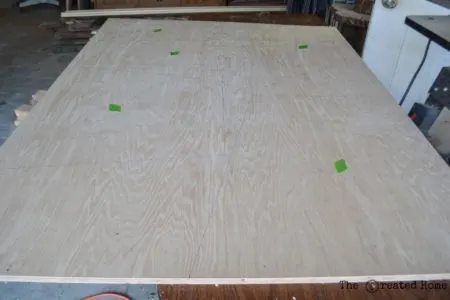
We chose to make the wall out of higher grade hardwood plywood, but you could save a little going with something a bit rougher. Using the dimensions I sketched I drew out each piece on the hardwood like a big puzzle. The nice thing is that you are not building a ship here, so it doesn’t have to be exactly perfect. I used a four foot level to get my lines straight. Label each piece as you go along so you don’t have to think too hard about it later when putting it up on the wall.
Cut and attach the pieces of the climbing wall
We used a table saw to cut out the pieces, but since they are not square that meant cutting without a guide. My husband happens to be exceptional at freehand cutting, so I was more than happy to let him do this one. Also, it was like 90 degrees out, so it was not the most pleasant of jobs.
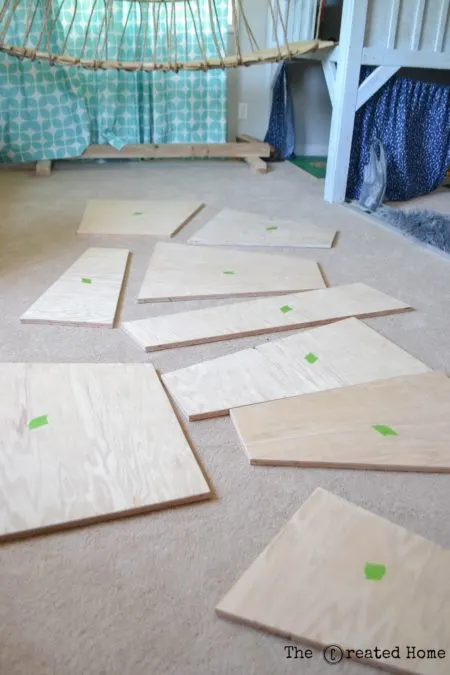
To attach the pieces of the climbing wall start by marking the studs that they will attach to. I drew light lines with a pencil the full length of the wall to help ensure that I didn’t miss the stud. Then simply secure each piece to the wall with 2 or 3 screws. I did this while my husband was at work and I gotta tell you, you can do it alone, but it would be easier with another person. Always pre-drill to ensure that the wood doesn’t split. My preference is the use the drill for making a pilot hole, and the impact driver for setting the screw. My toddlers are trained to know the difference and to hand me whichever one I need plus a screw. Soon I hope to upgrade them to doing the work themselves, and then I will hire them out. Just kidding. Sort of.
Attaching the handholds
The plywood is 3/4″, which in reality is slightly under that (.70, whatever that is). So we purchased and used 1 1/4″ lag screws instead of the 1 1/2″ that came with the holds. That way they would not go into the wall itself and leave puncture marks everywhere. You could also use furring strips, but that’s more work.
I actually bought the hand holds last year at Christmastime for my husband because he really enjoys climbing and wanted to share that with our children. So he got to take over the next part and attach the holds. And because I basically did nothing at this point I’m going to hand it over to my him to share a few pointers:
Spacing depends upon the size of the kids climbing. Toddlers need more holds than older kids. They will have more fun if they can easily climb the wall. Use painters tape to lay out your pattern. Start the first row about 8 inches off of where the floor mat will be. Put two holds 12 to 14 inches apart (measured dead center per hold). Then go up the wall adding tape every 8 to 10 inches up. Adjust a little and add some in the middle of the route every so often to give them more flexibility in the route they climb.
Once you are done with the tape grab your kids and test the layout with them. Hold them up as if they are standing on the first holds. Can they reach the handholds? If they can the spacing is correct. If not, adjust the tape.
Once you are satisfied with where the holds are placed grab the drill and start installing.
Bonus: How to child-proof your climbing wall
It took our kiddos roughly 5.3 seconds to get the hang of the wall and start scrambling to the top like monkeys. That can be a concern if we are not right there with them, so we created a way to secure the wall if you want to be sure it is only used with supervision.
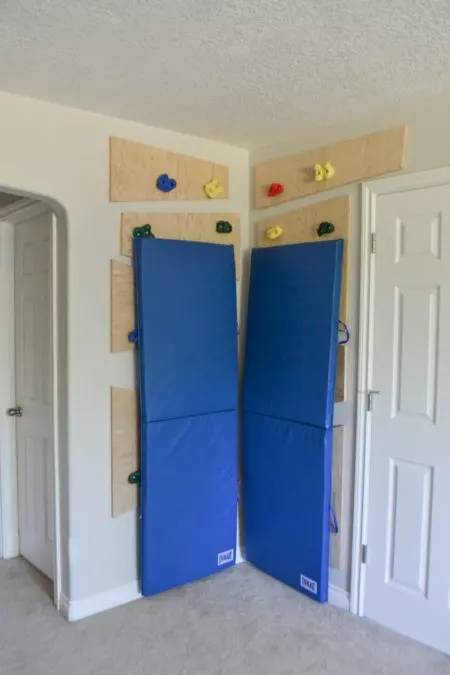
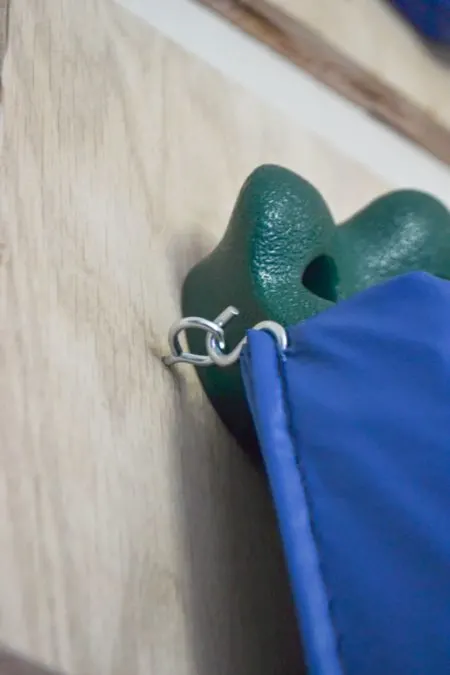
There it is. I simply drilled a hole in the outer layer of plastic on the mats where the seam is, and ran an s hook through it. I put a couple screw eyes into each side of the wall, and then hooked the s hooks on the mats through them.
My three year old gave this a try and was frustrated that he was unable to climb the outside of the mat. In other words – success. It’s really just that simple. Because we try not to do a lot of overthinking around here.
Finally, because you stuck around, here is a preview picture of how the wall sits in relation to the rest of the playroom.
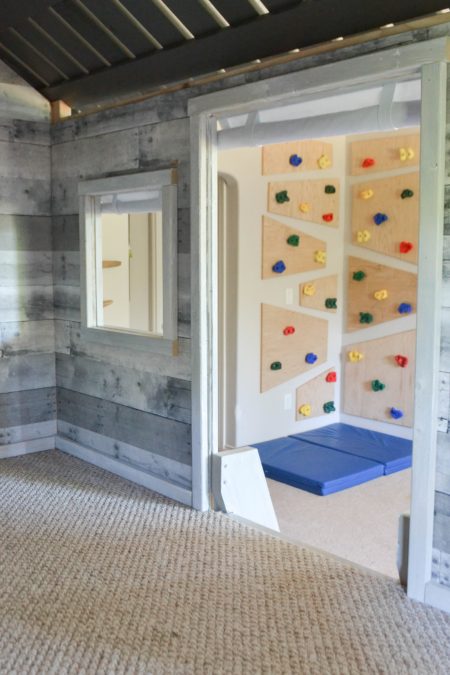
By the way, if you haven’t checked out our cabin playhouse, then you don’t know what you are missing out on. You can find that here. Stay tuned to see how it all came together! And if you decide to build your own climbing wall we would love to see pictures!
Happy building/climbing!
What is the weight limit for something like this?
I couldn’t tell you a specific weight limit, but I can tell you that it is into the studs and is very secure. My husband can climb on it…not that he can get very far, as the ceiling is only 8′ high!
I really want to build one for my kids. Am I right in reading that the holds are actually only attached to the wood plate? Not through it and into the wall?
Correct. They are bolted in, so could not go through the wall. They have held up great for years with no issues, despite lots of adults putting them to the test!
I hope the screw eye holes are smaller than the little fingers climbing around them: too small for a child’s pinky finger to get caught in them.
They are very small. My children were unable to get fingers through them, which is why I elected for this method.
I’ll recommend you to take those screw eyes out of the wall as soon as you can, if a kid uses it as a hold and their feet slip, they can get a very bad injury.
Otherwise it’s a great idea.
That would be the case if they could actually get a hold on them. However, these are so small our children cannot hook a finger through them. Thank you for the concern.
Hi! Just out of curiosity, what was the average dimensions of your boards?
That’s a bit of a tricky question. Here are a couple of dimensions to give you a point of reference: The bottom right side panel measures 26″w x 29″h, and the left side on the opposite wall measures 17″w x 15″h. I hope that helps. Please let me know if you would like any other measurements!
Did you treat your ply wood with anything? I just think it get dirty easily. We like how ply wood look too. Thank you!
Great question! I didn’t treat it with anything, and so far the only thing that has happened is a little crayon from an artistic toddler. It definitely couldn’t hurt to throw some finish on it!
Do you recall what size and kind of screw you used to attach the plywood to the studs? I’m currently making this in my son’s room and am having trouble figuring out which screws to buy. I also used the 3/4″ birch plywood.
Thanks!
I think we used 4″ construction screws. Good luck, and share a photo when you are finished! 🙂
I didn’t realize the safety police awarded so many badges! 😉
Love the wall! We want to build a playhouse with a climbing wall on one side. With your tutorial and Google Sketch Up(how did I never hear of this?!) I really think we can do it! Thank you!
Haha! I’m glad you like it! Share a photo when you are done! 🙂
I love it too!!!! My grandkids would love to have something like this! Thanks so much for sharing!!!!!
Thanks, Melanie!
This is totally awesome. In the children’s museum we go to they have one and all my daycare kids love to climb. I am sending this information to my husband that has taught climbing and is great at building things. Thanks for the post.
Thanks, Kelly! Sounds like it would be perfect for you guys!
Love this!!! We just recently had a baby and one of the things we plan for when he’s a little older is build a rock climbing wall for him in the basement.
Have you seen the video of the little baby climbing? So impressive what kids can do!
The link to the hand holds isn’t working (it’s taking me to a play-doh set), can you update it? I’d like to purchase the same ones you used. My kids are going to love this! I think I’ll add a bell or buzzer at the top!
Apologies. I have to refresh that link periodically. I switched it a few months ago – hopefully you saw it as I know it has been a while since you asked. Best of luck!
Thank you for sharing this! I am so excited. My 2 year old is a climbing master and aha has just discovered rock walls. I have a playroom with a similar corner as yours. It had our infant foam climber but we are way past that. This is now on our to do list. Her birthdays coming up in September so maybe as a gift.
Sounds like she will rock the wall! Thank you!
Hey my Is Maufred
I want more the arti
Ok first of all, I absolutely love this! My toddler has no interest in climbing out of his crib but I’d like him to be ‘into’ climbing or hiking or all things outdoors at some point. We don’t have any climbing trees in our yard but I’d like to have something like this outdoors as part of the slide/cubby house I want to build. Any advice for outdoor use? Will those handholds withstand the elements?
Absolutely! I have seen a good number of builders who use these holds for outdoor use. It sounds like your little guy will love it! Good luck!
So I have been obsessing over this wall since I laid eyes on it, lol. It’s really a great idea and my toddler would love it! I am purchasing the wood this weekend and have already ordered the other materials, but I am really struggling with the measurements. Just looking at it gives me anxiety, lol. I noticed you listed 2 of the measurements in another comment. Would you mind listing the rest? It would be super helpful!
Thanks
Thank you! I took down all of the measurements and am looking at redrawing a sketchup with all of the dimensions listed. That will hopefully be on the post tomorrow in place of the rather useless image that has been there. 🙂 Stay tuned!
Awesome, thanks so much! I look forward to it. 🙂
Hi there! Have you had a chance to list the measurements of the boards? I noticed an update on the project, but I still didn’t see any measurements.
Nice blog. Thanks for sharing how to build safe indoor rock climbing wall for kids. It’s really safe idea to build right measurement climbing wall for kids. thanks for sharing with us. I have to provide it for my kids.
Thank you!
I just going to make a rocking climbing wall for my kids fun, Thanks for sharing this helpful blog to make a climbing wall.
Kids like to climb. All-time they are busy to climb on sofa and bed. To take advantage of this habit to build a climbing wall is the best choice for mom. But safety also important to build a climbing wall. Thanks for sharing the process of climbing.
What a super fantastic idea. Lucky kids at your house.
Thanks for sharing!
– Kelly
Thanks, Kelly!
Hi, Great work! We want to do this too. What was the budget for the project? How does it compare to these modular climbing panels? https://eldowalls.com/diy-climbing-wall-panels
It’s been quite some time, but I think I was able to keep this under $150. The climbing holds are a bit pricey, but you’ll want to get good ones. And I recommend going with a fine finish plywood. I’m not familiar with those planels, but I can tell you that this wall has held up like a champ!
Sooooooo freakin’ cool!!!!
Thank you!
Great project. If we wanted to do this outside what kind of wood would you you suggest that can weather the rain and sun?
Teak is the best for outdoors, but that would be pricey. So I would probably just attach the holds to pressure treated boards.
Thanks for sharing this. I will be adding a climbing wall to access a lofted space in my house.
Hi, Thanks for your post! Do you know what material your wall is made of? Ours is drywall and I wonder if it would be strong enough to support all the plywood panels with the holds.. (And the weight of our toddler). Thanks!
Our walls are drywall. The plywood pieces are attached to the studs. They are strong enough to hold an adult with no problem!
I have some question for you about this. First of all Do you recall what size and kind of screw you used to attach the plywood to the studs? And what is the weight limit for something like this? Your answer is greatly appreciate to me. Thanks for your article.
I think they were just regular 3 1/2″ construction screws. If you attach a few screws it will hold a lot. Adults can climb on ours with no problem!
I love your playroom & would love to do this for my 3 year old,do you think it’s going to last for him, or do you think he’d be uninterested in a year or so?
So far my kids still love it, and it has been a couple of years. Of course they also take for granted that it is there, but they do use it frequently!
Thank you for the tutorial. I plan to put one of these up. I have one question, though. It looks like the bolts for the holds have nuts that go on the back of them. I assume there is no way to install these nuts if you are drilling into the plywood? Or did I miss something in the description.
Thanks
They are hex screws, and we just screwed them right into the plywood.
We recently saw this article when looking for unique ways to decorate a wall. This is by far the most amazing idea we have seen yet. I would have never of thought to use a mat like this but it makes perfect sense and gives it a real feel. Thanks a ton.
Thank you! My kids sure love it!
Thanks so much for the inspiration! I took it upon myself to redo the kids’ playroom and this seemed like the perfect addition. From start to finish, it was done in two days and I’m so happy with how it turned out. I used 20 holds I purchased from Amazon and hardwood plywood. I lacquered the plywood to bring out the natural beauty of the wood and for easier cleaning. I also put a magnetic chalk wall in the playroom and the climbing wall is half on that wall and half on the wall adjacent to it and, in my opinion, it looks pretty awesome. I’d love to share pics with you, but I’m not sure the best way to do that (if you’re even interested). Thanks again!!
That sounds incredible! I would love to see it! You can email them to sarah@thecreatedhome.com if you would like. I would love to share it!
Love this so much! So, for clarification, the plywood is screwed into studs on the wall. The rock holds are only screwed into the plywood, not into the wall at all? The plywood is only 3/4 inch thick, so the holds are only screwed in that far (not reaching the actual wall) and it holds the weight of children fine?
Yep! It holds up great and we have never had any problems with it, despite a fair number of adults testing it out!
I am really enjoying your blog. You are so impressive and incredibly creative – I don’t know how you do it but keep it up! xx
One day at a time, and mostly very slowly! 😀 Thanks!
This is seriously one of the coolest ideas for kids that I’ve seen!
Thank you so much!
SO excited about this! Plans are already drawn up, lumber is being ordered, and we are ready to go. I have one question – furring strips are definitely extra work. However, I’m concerned about the lag screws holding the climbing holds well enough. You said it accommodates your husband, has that still held up after these years? Have the holds shifted/slipped at all?
This is a bit late as replies go – apologies – but yes, the lag bolts have held up great. No slips, no shifts, no concussions. 🙂
I just found this article and definitely will be trying it out for my 3 little kiddos. I hope this helps wear them out more too! haha. Also, I love how you trained your kids to know the difference between a drill and an impact driver. Good luck hiring them out!! 🙂
It starts young! (Climbing AND power tools! :D)
Thank you!
We have been looking for ideas on how to make our middle child’s bedroom fun. This by far is the best idea we have seen yet. So easy to create. We love love it. Will be starting on it this weekend. Thanks so much!
Awesome! I hope it worked out for you!
I just started looking into building a climbing wall for my daughter. I had already been thinking about using plywood-to-wall and into the studs. Agree that should be extremely secure – literally hundreds of kilos of weight capacity. I love the way your wall looks with using the cut outs of plywood. I didn’t read all the comments, so maybe someone else said this already — it looks amazing — but can’t the little climbers “cheat” and use the plywood edges for finger / toe holds? Btw, I hope you have survived the safety police and have not gone to jail or been condemned to the mommy shame sections of stores/restaurants/yoga classes.
Hi Dan,
Thanks! In answer to your question – yup, they cheat. I figure it’s all fair game and it teaches them some next level climbing skills. And yeah, the shamers are more hilarious than anything. 🙂
Your writing seems to be totally an inspiring one. Thank You!!
Right here is the perfect webpage for everyone who really
wants to find out about this topic. You understand so
much its almost tough to argue with you (not that I actually
will need to…HaHa). You certainly put a new spin on a topic that’s been written about
for a long time. Wonderful stuff, just wonderful!
We have had a few clients want to incorporate the climbing walls for their kiddos. This is by far the best idea I have seen yet, thanks for the great share!
Best,
Josh
Thank you! It’s a great way to incorporate a wall in just about any space. Glad you like it!
Holy cow I’m so glad I found this! With this insane coronavirus right now I’m struggling with keeping my three little ones occupied while I work. I am so going to get my husband to build this asap!! haha!
Thank you! There’s never a better time to build than right now, right?! Good luck!
Man, I would have loved to have something like this as a kid! Such a great and (mostly) low impact form of exercise that pushes the kids out of their comfort zone. Gotta send this to my sister and brother in law now lol
And there’s no better time to do it, too! Thank for the kind words!
We did it this weekend! Thank you for the instructions. We aren’t handy and we made it through!
Yay! I hope it has come in handy during the quarantine. 🙂 Share a photo if you get the chance!
Love the idea! I don’t have your husband’s angle cutting skills so will probably have to do with square pieces.
I just wanted to confirm you didn’t use the bolts or weld nuts that came with the holds. Instead you just used lag screws directly on the plywood?
My husband doesn’t have angle cutting skill, either. 😉 For this I simply drew lines and traced them with a jigsaw. And yes, that is correct. I used the lag screws linked in the materials list. Best of luck!
My husband doesn’t have angle cutting skills, either. 😉 For this I simply drew lines and traced them with a jigsaw. And yes, that is correct. I used the lag screws linked in the materials list. Best of luck!