
Where are my Fixer Upper fans? If you love the show it is probably because you love Joanna’s style, but likely also because you love Chip and Joanna together. We recently re-watched the episode where she shows Chip the Silos and he’s like “Oh, geesh, really?!” (Paraphrased a lot.) But then like 5 minutes later he’s figured out how to buy it for her and it’s so cute because he’s surprising her and you wish you were them and your voice has strangely gone up an octave and your asking your husband to buy you a silo, too…
Anyway, the point being: My husband is on par with that kind of awesomeness. I mean, he has never bought me a silo, but I just asked him he would and he unhesitatingly said yes. Never mind our bank account resoundingly responded “no!” It’s the thought that counts, right?
So I recently cooked up this wonderful, brilliant idea. I wanted to build a sort of modified pergola on our back patio. Only without actually having it rest on the paver stones (not a great idea, structurally), and without digging out for footings (a great idea, structurally.) The vision of what it could be was so clear in my mind. But, let’s be honest, it’s not like I could claim a need for a pergola. We have discussed building one, but really, this wasn’t necessarily the right time.
But, the vision! I was starting to obsess.
See, it’s things like this that lead people to wonder when my endless list of projects will ever end. Never.
Husband’s response was typical of our conversations on such topics. The first five minutes are spent raising eyebrows and uh-huhhing with just a hint of exasperation that wife is once again suggesting new projects while working on two dozen others. The hour after that is spent with him quizzing me about my design, determining technical details, and often adding his own ideas to the mix. That’s right, my husband is awesome.
Guys, we did it. And it is all that and a bag of chips.

*This post contains a few affiliate links for your convenience. You can read my full disclosure policy here.
***I have received a number of questions about the pergola since writing this post, and I have attempted to answer them all here.***
Materials and Tools
This is based off of the measurements for the pergola we built. You will need to make adjustments as needed for your space.
6 – 2x4x8s
6 – 2x4x10s
8 – joist hangers
2 – joist hangers
22 – 5-6″ bolts + nuts (calculate for the depth of the 2×4, siding, plywood, and then enough extra to drive well into the stud)
Stain – I used General Finishes Brown Mahogany Water Based Stain
You can complete this entire pergola with only a couple of tools!
Circular saw
Drill/Impact Driver
Cut list:
-The two boards braced to the house are 9 feet tall.
-The 45 degree arms measure 7 feet long, long point to long point.
-The four arms extending out from the house are 8 feet long
-The four crossbars on top are 113″ long
A necessary word:
As with any DIY project, please use all precautions and utilize safety gear. These are the steps we took to build our pergola, but I cannot assume any responsibility for your build. I also cannot give advice when it comes to weight capacity, how to attach the pergola to your house, etc.
If you want to know about the dining set, you can find that here:
And if you want to know about the chandelier, you can find a tutorial here:
How we built a pergola for under $200
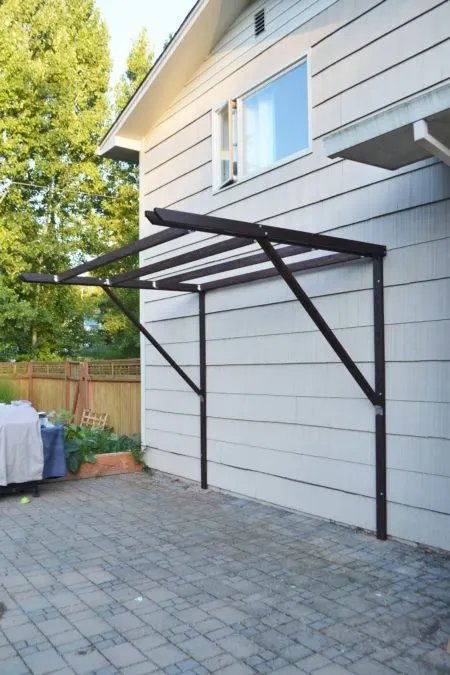
Our back yard has a large paver patio. The portion of the house that it abuts to is tall and mostly bare. The only window is on the second story. Originally the home had a door where that window was, and an old deck. But that was before my husband purchased it, moved it from one city to another, and completely remodeled it. That left us with a wall of opportunity, as it were. A big, blank wall.
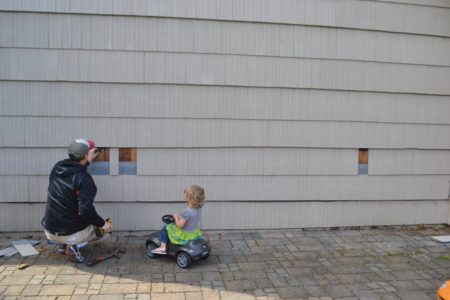
Step 1: Locate the studs
Our house has this shake/shingle siding, which really made the job easier. We also had the faintest marks about 10 or so feet up where the old deck had been screwed into the studs. If you are looking for studs through traditional long siding (hardiplank, etc.) your best bet is to go from the inside out. But obviously this is a pretty individual thing. Our house is Over 50 years old, which means it has 2×4 walls instead of 2×6. That also makes it easier to drill from the inside out to locate our mark. You can see in the photo where we pulled shingles to test where the studs were and to determine the positioning of the pergola supports. We were able to tack these back into place once we determined position.

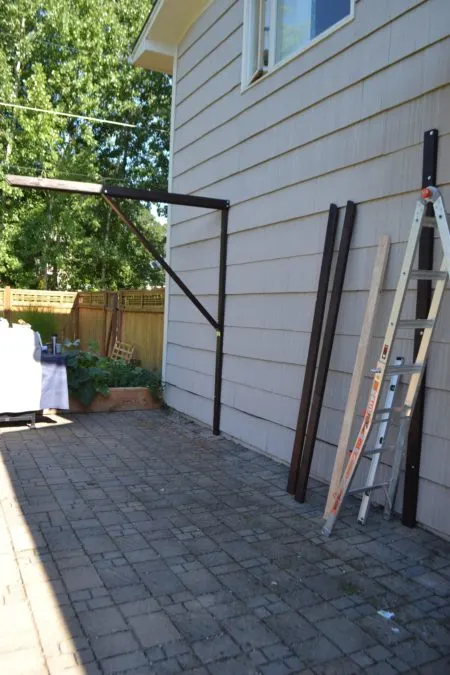
Step 2: Secure the pergola supports
My design calls for the weight of the pergola to be sustained by the house itself rather than the pergola. The weight of a full pergola would be enough to crack paver stones, creating a potentially dangerous situation. Alternately we could dig out the pavers and create footings, which would be more than we wanted to do on this property.

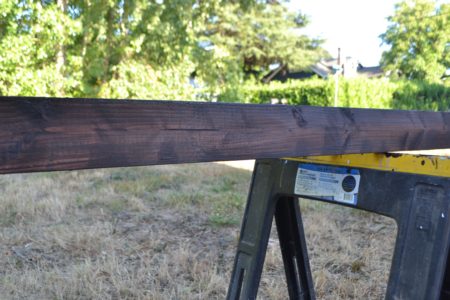
I should add that we stained all of the boards before attaching them. Except the 45s. I don’t know why we didn’t do the 45s first. Something to do with timing.
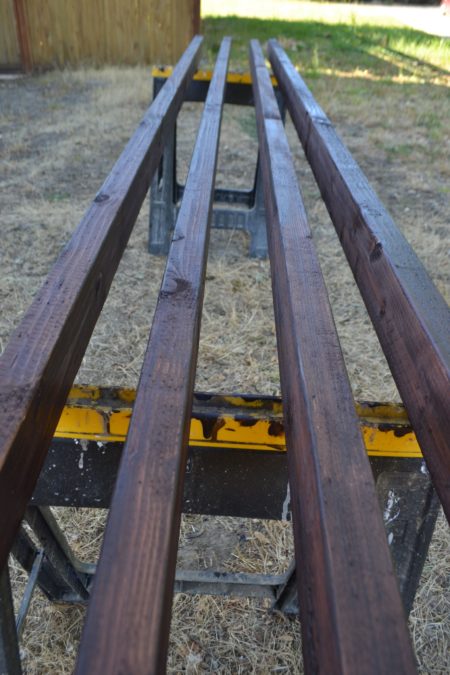
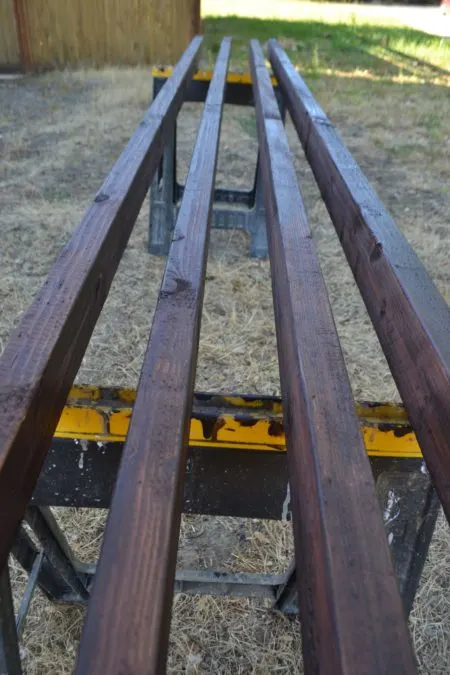
Take a look at how gorgeous this color is. It’s Brown Mahogany water based stain by General Finishes. I love these stains and really cannot say enough about them.

Step 3: Determine the length of the 45 degree angle
Oh my gosh. Math. Guys, I was absolutely terrible at math in school. Since getting into remodeling and woodworking I have grown very comfortable with fractions. In fact lately I have started to pat myself on the back for getting over my fear of mathematics.
*Seriously, if you are not planning to do this yourself, skip the next three paragraphs and jump to step 4.
We had to figure out the hypotenuse of an isosceles triangle to determine the load bearing capacity of the upper supports. Fortunately where I am strong in basic accounting and, of late, fractions, my husband has retained a surprising degree of mathematical knowledge in regards to equations. What you need to do is use the pythagorean theorem, a2 + b2 = c2
Believe me, there is no one in this world more shocked that I am about to type this than I am. Basically, you will need to determine how far out your support needs to be to carry the top load. I will not even attempt to cover span calculations here, but recommend that you do some homework to determine that your structure is properly supported. We determined that our support should safely sit five feet out the 8 foot long “beam,” which in our case was a simple 2×4 rather than a heavier 2×6. I should note that we chose to construct the entire structure from 2x4s rather than the more common wider boards.
We further determined that we wanted the 45 degree board to start five feet down from the top of the support board against the house. That meant that a = 5 feet and b = 5 feet. Squared that is 25 + 25. The square root of 50, then, is 7.07 (thank you, Google). Our board would need to be seven feet long.
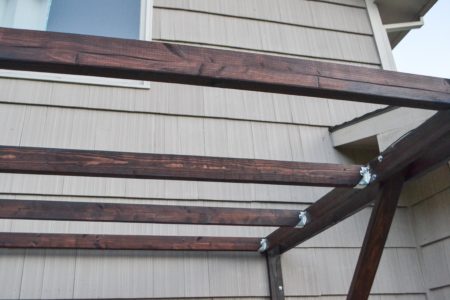
Step 4: Join the top supports and the 45 degree boards
Are you still with me? Let’s be honest, I would have skimmed all that if it were me. Or maybe I would slam my laptop closed and run way screaming “Math! Noooooooo!”
This step is best accomplished with three people. Or two very determined people I guess. We had to hold the 45 in place while also holding the top 2x4s and setting them in place. We set them with screws, then went back after everything was attached and bolted them in.
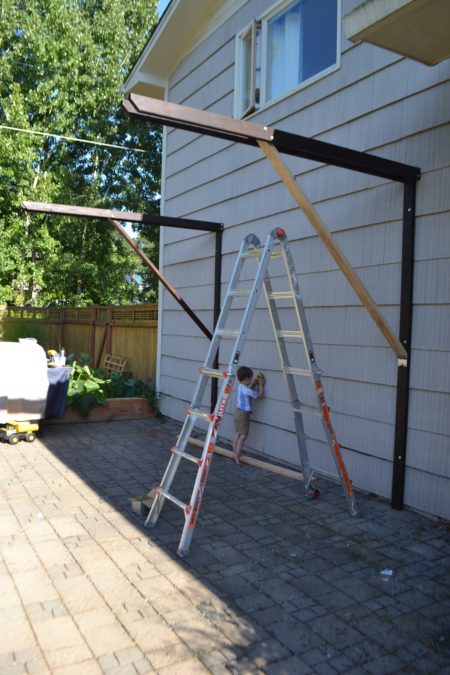

Step 5: Hang the cross supports
We added four 2x4s that span the top of the structure. Again, these are 2x4s so as not to add a lot of weight to the structure of the pergola. We used joist hangers to make the job easier.

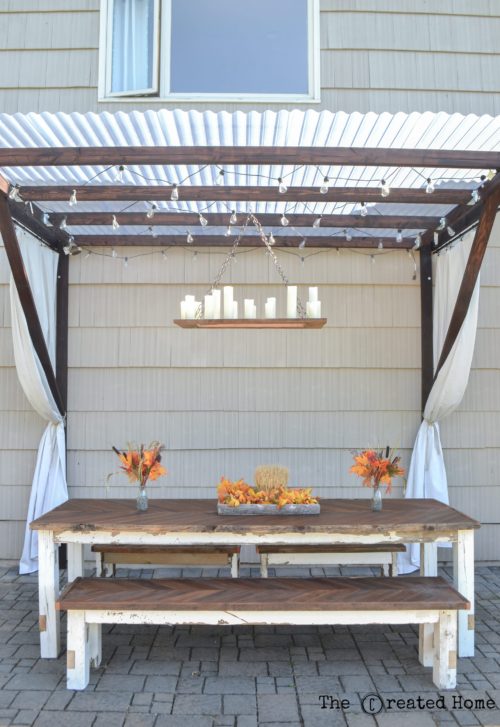
Step 6, 7, and 8: Add cover, curtains, and accessories
There’s not much to it, is there? One day’s worth of work, and that with toddlers. Just look how beautiful that color is.

The cost at this point was only about $100. What doubled it for us was adding the rain covers. I should add that we did not consider snow loads when we built this. Here in the Pacific Northwest we don’t get snow very often. When we do it is called a “snow event,” which should tell you how often that happens. What we do get is rain, and it just wouldn’t make sense to go to the trouble of constructing a pergola without adding a rain cover. We used corrugated PVC roof panels.
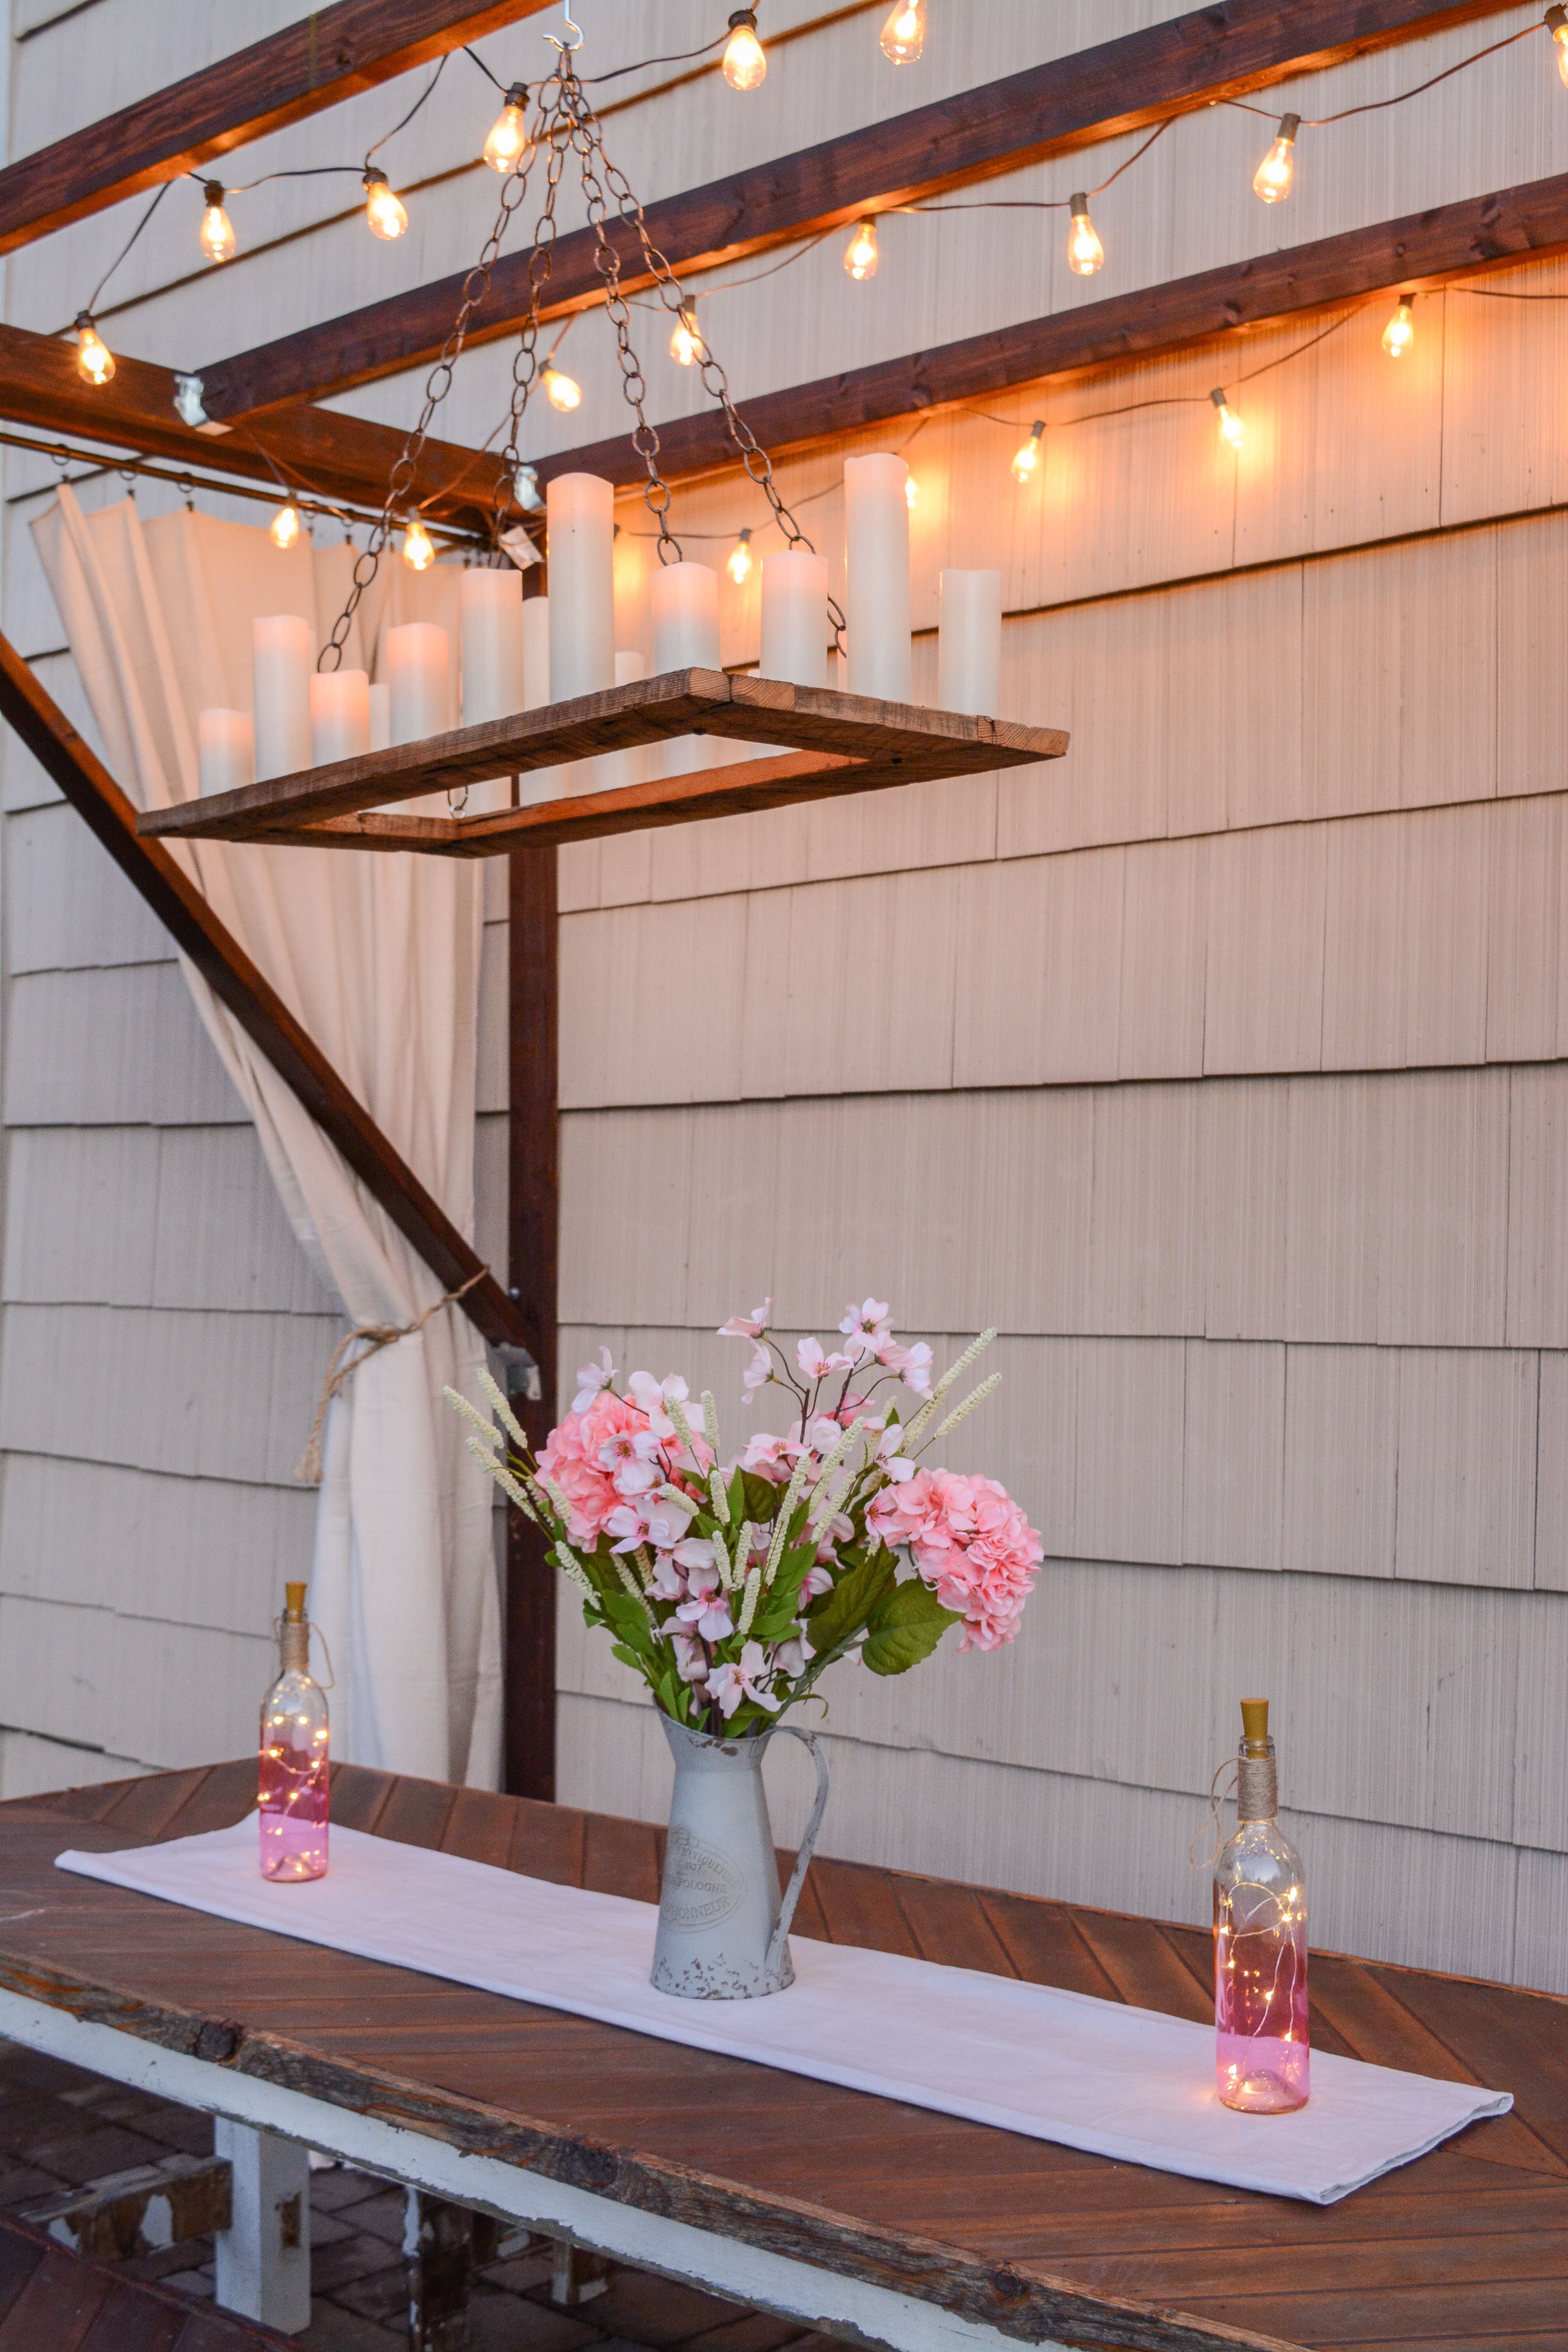
For curtains we used electrical conduit, which we already had on hand and which I simply spray painted black. For curtains we used drop cloths. We strung cafe lights to add ambiance, and a diy chandelier really set the whole thing off. (I’ll cover that one later.)
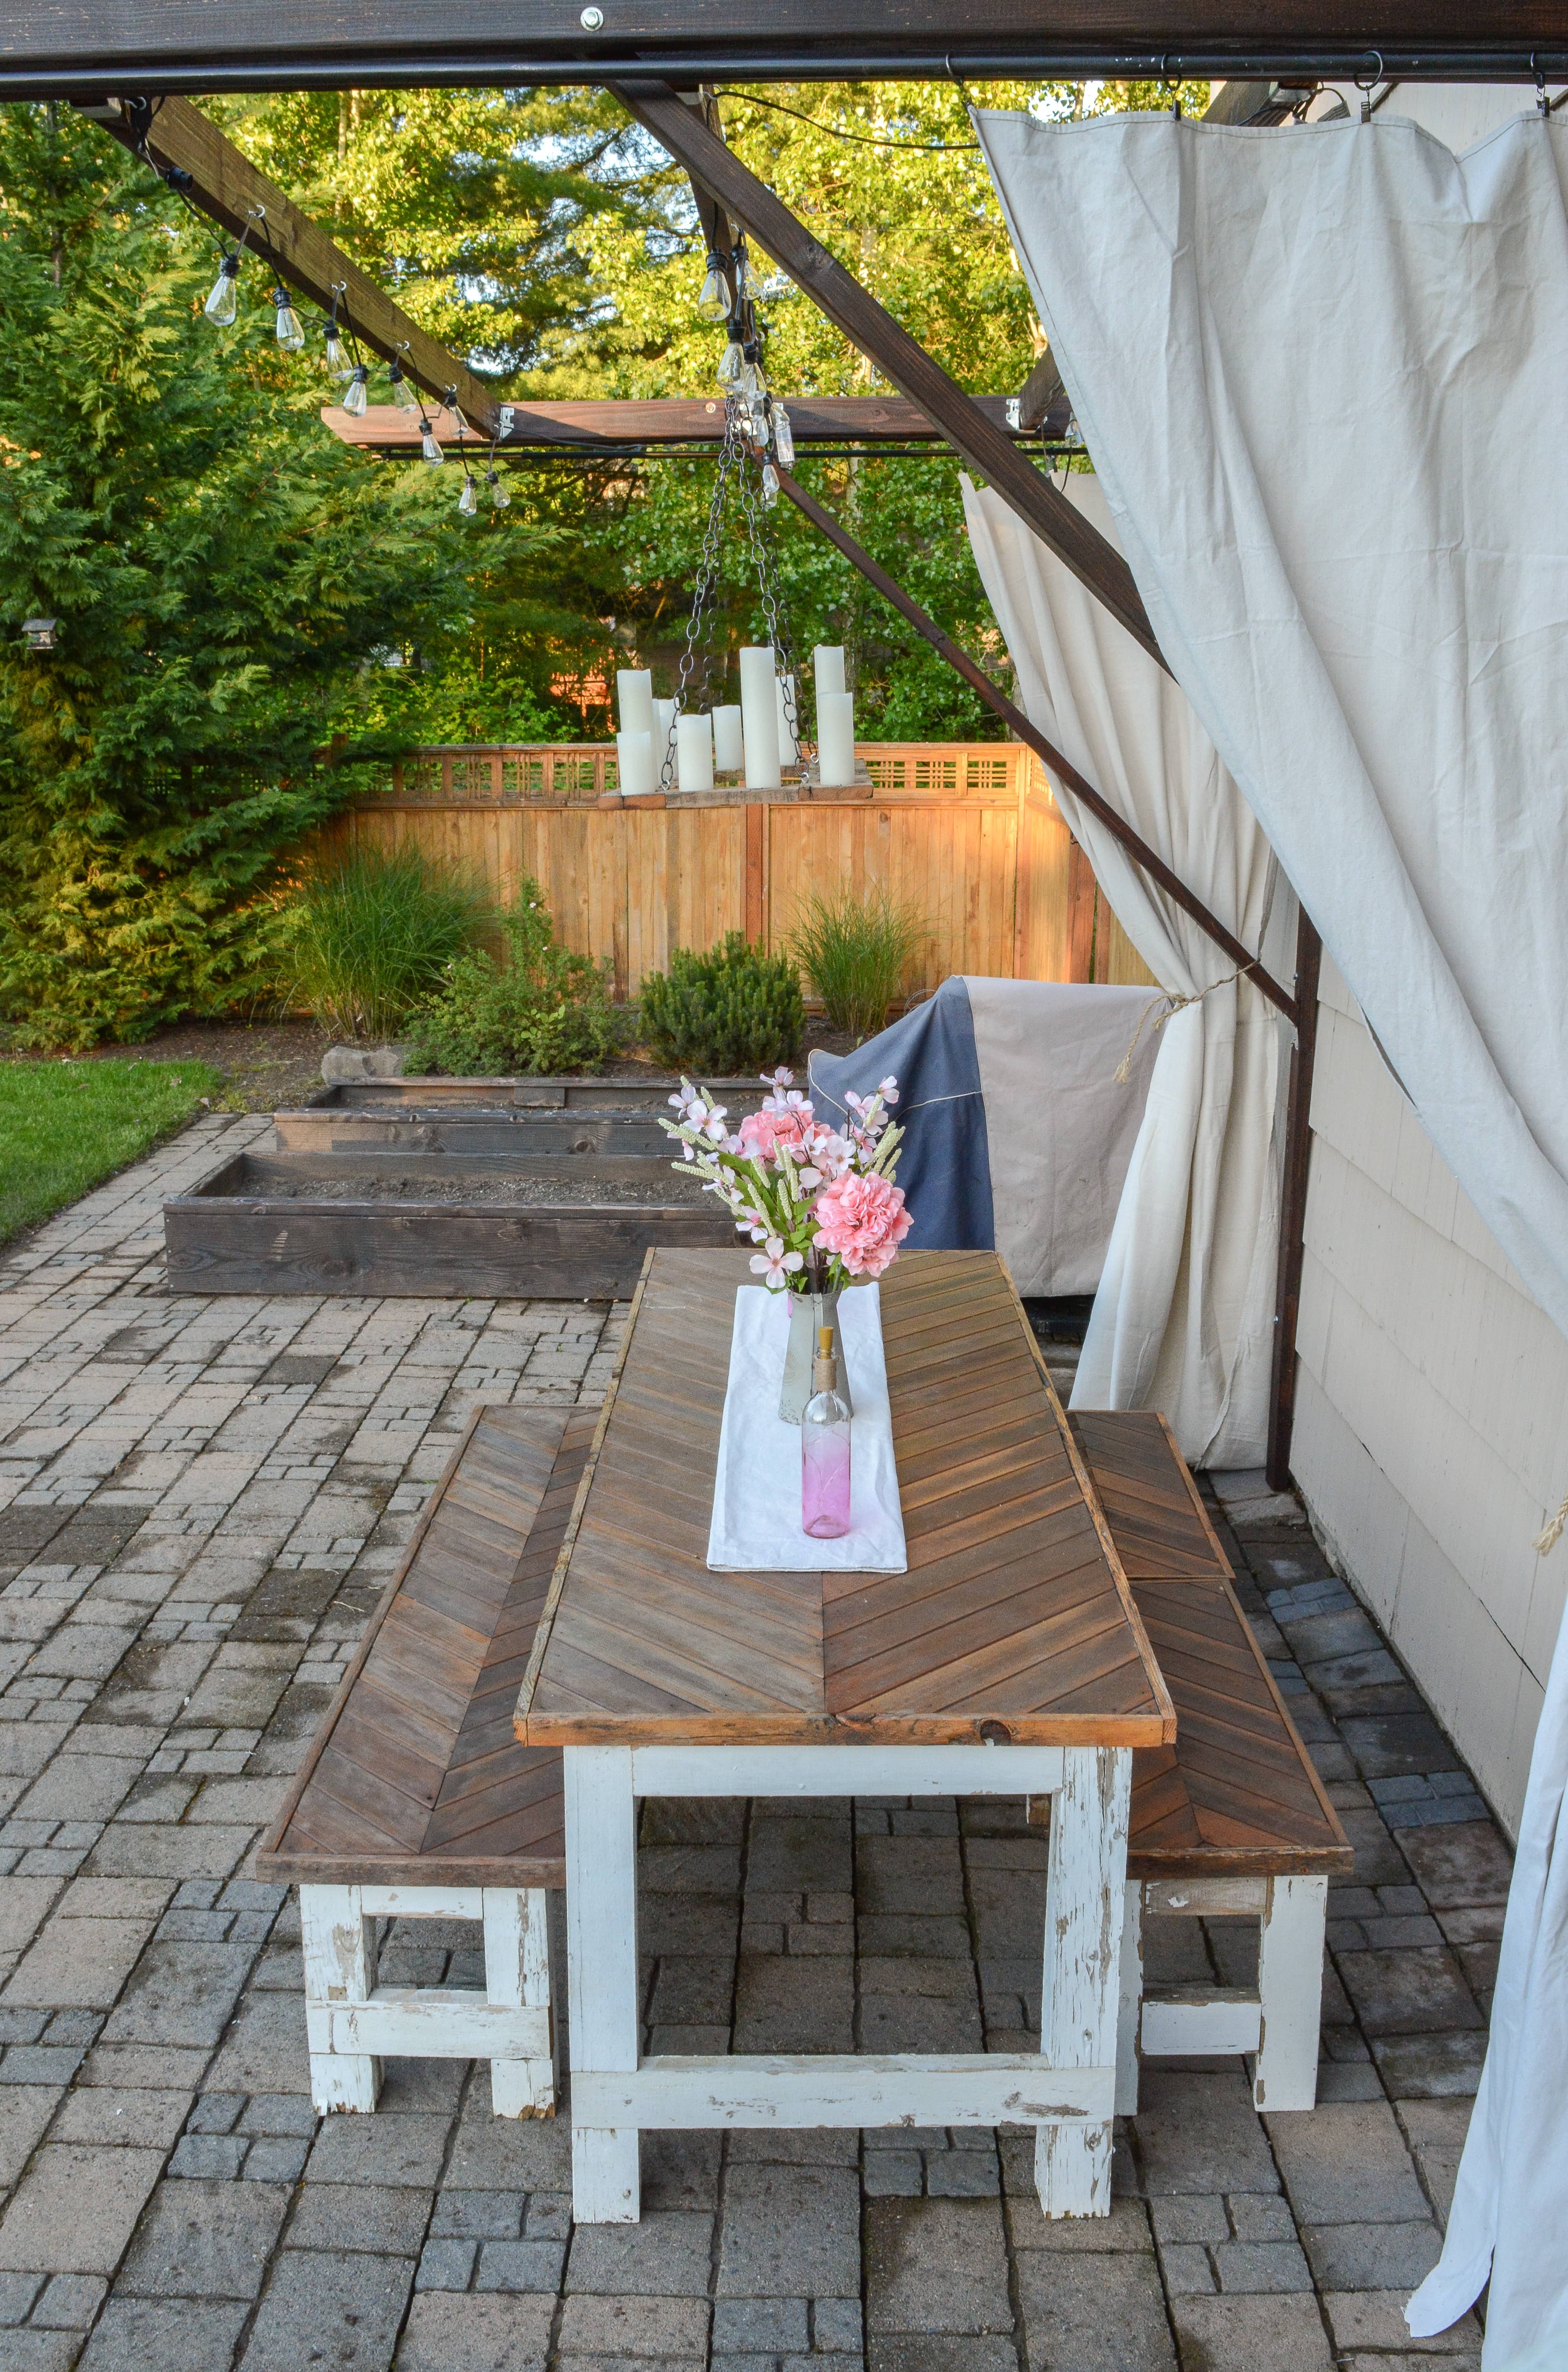
My diy dining table and benches made from the remnants of our neighbor’s old fencing and our dilapidated hot tub wrap finished off the space. (Check back in on that one, too.)
Now, if that was a lot to read, you can see it all in 24 seconds here:
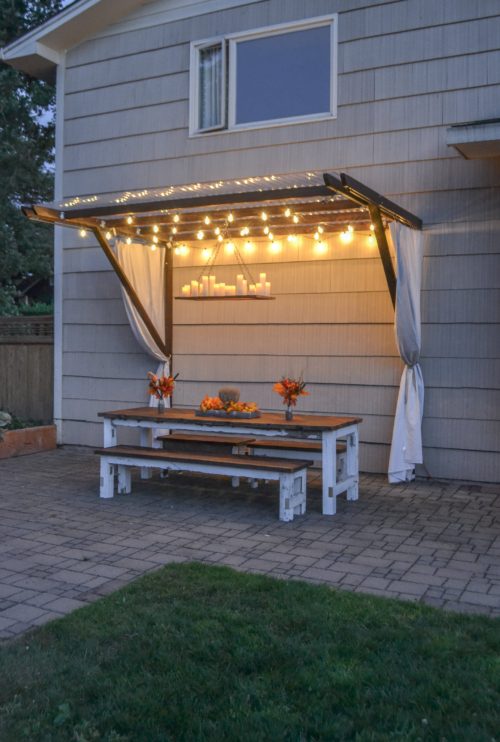
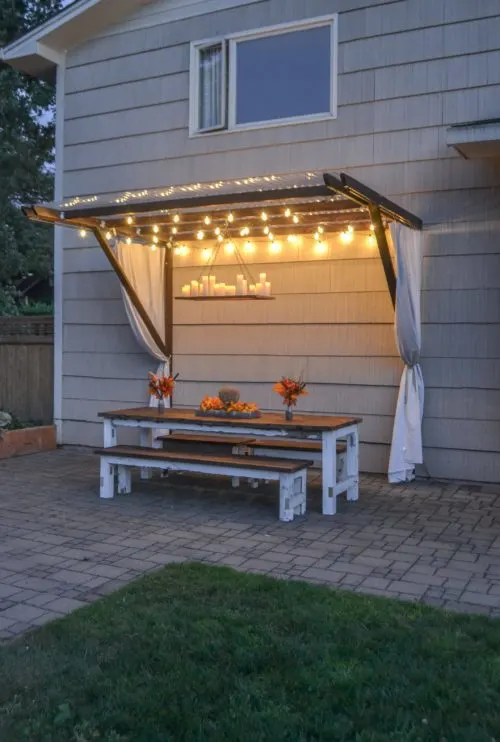
Here’s the finished project. My dream came to life very nicely, I think!

And here it is all lit up.
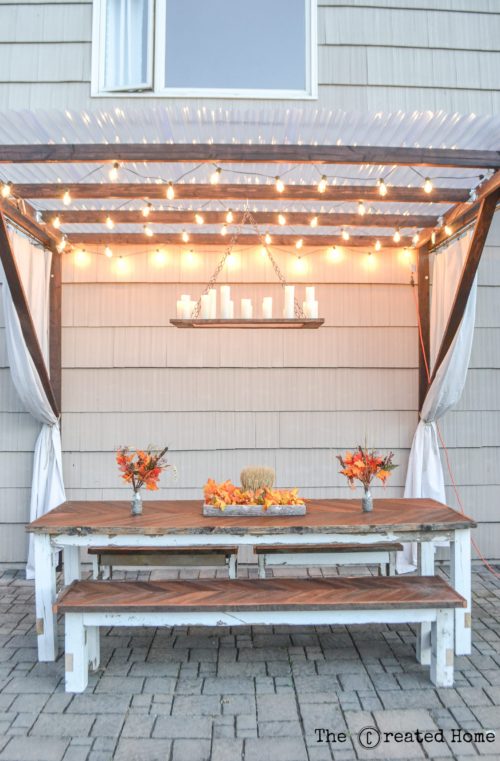
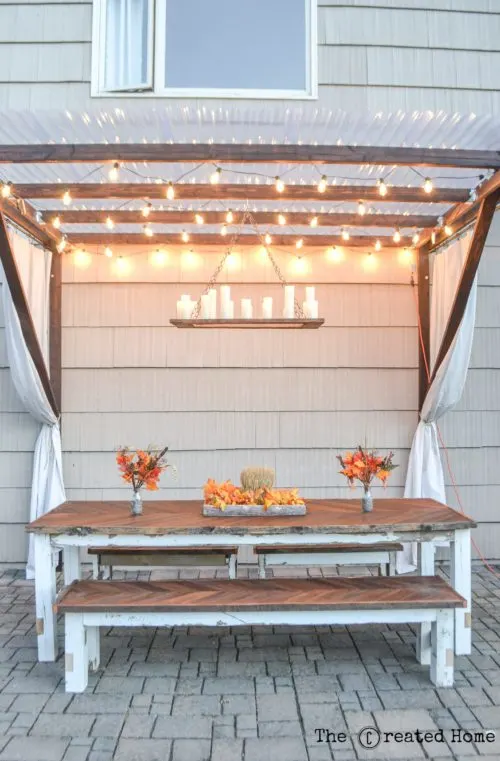
We LOVE how it came together. Having an outside dining area has really finished off our back yard. The ENTIRE project: Pergola, lights, curtains, chandelier, and dining set came to a grand total of $400.
Guys, $400. If you are interested in learning about how we did that with a full dining set as well, you can read about that process here.
Be sure to check out part two, The DIY Frugal Pergola: Your Questions Answered if you have any questions!
Thanks for reading, and happy building!

40 Simples Trabajos Optimizar Tu Patio Trasero Que Puedes Hacer Tú Mismo
Wednesday 24th of March 2021
[…] se tejen en una pergila de ensueño, aportan un toque de clase a cualquier entorno al aire […]
Hannah
Friday 19th of March 2021
hello! thanks for sharing this! I'm wondering how big is your roof area? 12 ft wide?
Sarah
Wednesday 31st of March 2021
I believe it is 10 feet wide, if I recall correctly.
60 Adorable And Easy DIY Backyard Ideas • DIY & Crafts
Sunday 31st of January 2021
[…] thecreatedhome […]
Hilton Enterprise
Friday 29th of January 2021
A debt of gratitude is in order for this article extremely accommodating. Safety gloves much appreciated.
22 DIY Awesome and Inviting Outdoor Furniture Projects
Wednesday 30th of December 2020
[…] Instructions: thecreatedhome.com […]