
Let me just start by saying this custom kids’ closet has my heart now and forever.
Is it narcissistic to say that about my own design and build work? I don’t care, because I love it. The kids do, too, which is fortunate for them or we might have to switch rooms.
I want to emphasize that this is a build that is accessible to even beginning DIYers. I’m going to show you some tips and tricks to make this project completely approachable, so you can create the custom closet of your dreams.
I made a video so you can see the entire process. A list of links to all of the materials included in this build follows. I am also including a few more details here. Please don’t hesitate to ask if you have questions!
*This post contains affiliate links for your convenience. You can read more about that here if you like.*
Tools:
You can create this entire closet with only a drill and a circular saw, as far as power tools go. That said, there are some tools that made this job a bit easier, and which I highly recommend:
Kreg Accu-cut
Kreg Hardware Jig
Router
Kreg Pocket Hole Jig
Drill
Circular Saw
Materials:
2 – 4×8′ melamine sheets
2 – 25′ rolls of banding
3- 2x4s
dresser
1- 16″ x 48″ hobby wood
drawer slides
stain (I used Brown Mahogany by General Finishes)
closet rod hangers
wallpaper – I used Tibetan Grasscloth and The Forest, both by NuWallpaper
hardware – I used these knobs and this pull
paint
The cute stuff that makes it look good once it’s done:
I won’t make you scroll to the end to find this…
Fox pillow
sun pillow
do good pillow (it was at Target but I cannot find it online.)
reading nook light
dinosaur
marquee star
rug/pad
hanging baskets (Michaels, though I cannot find them online)
large baskets
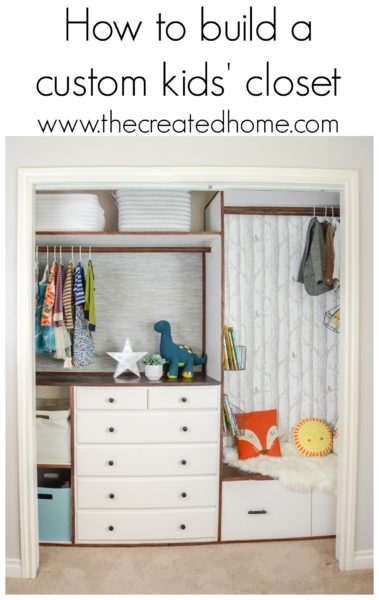
The Details: How to build a custom kids’ closet
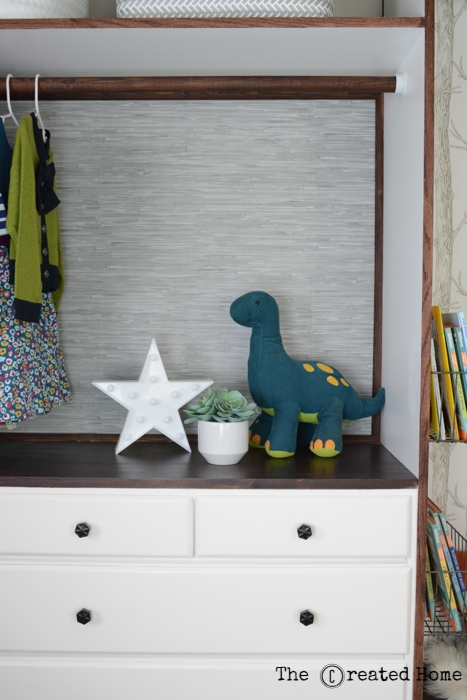
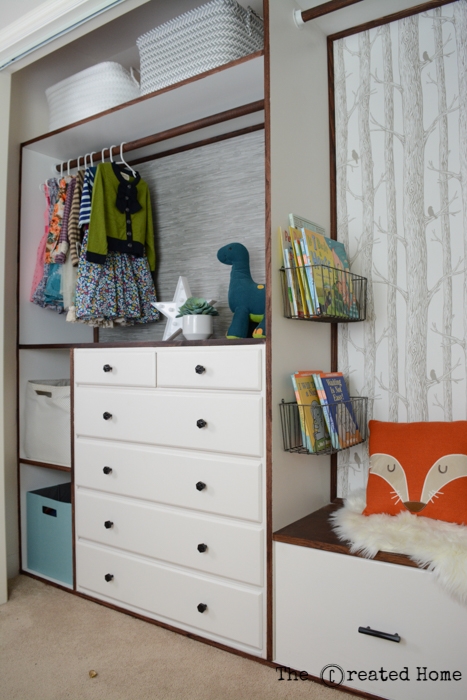
The grand secret to creating this closet easily and inexpensively is the use of an already existing dresser. Even if you are skilled in the art of drawer building, you can’t beat the price of picking up an inexpensive dresser. I found this one for $30.
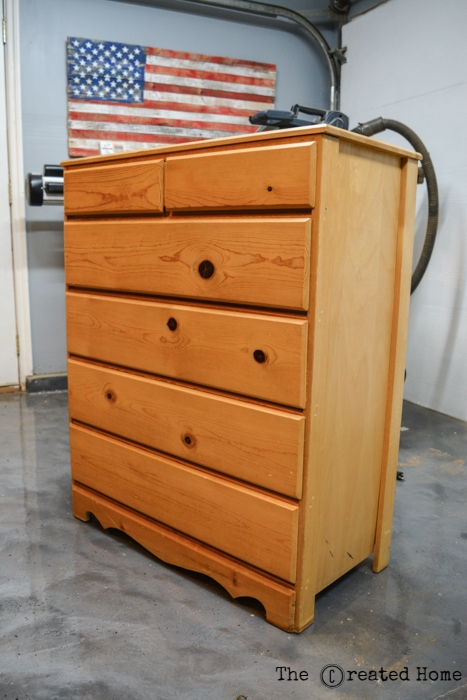
Remove the legs, decorative trim, and top. Paint the faces and frame. Your build measurements will be based off of the measurements of the dresser, so this is your starting point.
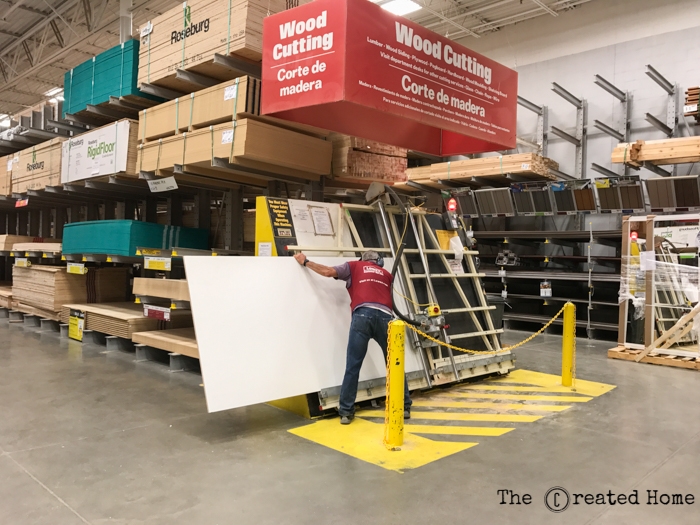
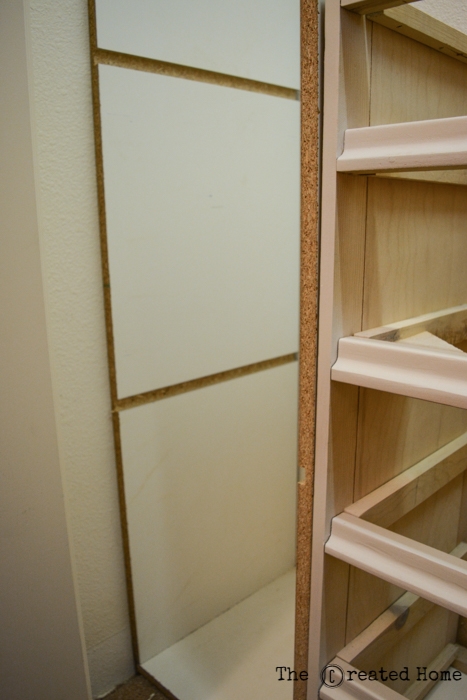
The second grand secret is to have Lowes or Home Depot cut the 4×8 sheets into strips for you. Determine your width (mine are 16″) and have them cut the boards into strips. Then all you will have to do is use your circular saw to cut the pieces to length, saving you roughly 7 years in building the closet.
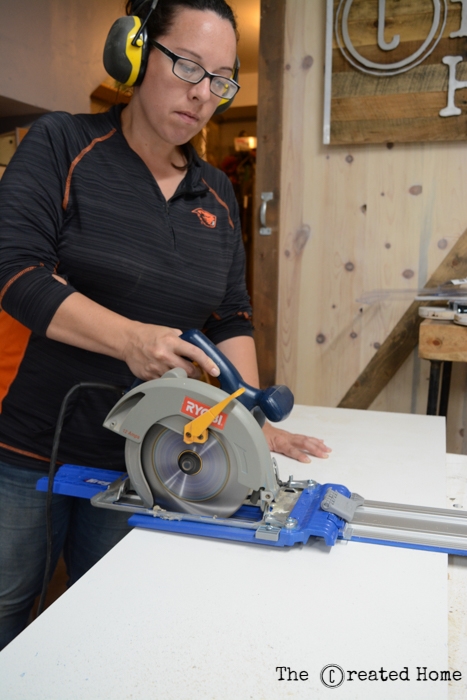
I used the Kreg Accu-cut to cut the 16″ wide panels to length. It made the job super fast and accurate. I was really happy about that, despite my issues with RBF. Google that.
My preferred method of joining the frame and shelves is to route out grooves. Cutting a support would also work fine, I just like the look. Routing is a little more set up, but it looks so clean when it is finished. Helpful hint: Line up and clamp boards that will be joined by a shelf to insure that they are cut precisely even.
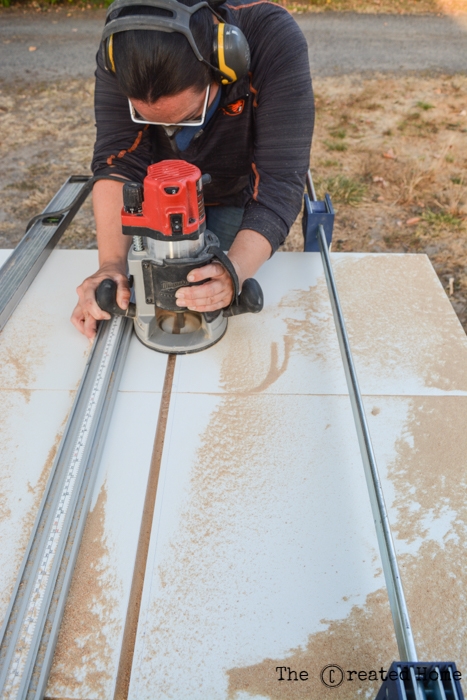
If that didn’t make sense, this is what I am talking about.
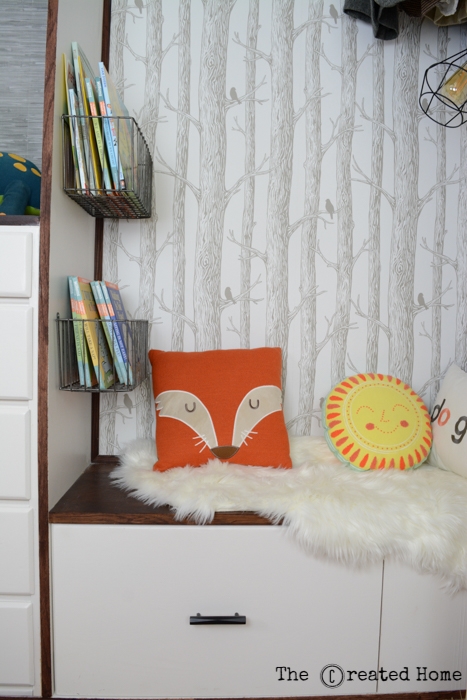
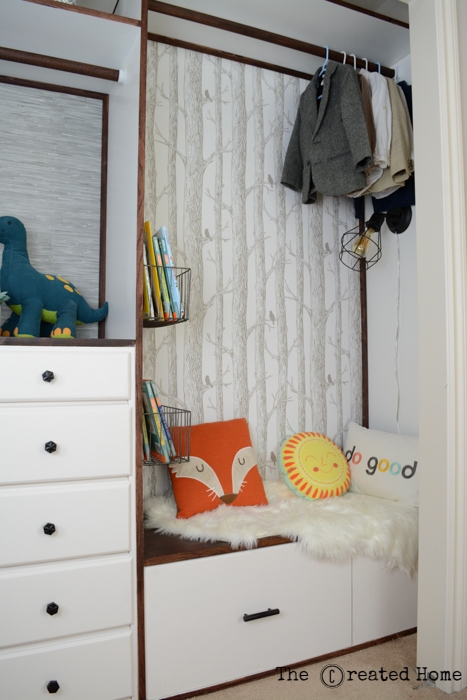
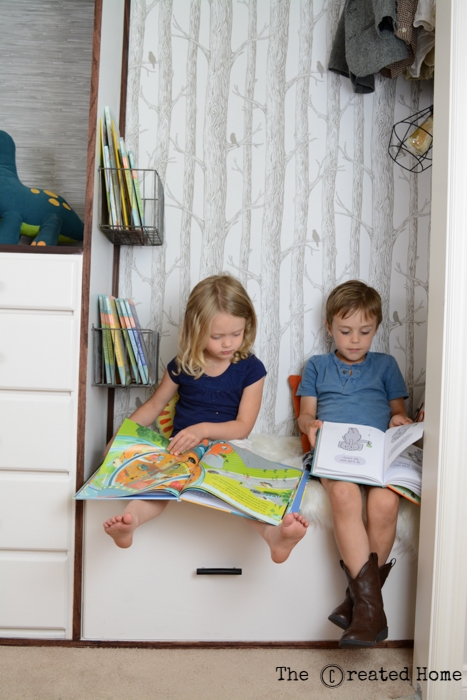
The reading nook
A custom closet is so much more space-effective that there is room for creativity. Aka. fun. So I built a reading nook into the plans, because I love books and my kids love books, and that makes me happy.
If you are keeping track of such matters, this is in fact the second children’s reading nook in our home now. #momswhobuild
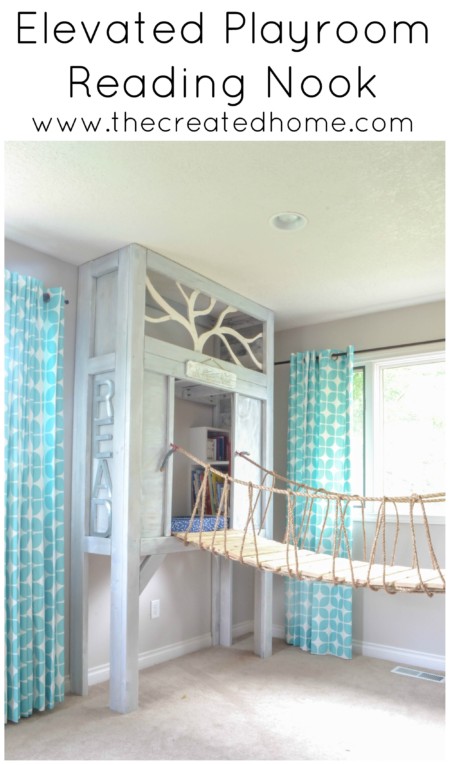

This nook is built on a solid 2×4 foundation so that I can steal my children’s reading space. It also houses a large drawer for their shoes. I’ve basically given up on the idea of my kids putting away their shoes in any sort of organized fashion, so a big drawer to dump them in is a win.
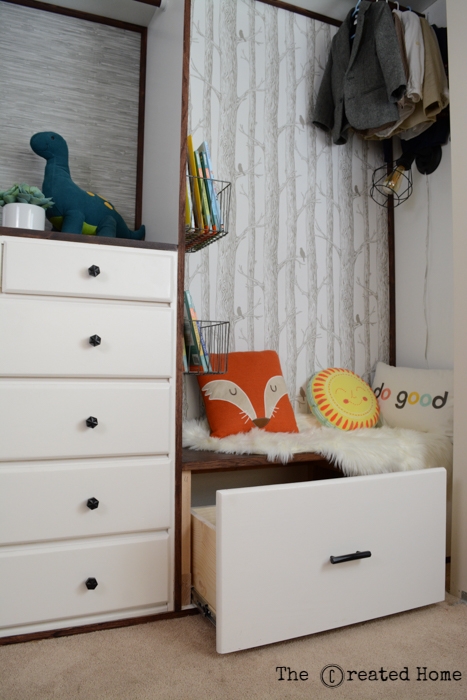
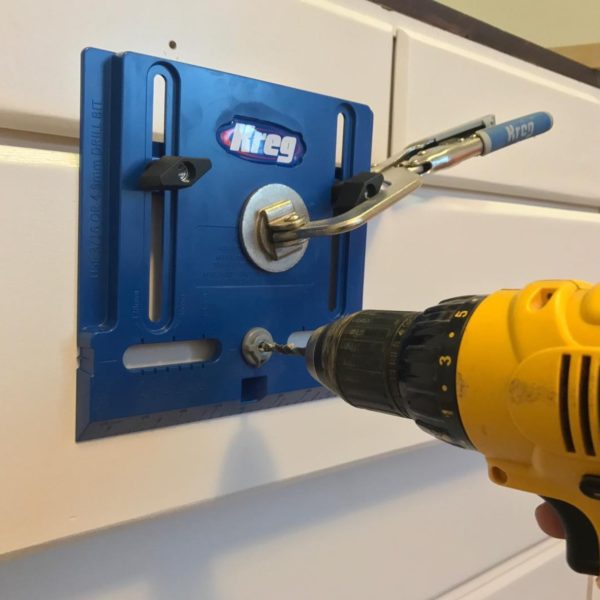
The drawer face is built from the top of the dresser that I removed and replaced with the shelf. The knobs and pull are from Liberty hardware. I normally hate installing hardware, but this time I picked up the Kreg hardware jig and the job was so simple that I only pretended it was taking me forever because that room has an air conditioner and it was hot outside.

Those awesome wallpaper prints are Tibetan Grasscloth and The Forest, from NuWallpaper. They set the tone for the entire closet, and I love them. They are removable so no need for commitment issues.

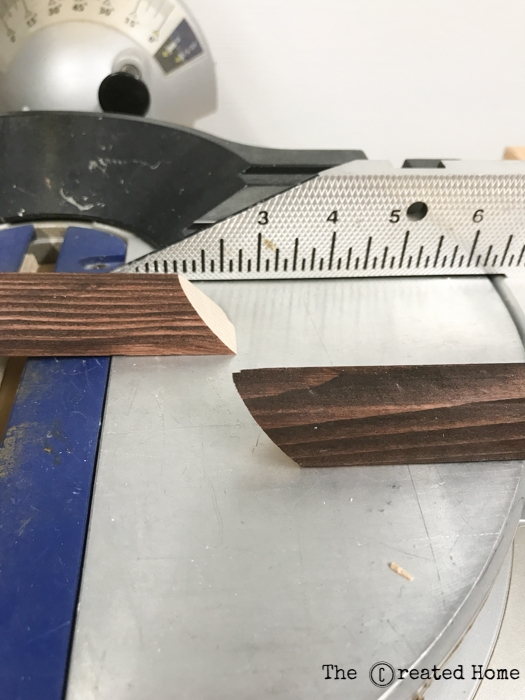
If you find yourself with a gap to cover between the frame and the back wall, as we did, or you just like the look (because it does look good), use quarter round. The trick with fitting the quarter round is to cut them on a bevel rather than a miter. The other thing to remember is that you’ll need to cut so the cut part is up (back piece in the photo), rather than back-cutting (piece in foreground).
Trimming
The final thing I didn’t discuss in the video is the border/trim. Had I made sure that the shelf and bench seat overhung the frame I would have trimmed with thin lattice wood. However, I somehow overlooked that detail, so I went with edge banding instead. And I’m really happy with how it turned out. I stained the banding in place, which was maybe, probably, definitely stupid. But I’m really not sure there was another way to do it quickly, so it was worth it.
The color, by the way, is Brown Mahogany, by General Finishes. I love that it is water-based so I didn’t mind applying it right there in my kids’ room.
This entire closet only took us a couple of days, though to be fair, I had the dresser done before then. My kids are thrilled with their closet and love the reading nook.
So how about it? Are you ready to conquer your own custom closet? What would your dream closet look like? I love the functionality and design that comes with renovating a closet space. It is just one of those things that makes life so much easier. Again, please reach out if I missed anything. And happy building!

Tom Vincent
Sunday 19th of July 2020
Really you did a nice job! This moment very special if we make something for our kids. I like your custom kids closet building ideas and now I can try to build this. Thanks for your awesome ideas. Please keep it up!
Sarah
Thursday 1st of April 2021
Thank you very much!
Shared Kid's Room Reveal - The Created Home
Sunday 16th of February 2020
[…] knocked out the closet last year, so that was one huge check off the list. You can read about that here. Oh, and yes, we still love the closet a year later, yes, they can get their clothes, and yes, that […]
Toys to build your little builders - The Created Home
Sunday 16th of February 2020
[…] aren’t toys…but they are pretty great. We have two reading nooks in our home – one in their closet, and one in the playroom. These books celebrate creative thinking and action, and the courage to go […]
Dana
Friday 9th of August 2019
Hi - what are the dimensions of this closet? I am doing a 5 foot wide space ...
Sarah
Monday 23rd of September 2019
Hi Dana. The closet is 7' 7 3/4" wide, interior dimensions. The opening is probably a little over a foot narrower, but I don't have an exact measurement on that right now.
KRISTIn
Tuesday 25th of September 2018
This is so cute! I'm definitely building my daughter a closet like this. Just three questions: 1. Does the light in the reading nook work? How did you wire it up? 2. Are the shelves on the bottom left functional? It looks like it would be hard to slide those bins in and out. 3. How did you slide the shelf in that is between those two bins? Looks like it would be hard to do from that angle.
Thanks!
Sarah
Friday 23rd of November 2018
Thank you! The light does work. I planned to wire it, but have never gotten around to it. It does have a plug in option, so that is how we have been using it. The shelves are functional, though as you noticed, it was a tight squeeze. Since building a mudroom we have shifted things in the closet and those shelves are now used for books. I added the shelf before adding the vertical shelf to the right. It definitely takes some thought when jigsawing it all together! I hope that helps!