• Email
  • Facebook
  • Instagram
  • Pinterest
  • Twitter
  • YouTube

The Created Home

The Created Home is a diy blog dedicated to building, design, woodworking, and remodeling/renovating.

  • Home
  • Blog
  • Contact
  • Tutorials

How to Refinish a Piano without Paint

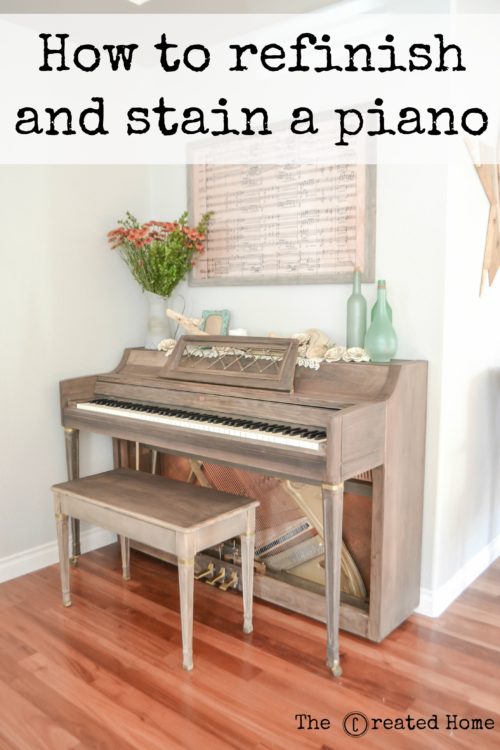
Recognize this piano?

How to refinish a piano using Weatherwood Reclamation stain

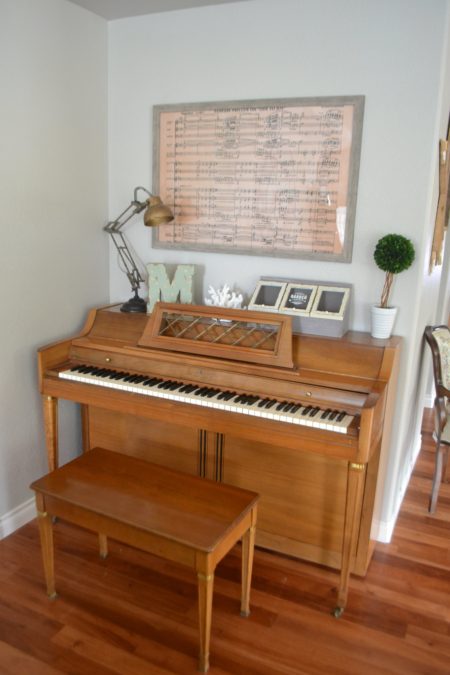
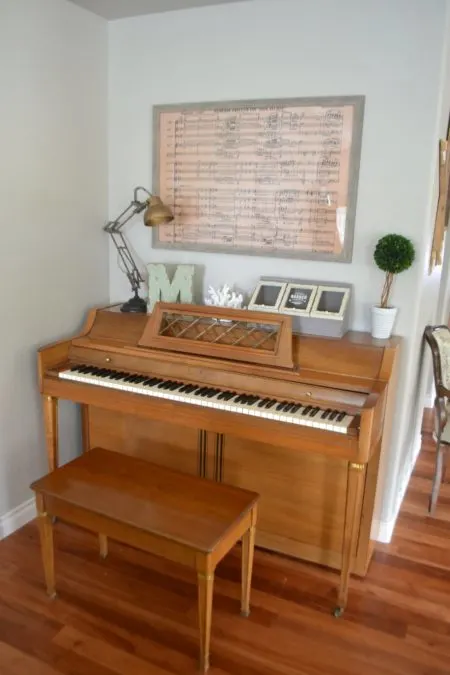
Perhaps you have one in your home. At least you likely know someone who does. There is not a whole lot that is desirable about honey colored furniture these days. Perhaps someday it will come back, but until then, DIYers the world over will continue to dedicate themselves to painting, stripping, sanding, and otherwise removing all trace of anything resembling those delightful orangey tones.

When it comes to pianos, the best thing, the sanity-saving thing to do, is to paint over it.

Really, if you are thinking about refinishing your piano you should probably paint over it.

But, if you just can’t bring yourself to do it – if wood grain is just something you don’t want to mess with, then read on, my crazy friend. Read on.

Why in the world would you stain a piano?!

We inherited this piano from my in laws, and as soon as it was in the house people began asking when I would refinish it. Because, as it turns out, you can’t simultaneously run a diy blog and own a honey colored piano. Such is life.

But, here’s the thing. I just couldn’t paint it. Don’t get me wrong, there are some lovely painted pianos out there. They look great. But I cannot paint a piano for the same reason that I cannot get a tattoo. Inevitably I will wish I hadn’t, and both are really difficult to remove.

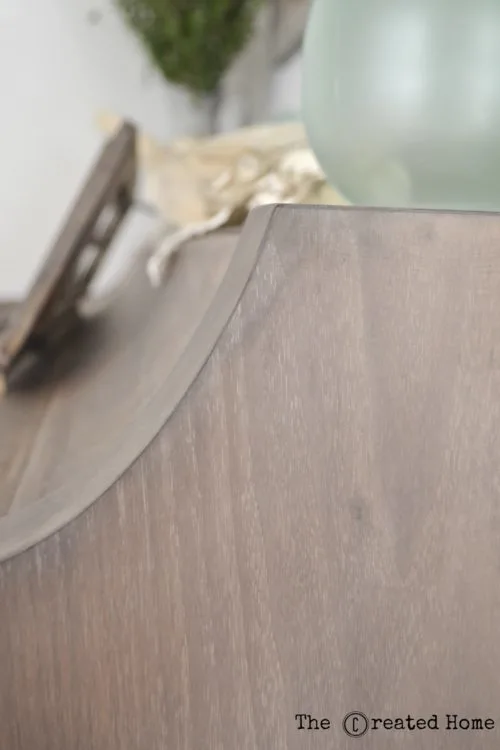
So I less than enthusiastically puzzled over stain choices. Then one day I learned about Weatherwood Stains, a product that reacts with the wood to produce a weathered gray look, resembling old wood. I was fascinated, and for the first time I caught a whiff of that elusive excitement I needed to enter upon a pretty monumental project.

Admittedly, you could totally have skipped that part. But you might find it interesting if you are on the fence yourself. Also, I think it is important to introduce the product that is at the heart of this project.

How to refinish a piano using Weatherwood Reclamation stain

Guys, this is one of my favorite things, ever. This isn’t a sponsored post, but the good people at Weatherwood Stains did share this project with me. And let me tell you – it takes a pretty incredible product to make me undertake stripping a piano. So let’s get to it, shall we?

How to stain a piano

*This post contains affiliate links for your convenience. You can read my full disclosure policy here. 

Materials needed:

*All of these are available at the major hardware stores and Amazon. I have included links that reflect the lowest price for each item.*

stripper

after wash

scrub pads

scraper

sanding sponges and pads (you will also need some fine grit pads for your sander)

wire brush

chemical resistant gloves

stain (I used Reclamation by Weatherwood Stains)

finish (I used Dead Flat Varnish by Weatherwood Stains)

stain brushes

Tools needed:

sander (I use, and love, this one)

screwdriver

respirator mask

safety goggles


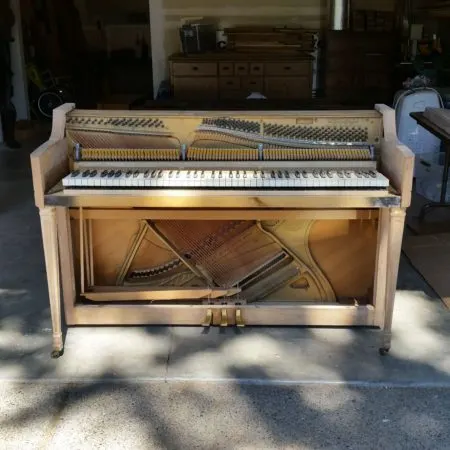
Step 1. Disassemble the piano

Slowly and very methodically disassemble what you can down to the sound board. Personally, unless you are a piano technician, I would leave the rest of it alone.

Tip: Place each set of screws in its own sandwich bag and note on the outside with a sharpie where they go. Photograph each part and write the corresponding photo number on each bag. By the time you are done you will likely have forgotten all those details.

How to refinish a piano using Weatherwood Reclamation stain

Step 2. Sand and strip

Sand the flat surfaces. This is personal preference, but stripper is some gnarly stuff to work with, and I prefer to reserve it for surfaces that cannot be easily sanded. Cover the keys and soundboard as best you can during this process.

How to refinish a piano using Weatherwood Reclamation stain

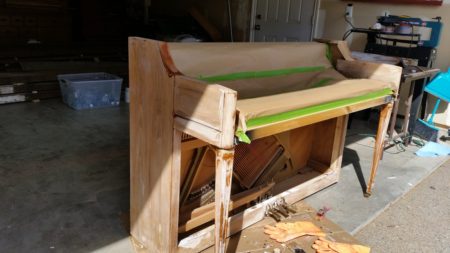
Tip: Ignore the bad example of the photo above. Stripper works best if it is allowed to stay moist and work into the finish. Cover or wrap the surface as you work and allow it to thoroughly penetrate. After a suitable amount of time, as determined by testing, scrub the stripper and dissolved finish off using a soft scraper and wire brush. Follow up with after wash using a scrub pad to remove the residual stripper. Be sure to wear chemical resistant gloves, safety glasses, and a respirator mask while working with these chemicals. They are serious stuff.

How to refinish a piano using Weatherwood Reclamation stain

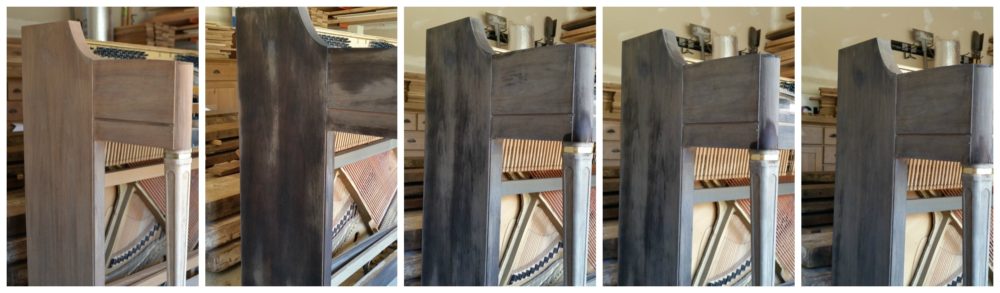
Step 3. Stain the piano

That last step is going to take you a long time. Be sure to allow the newly stripped piano to sit for a couple of days to thoroughly dry out. You don’t want to try to work over an area that was recently exposed to those chemicals.

Unlike other stains, Weatherwood Stain is applied without wiping back. Apply enough stain to thoroughly saturate the wood, then stand back and watch the magic. That’s the fun part.

Here’s a video introducing that process in a little more detail and giving some background if you would like.

Can you tell that I’m painfully awkward on video? I have a very strong dislike of being in front of the camera.

Part 2. This one is a time lapse of the stain doing its thing.

Here’s a few photos of that process.

How to refinish a piano using Weatherwood Reclamation stain

Weatherwood notes on its website that if the wood you are staining is a soft maple the reactive stain will produce a purple color. Their simple solution is to coat the newly stained wood with hydrogen peroxide and let let it soak in and dry. Here’s a quick video showing how well that process works.

Step 4. Seal the wood with vanish

For the finish I used Weatherwood’s Dead Flat Varnish, per their recommendation. Take a stroll down your local Lowes or Home Depot and you will realize that a flat varnish is a tall order. The only flat varnishes of which I am aware are General Finishes water based topcoat and this flat finish by Weatherwood Stains. Now, I realize it may be nerdy to get excited by a varnish, but I am totally doing the happy dance over this stuff. I expected it to have some small amount of sheen because that’s what finishes do. This one does not. It is as close to perfection as it gets. I will definitely be using it again for future products.

Take a look at this finish.

How to refinish a piano using Weatherwood Reclamation stain

That is with three coats of finish! I’m telling you, I’m in varnish heaven.

Now, to back up a moment: Weatherwood Reclamation stain is very environmentally friendly and VOC free, but it does have an odor. I let the piano sit for a week or two in the garage to allow the smell to dissipate before moving on to the next step. To be fair, it didn’t really need that long, I just needed to find enough people to lift the piano back into the house so it worked out! Always apply varnish in a clean environment. I finished the piano inside the house and did not have a problem with any strong smell.

Step 5. Reassemble the piano

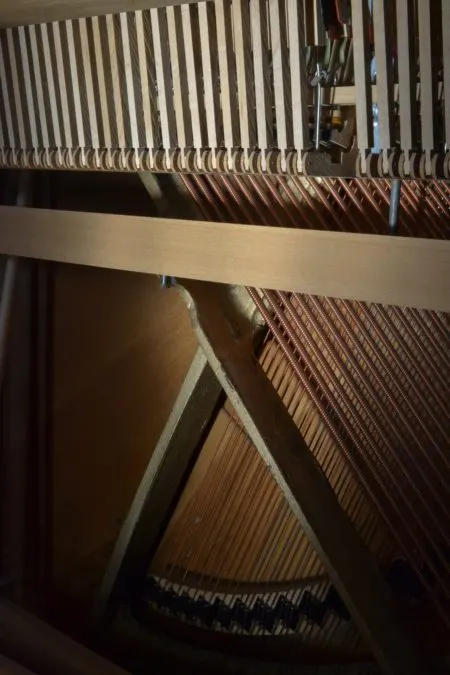
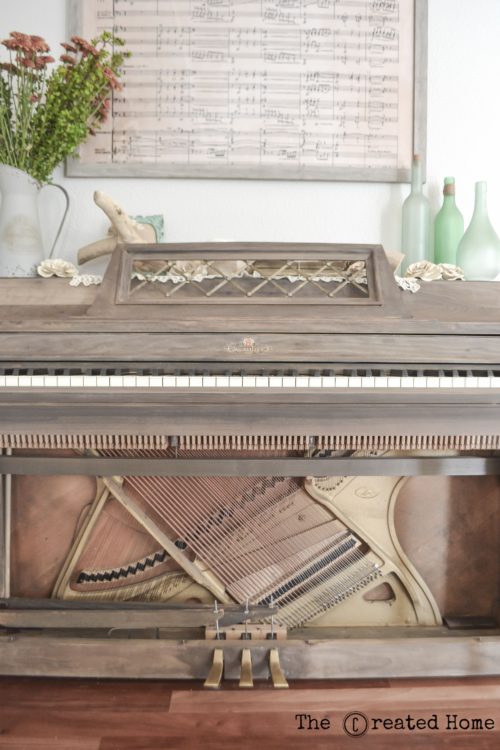
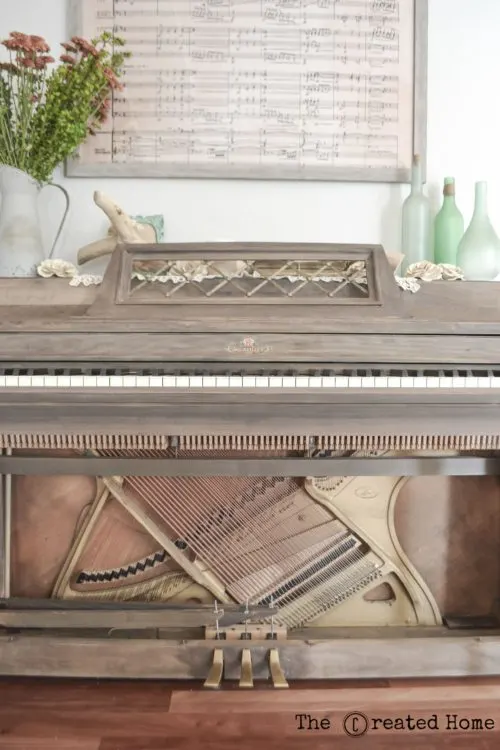
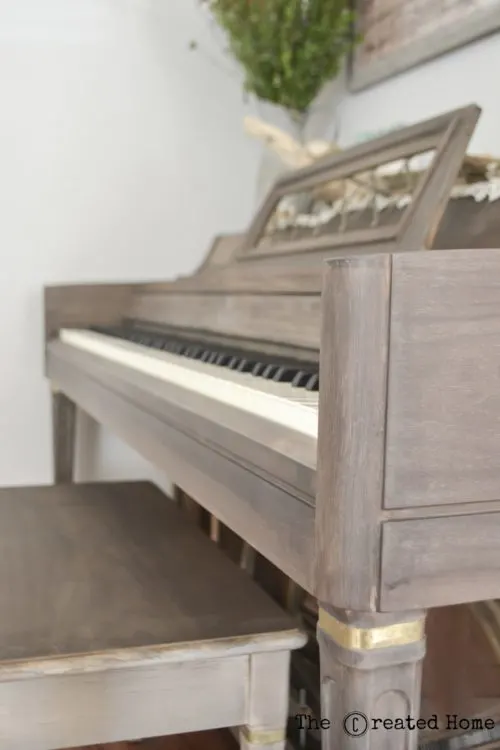
If you documented each part of step 1 then step 5 should go pretty smoothly. I made the decision to reassemble our piano without the bottom panel, leaving the lower part of the sound board open. I like to think the piano looks like it has just washed ashore on the beach. My husband says it evokes more of a found-in-the-woods feel. Either way, it has a deconstructed, returning to nature look to it that I love. I realize it is not for everyone, and expect to hear a few “oh my gosh, she ruined that piano!” comments, but I’m cool with that. This was an artistic project that I consider an expression of the things I love: nature, music, wood. All those lovely elements. It also pairs well with my love for photography.

How to refinish a piano using Weatherwood Reclamation stain

How to refinish a piano using Weatherwood Reclamation stain

So there it is!

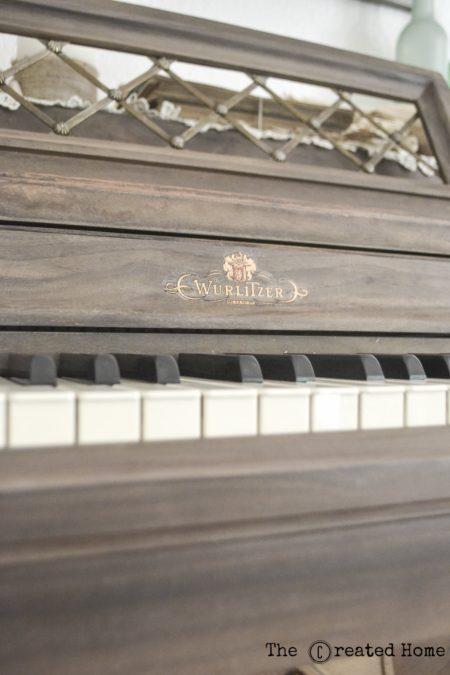
One more note: When you sand a piano you will need to replace the decal. You can order a new one online. The process is not so much a stick-it-on-and-go thing as a sweat, tears, and cursing ordeal, but take it slow and it will be fine. I am actually still working to remove the last bit of residue from ours so it will look a bit more seamless.

How to refinish a piano using Weatherwood Reclamation stain

The finished piano

I love the look of the piano. It now fits so much better with our aesthetic. My kids were thrilled to have it back in the house because they love to play it, and by “play” I mean pound on the keys energetically.

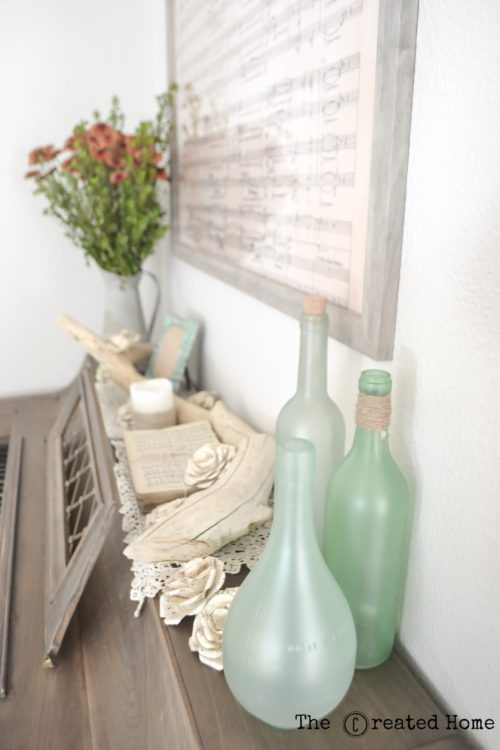
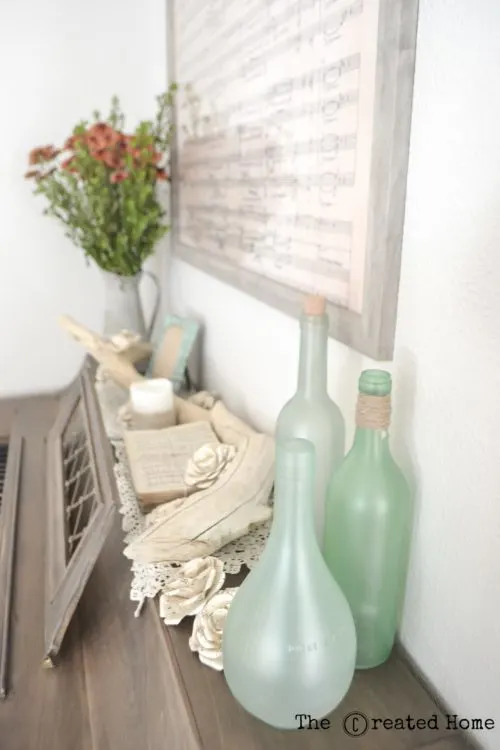
Here’s it is in all of it’s washed-ashore or left-in-the-woods glory. I even topped it with a piece of driftwood and some sea glass in what is definitely an over emphasis of a point. The framed piece of music over the piano is from Beethoven’s 9th Symphony, which is my favorite piece of music. I created it by enlarging it onto a piece of engineering paper printed at Staples. The roses on top of the piano I folded out of sheets of music from vintage church hymnals.

How to refinish a piano using Weatherwood Reclamation stain

How to refinish a piano using Weatherwood Reclamation stain

The framed piece of music over the piano is from Beethoven's 9th Symphony, which is my favorite piece of music. I created it by enlarging it onto a piece of engineering paper printed at Staples. The roses on top of the piano I folded out of sheets of music from vintage church hymnals. 

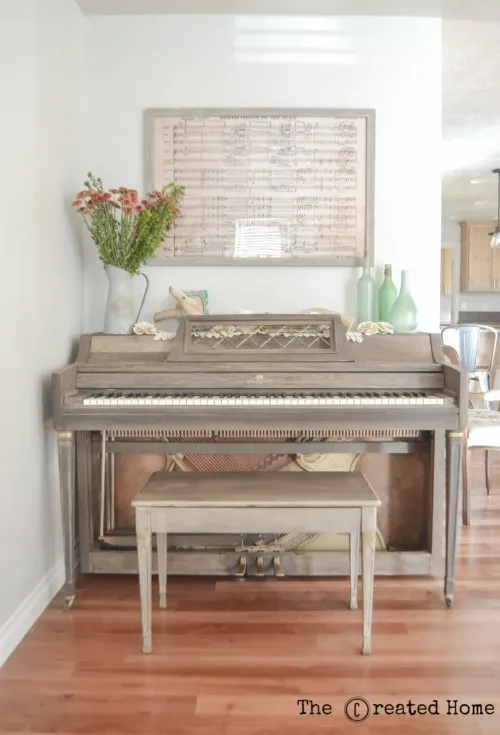
I love that it is a one of a kind piano now.

How to refinish a piano using Weatherwood Reclamation stain

Thanks for reading! I have been asking myself if it was all worth it as I look at our newly finish piano, and the answer is yes. I don’t think I would have been happy with it if I had used any other product. I wanted something special, and the Weatherwood stain fit that perfectly. I will definitely be using more of their reactive stains on future projects. If you love the barn wood look it is well worth checking out.

If you have an old piano that has to be stripped and refinished, either because you plan to restain or because it has years of built up paint, my advice is to set aside a good deal of time to finish the project and not try to rush any part of it. It is definitely a doable job, and doing it yourself will save you a lot of money, but it is not a speedy process and it requires a ton of attention to detail.

Thanks for reading!

The framed piece of music over the piano is from Beethoven's 9th Symphony, which is my favorite piece of music. I created it by enlarging it onto a piece of engineering paper printed at Staples. The roses on top of the piano I folded out of sheets of music from vintage church hymnals. 


Related Posts

  • Top 10 Builds of 2016Top 10 Builds of 2016
  • DIY Kitchen Renovation RevealDIY Kitchen Renovation Reveal
  • DIY Mudroom with Dog BathDIY Mudroom with Dog Bath
  • How to Makeover OSB StairsHow to Makeover OSB Stairs
  • How to make an easy hidden compartmentHow to make an easy hidden compartment
  • How to DIY WainscotingHow to DIY Wainscoting

Comments

  1. Alex Rosh says

    September 29, 2016 at 4:59 pm

    Wow! How gorgeous is this!! My in-laws downsized and also gave their piano to us, but unfortunately we can’t do anything to it since they might ask for it back. Fortunately though, it’s not too bad looking and isn’t honey colored😂 Good job!!

    Reply
    • wpadmin says

      October 3, 2016 at 4:48 am

      Thank you! I am not sure I would have done anything if it were not honey colored! Haha!

      Reply
  2. Deborah says

    September 30, 2016 at 2:50 am

    That’s incredible! Great job!

    Reply
    • wpadmin says

      October 3, 2016 at 4:49 am

      Thank you, Deborah! I appreciate that. 🙂

      Reply
  3. Missy says

    April 14, 2017 at 9:04 am

    I am in love with this piano!!! Great job!

    Reply
    • Sarah says

      April 29, 2017 at 10:23 pm

      Thank you, Missy! I appreciate it! And I am, too. 🙂

      Reply
  4. Kerri says

    April 28, 2017 at 3:14 pm

    This is stunning! I plan to use this page to hire out the refinishing of our piano, but can you please give me some more info on what file you used and how you enlarged the sheet music? I would so appreciate it!!

    Reply
    • Sarah says

      April 29, 2017 at 10:17 pm

      Thank you, Kerri! I cannot recall where I got the music exactly. I Googled Beethoven’s Ode to Joy. I edited the image to look a bit aged, then took the file to a local print center and had it printed on a 24×36″ engineering print. I hope that helps!

      Reply
  5. Pablo says

    September 12, 2017 at 2:57 pm

    I love this project. I bought all the supplies except the stain and varnish. The price is killing me! Anyone know of a similar alternative to the reclamation stain thats less than $80?

    Reply
    • Sarah says

      September 21, 2017 at 10:12 am

      It’s not a small project, for sure! What you will want to look for is another reactive stain. There are other’s on the market – an increasing number, actually. I have tried a few, and I come back to Weatherwood because they have given me by far the best results. They are also really good about showing what results you can expect on different woods. I would say try a couple and see what you think. I would caution against using the vinegar and steel wool trick on this one, as you just won’t be able to control the results much with that and it will probably go very dark. Personally, I chose Weatherwood because even with a little higher cost for the stain, it was a massive savings over having the piano done (you may feel it worth it by the time you are done, haha!) Also, I needed to trust that it would work, or all that work would be for nothing. I hope that helps a little. Test some brands out and see what feels right for you. And definitely share a photo when you are done, please! Good luck!

      Reply
  6. Ivana says

    September 28, 2017 at 11:06 am

    This is stunning. Can you tell me how much stain you needed for this project? Thank you

    Reply
    • Sarah says

      September 28, 2017 at 2:18 pm

      Thank you, Ivana! I maybe used half of a quart of the stain. (And then used the rest for several other projects!) 🙂

      Reply
  7. Mary says

    November 4, 2017 at 9:13 pm

    Your refinished piano is really lovely. I also have a honey-colored-piano, but mine is rather banged up. Near the bottom there is even some split and missing veneer. Is your piano solid wood, with no veneer? I’m new to this whole messing-around-with-furniture business, and I don’t know if it is dumb to try to refinish a piano with damaged veneer. (The optimist in me wants to believe that I can add gold bands, as you did, and conceal problem areas.) Also, is that same optimist really asking for trouble by thinking she might avoid stripper altogether? I want to do this whole project in the house, because when we moved in a year ago my husband said, “and we will never have to move that piano again.” Your piano, like mine, does not seem to have a lot of carved detail, but obviously you felt the need to use stripper anyway. Is it something I really can’t avoid, if I want to actually finish this project? Thank you in advance!

    Reply
    • Sarah says

      November 23, 2017 at 8:59 pm

      Hi Mary! Apologies for the delayed response. Yes, my piano is a soft maple veneer. The gold bands are original to the piano, so unfortunately I can’t tell you much about adding those. You can repair damaged veneer. It is not a job for the feint of heart, and will likely never look perfect. I totally understand wanting to finish it inside. Pianos are so heavy! You may consider paying off a few strong men with pizza. 🙂 I found stripper to be the gentlest option to avoid eating through the veneer and risking damage to the piano. Those legs, for example, would be really difficult to sand without destroying detail. I hope that all helps. If you have any other questions please feel free to ask!

      Reply
  8. Elly says

    January 30, 2018 at 9:32 pm

    I found your project on Pinterest. My hubby bought me a piano yesterday afternoon, I have it pulled apart (in my living room (thank you tile floors) because I don’t have a garage), and mostly stripped. The second I saw yours, I could see Miss Ethel’s new look. Thank you for posting! (Yes, lol, my piano has a name.)

    Reply
    • Sarah says

      March 10, 2018 at 8:43 am

      I would love to see a photo! Miss Ethel is a great name. 🙂

      Reply
  9. Jill says

    March 5, 2018 at 9:37 pm

    Looks fantastic! I am not experienced with refinishing furniture. My piano has veneer, which you said yours is, but it also has lots of carved details. Will a stripper remove the orange stain from details very well? Also, can you estimate how many hours this took you – someone who knows what they are doing? I am researching this vs chalk paint. Chalk paint is obviously way easier, but your just looks so much more elegant!

    Reply
    • Sarah says

      March 10, 2018 at 8:32 am

      It will take some time, but yes, stripper is the best solution. I’m not going to lie, this took a healthy dose of hours. I’m not going to hazard an exact guess because it has been a while since I did it. But I’ll tell you that I spent a couple weeks on it, between doing the mom thing and other life commitments. 🙂 Good luck, and please share a photo if you decide to do it!

      Reply
  10. Jill says

    March 10, 2018 at 8:41 am

    Thank you! I appreciate your response.

    Reply
  11. Britnee says

    March 22, 2018 at 8:16 pm

    Hello! So I’ve just started in on my piano project! Thanks to your blog I am following your steps/tools word by word! So I’ve dismantled the piano and starting in on the music rack and already having questions lol. When you applied the stripper what did you wrap it with to keep moist?

    Reply
    • Sarah says

      March 25, 2018 at 9:50 pm

      How exciting! I didn’t wrap this one, which was something I would definitely do different. Wrapping slows the drying, which helps it remove the material more thoroughly. Had I done so I wouldn’t have had to fight it so much. For the legs and things where it’s really hard to get a sander I would just wrap it in plastic wrap. I used stripper all over the piano – wherever there was wood. Just be sure to keep it out of the mechanisms, of course. It’s a messy job! Good luck, and please let me know if you have other questions!

      Reply
  12. Britnee says

    March 22, 2018 at 9:01 pm

    Also did you use stripper on the entire piano first?

    Reply
  13. Kati says

    April 1, 2018 at 3:06 pm

    I love this finished product!! And it makes me want to re finish my upright grand. Did you use a glass or anything on the bottom of yours? Or just not re attach the wood. I’m worried my kids would destroy that if left open, but I love the mechanical look.

    Reply
    • Sarah says

      April 5, 2018 at 7:53 am

      Thanks, Kati! I didn’t put any glass down there. My kids have definitely gotten down there and messed with the mechanisms, but it’s built pretty tough. I think it’s fair to say with kids there is always the risk that a finger could be pinched, so plexiglass could be a great solution.

      Reply
  14. Kati Stephenson says

    April 2, 2018 at 5:52 pm

    What did you use to replace the wood to see all the hardware underneath? Did you leave it uncovered? or put glass or plexiglass there? your project turned out beautiful btw. I have an Upright grand from 1902 that I want to re finish.

    Reply
  15. Naomi Roy says

    July 27, 2018 at 1:12 pm

    I’m just beginning this process step by step! I love your work and writing. Good job! Thanks.

    Reply
    • Sarah says

      November 23, 2018 at 8:42 pm

      Thank you! I know it has been a while, so I hope it went well. Please do share photos when you are done!

      Reply
  16. Yvonne says

    December 18, 2018 at 12:24 pm

    How were you able to leave the brand of the piano after staining. I have the same brand Wurlitzer it is a baby grand .

    Reply
    • Sarah says

      January 30, 2019 at 9:19 pm

      I removed the sticker and purchased a new one online. I don’t recall the site, but they are available!

      Reply
  17. Teresa says

    January 10, 2019 at 9:38 pm

    Hi. How did you apply the varnish? If you used a brush, what kind and did it leave brush lines or does this varnish level out? I used general finishes wipe on clear coat for another project and didn’t like the dragon lines from wiping it on.

    Reply
    • Sarah says

      January 30, 2019 at 9:32 pm

      I used Dead Flat Conversion Varnish by Weatherwood Stains. If I remember correctly, it was a foam brush. That varnish applies super easy with no lines. I’m surprised to hear the General Finishes was streaking. I have had great luck with their products, with the exception of the Enduro-var finish. That one streaked.

      Reply
  18. Robin says

    March 19, 2019 at 3:44 pm

    I think it looks so good! And not “found in the woods”. I was thinking more like a muted steam punk when I saw it finished. Maybe you could just come do mine?? 😉

    Reply
    • Sarah says

      September 23, 2019 at 10:07 pm

      Muted steam punk sounds good, too! And yeah, I’m still exhausted from mine! 😀

      Reply
  19. That Sassy Life coach says

    April 10, 2019 at 10:59 am

    I love the look you have decided to go with. Can you play the piano at all? I have always wanted to learn but never got around to it 🙂 xx

    Reply
    • Sarah says

      September 23, 2019 at 9:51 pm

      Not much, it’s been quite a few years (more than I will admit!) My kids want to learn, and I am happy to have them developing an interest!

      Reply
  20. Jean says

    May 11, 2019 at 9:41 am

    I just found this post on Pinterest in my feed. The piano looks amazing! I have been looking for a good stain to use on a project, what if you don’t know what type of wood you are wanting to stain?

    Reply
    • Sarah says

      September 23, 2019 at 9:03 pm

      Get a good photo of the wood grain and post it online. Guarantee a bunch of people will present their professional opinions about what type of wood it is! 😀

      Reply
  21. Jess Grimm says

    June 3, 2019 at 4:47 pm

    Hey, Sarah! I am totally considering this because of how beautiful yours turned out. (Found you on Pintrest) I do have a question though. I have the same color floors you do and LOVE your wall color. What is it?
    Thanks!

    Reply
    • Sarah says

      September 23, 2019 at 8:56 pm

      Thank you! Please do share if you do the piano project. It’s a good bit of work, but I’ve never regretted it. The walls are Agreeable Gray, by Sherwin Williams. (Bonus: I have taken to having them mix it to 75%, and it’s GORGEOUS.)

      Reply
  22. Houston Gordon says

    June 13, 2019 at 4:06 pm

    This is amazing!!! I just got a piano that is not pretty and was looking around on how I wanted to refinish it. I found your post and loved how yours came out. Have been stripping mine the past couple of days and just bought the stain you did. I’m so excited!!

    Reply
    • Sarah says

      September 23, 2019 at 8:51 pm

      How did it turn out? Please do share if you get the chance!

      Reply
  23. Michelle says

    July 19, 2019 at 9:37 am

    This is absolutely stunning. Can you tell me about the flat finish? I’m concerned with kids and dust that it would be hard to wipe down if it’s not glossy. Thoughts?

    Reply
    • Sarah says

      September 23, 2019 at 9:24 pm

      It wipes down great! Actually, it hides the dust really well. I don’t even want to admit how often I’ve realized that it has been dusted in forever.

      Reply
  24. Jana says

    August 10, 2019 at 10:33 am

    Hi Sarah,
    What size is the frame above the piano? I am loving this whole look!! Thank you for your post!

    Reply
    • Sarah says

      September 23, 2019 at 8:47 pm

      Hi Jana,
      The frame is 38×26″. Thank you so much!

      Reply
  25. Mary says

    September 7, 2019 at 4:05 pm

    We found a piano marked “free” on the side of the road. My kids thought it would be a great family project to bring home : ) It is in our garage with some parts off. We did try to apply stripper (and wrapped it in Saran Wrap) but not it is even darker and it seems gooey. We don’t know what to do next. We are not handy people and have never tried something like this before. Do you know what we should do next? We have steel wool pads but I’m afraid that would scratch the wood. Does that matter if we are going to strip it? I guess we just don’t know where to even begin. Any help is appreciated!

    Reply
    • Sarah says

      September 23, 2019 at 8:37 pm

      Hi Mary. It really depends what the wood is. Can you test a small area to see if it’s solid wood or a veneer? If it’s tacky you will likely need to reapply stripper and carefully follow the instructions for whichever product you go with. This time of year you probably don’t need to wrap it or anything – unless you are somewhere hot of course. Steel wool will just gum up. Try reapplying stripper, waiting a bit, and using a plastic scraper to avoid scratching the wood. It can be a beast of a project, for sure, but you are right that if you are stripping it anyway it can all be just fine! Best of luck!

      Reply

Leave a Reply Cancel reply

Your email address will not be published. Required fields are marked *

Subscribe via email

Archives

Categories

More about the author

My name is Sarah. I am a wife and mother, a project addict, a remodeler, and an aspiring designer and fine woodworker. My passion is creating and sharing what I am learning with others. Read More…

Latest From Instagram

thecreatedhome

Instagram post 2194534369014636496_36840731 I receive a gratifying number of requests for this star each year. Unfortunately, this year has been one for the books and I just didn't have time to make any. But I am happy to say I am working on plans that will allow me to make a number of them in 2020 in a slightly smaller size. If you can't wait, you can always make your own by following the tutorial on the blog. .
#christmasstar #woodmosaic #woodenstar #diywoodstar #starmosiac #freetemplate #diy #reclaimedwood #christmasdecor
  • Policies and Copyright
  • Media Kit
  • Get in Touch

Copyright © 2019 · Swank Theme On Genesis Framework · WordPress · Log in