
My kids love to build. Last year I bought them some wooden blocks.
They like building more than they like sharing.
So I made more. They are getting them for Christmas, so alas, I cannot now show you a photo of glee filled toddlers happily playing together, cherubic smiles upon their faces as they work to build collaboratively.
I’ll show you that photo just as soon as it happens…
But I can show you this:
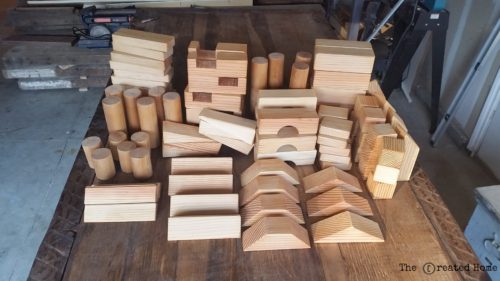

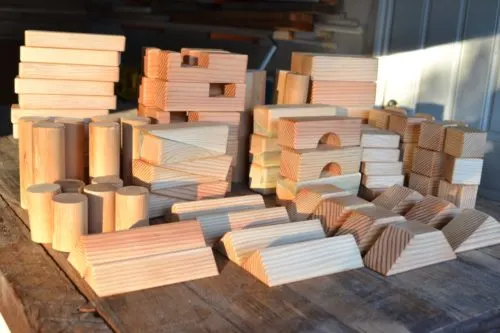
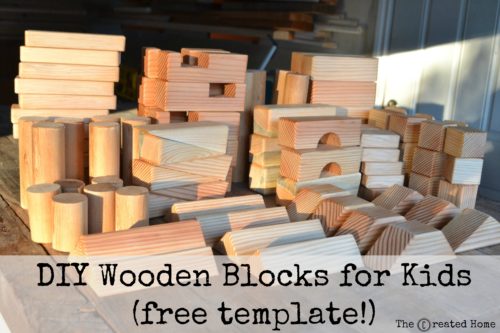
That’s a 100 piece set right there, folks.
Let’s talk about whether it’s worth it to make your own wooden blocks. Is it cost effective? Maybe. Some block sets are really, really pricey. Others, not so much. I calculated the cost if you didn’t have any of this wood on hand…then lost the paper I wrote the calculations on. But it pretty well came down to being a good deal for quality blocks, and something I would definitely do again.
Materials
*This post contains affiliate links for your convenience. You can read about what that means and stuff here.
I used hemlock and doug fir to make the blocks. You can use whatever, really. You’ll be able to make a set this large with:
1 – 1×2 @ 6′
3 – 2×2 @ 8′
1 – 1 1/4″ diameter closet rod @ 6′
Time
Can I get this done in time for Christmas?! Sure, just give yourself a couple of hours.
Tools
You can make these with just a miter saw and a table saw. You could also skip a couple things and use just the miter saw.
The Template
You know what I’m going to do? I’m going to give you a free template to make all of these patterns yourself. Seriously. No strings. I’m just that nice.
Click here to download:
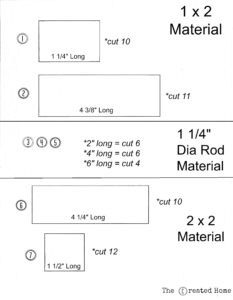
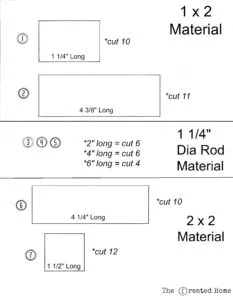
**UPDATE: Pattern number 10 (4.25″ 2×2) is incorrectly marked as a 45 degree angle. It should say 22.5 degrees. One way to make these cuts safer is to cut the angle, then chop it down to length. As always, remember to use all safety precautions when using saws.**
How to cut the wooden blocks
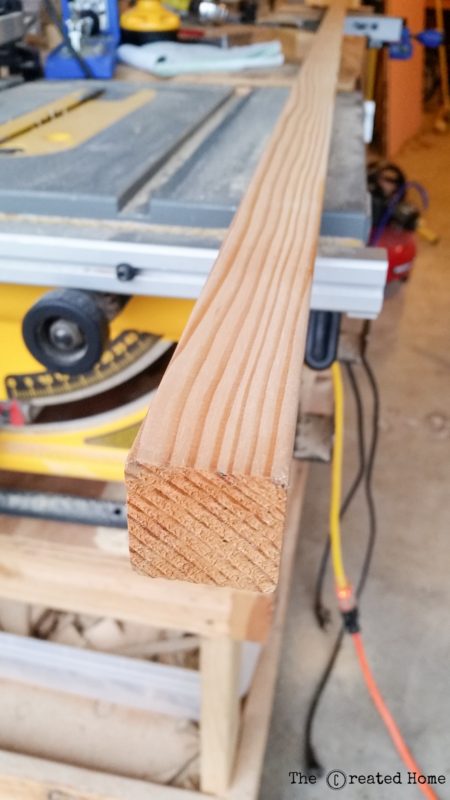

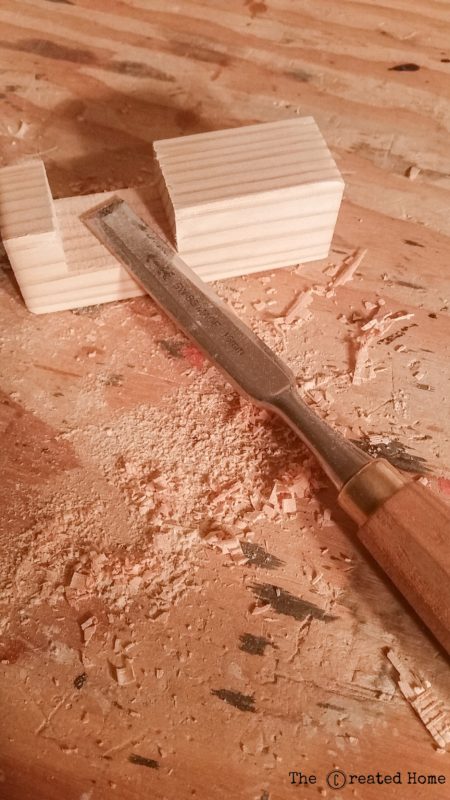
Okay, so you have the template, which tells you most of what you need to know. I’m going to level with you here. The number of blocks I made of each type is totally arbitrary. Switch it up if you like. Some blocks cut out super fast, some take more work. The notched blocks (#9) take some work. I made those by running them through the table saw repeatedly, then chiseling them out. If that sounds like a lot of work, skip that pattern. Your kid will never know.

The other blocks were made using the miter saw, with the exception of the final two patterns, #14 and #15. To make those I set the table saw on a 45 degree angle, then ran a long piece of 2×2 though. For extra safety I used a 6′ piece and only ran the first couple feet so my fingers were far away from the blade. After that I used the miter saw to chop the pieces, creating a larger and a smaller triangle for each cut because the table saw wasn’t set perfectly down the middle. Your’s probably won’t be, either, so you’ll end up with a large and a small triangle.
For the round blocks I used closet rods, which I had laying around the shop. These blocks are a terrific scrap wood project if you have things like that around. Check Restore as well and you can often snag a great deal.
Finishing
I sanded the edges of each piece using my stationery belt sander. Round all of those edges. The notched pieces you’ll have to hand sand a bit, as much as it pains me to say that. I hate hand sanding.

Finish the wooden blocks with food grade mineral oil. Because kids stick things in their mouths. And by things I mean everything.
Pile the whole lot of them in a big canvas bag, stick a bow on it, and enjoy the magic of your kids playing peacefully all day long. Or however it works out – results may vary.
As always, drop me a line if you have any questions, and happy building!

Wood Ship Kit
Friday 11th of September 2020
That's really nice post. I appreciate your skills. Thanks for sharing.
Sarah
Thursday 1st of April 2021
Thank you!
Best Giant Outdoor Wooden Blocks: Buyer’s Guide | Oddblocks
Saturday 29th of August 2020
[…] Credit: The Created Home […]
DIY Wooden Blocks for Kids (with a template!) - The Created Home - Kids Activities
Thursday 4th of June 2020
[…] My kids love to build. I bought them wooden blocks. They like building more than the like sharing. So I made more. Here’s the template so you can, too.. Read more at thecreatedhome.com […]
Buy Nothing Day and Gifts That Don’t Involve Capitalism | Rubber Tramp Artist
Monday 25th of November 2019
[…] in your life, make sculpting dough, sidewalk chalk, bubble solution, rainbow crayons, moon sand, wooden blocks, and/or bean […]
6 Ideas of Wood Crafts for Kids | Wood Dad
Wednesday 2nd of October 2019
[…] For more info on how to make wooden blocks see https://thecreatedhome.com/diy-wooden-blocks-kids/ […]