
Reveal posts are weird for me as a DIY blogger. I want to show you stunning before and after photos of our bathroom renovation, but with the intent that you say, “Sweet, I can totally do that!” rather than, “Oh man, I could never do that.”
You can totally do it.
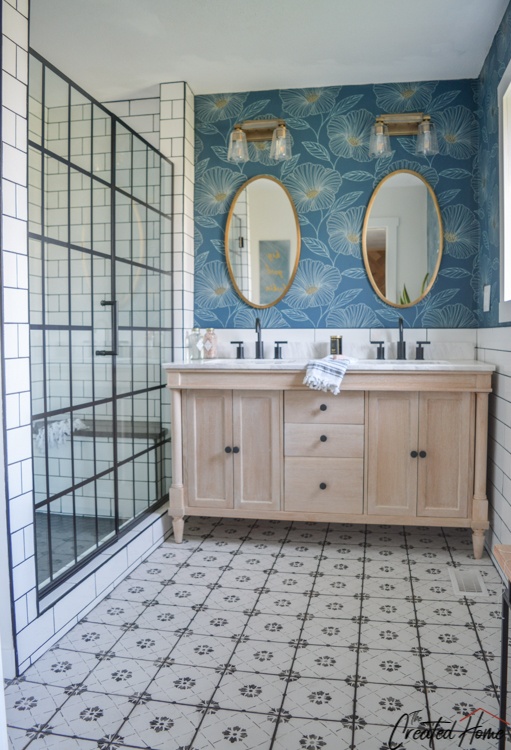
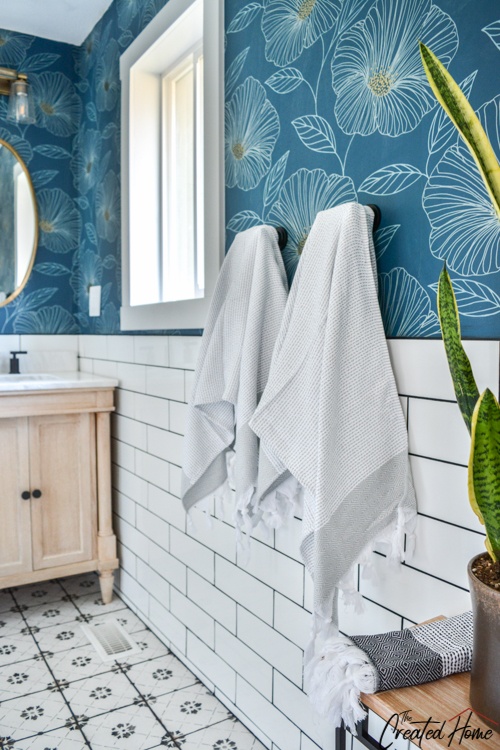
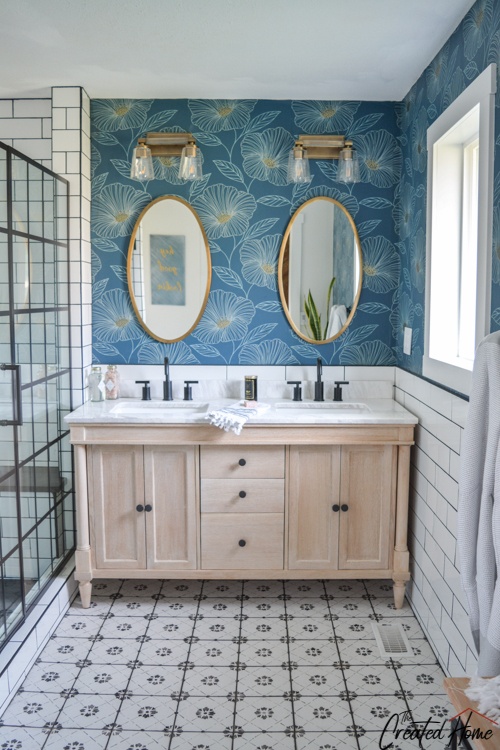
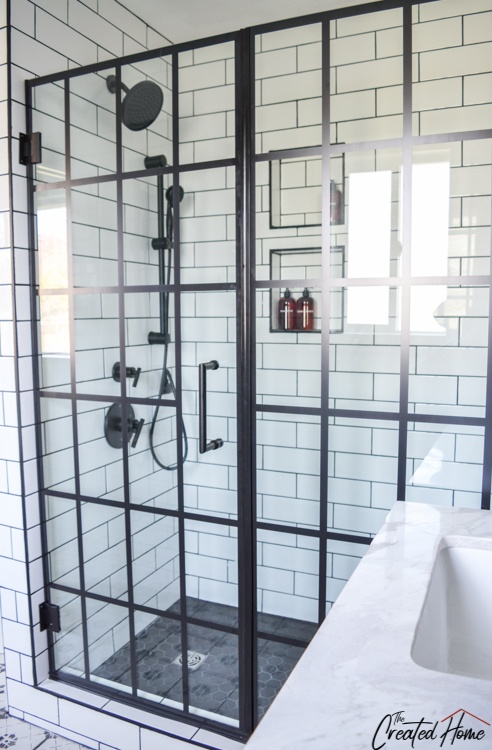
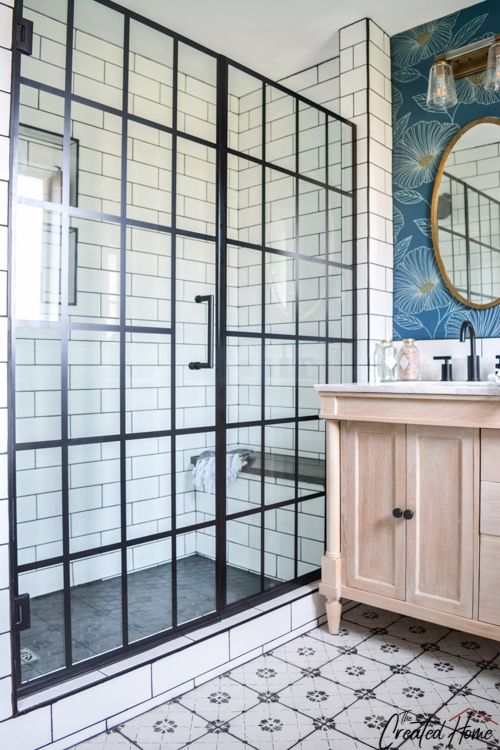
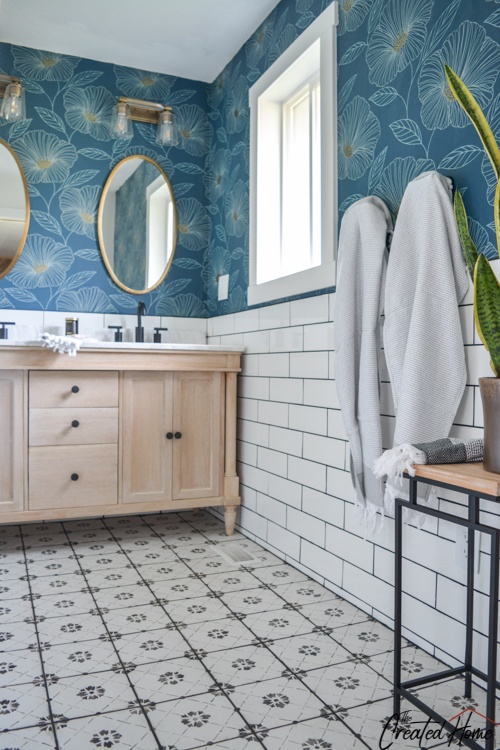
Here’s a look at our brand new master bathroom:
In case you missed it, I have tiling and grouting tutorials for this bathroom. And in the next week or so I will have a tutorial and build plans up for the vanity.
Here’s what I’m going to cover here:
- Tear down of the old bath and why we did it
- The budget
- Where to spend money, where to save
- Source list
*I will include links to materials, so I’ll add that as an Amazon affiliate I earn from qualifying purchases. This disclosure pertains to all the links in this post. You can learn more about affiliate links here.
Where it all started…
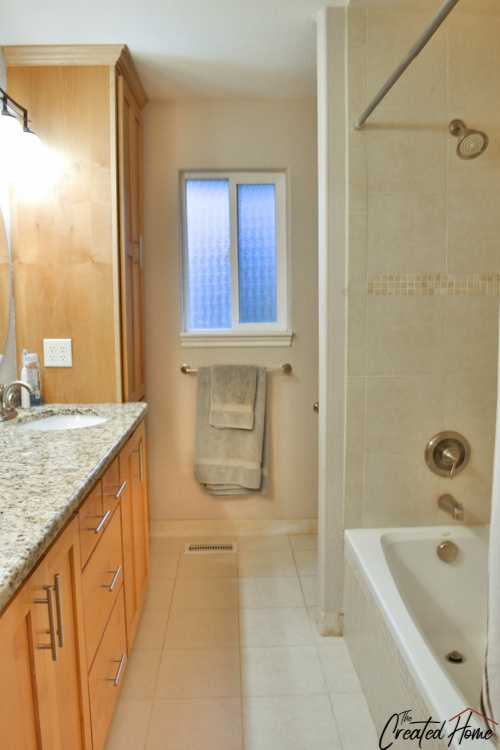
Our bathroom was located in the hallway outside of the master bedroom. If there is such thing as a galley style bathroom, here it is. It was always the plan to change it to an on suite, and over the years we have talked about many possible plans to do so, from the minimal to the tear-it-all-down scenarios.
A major water leak helped narrow those options and got us started on the bathroom renovation sooner than expected. Truth be told, sooner than we were ready. Fortunately our home owners insurance covers mold and water remediation. My advice after all of this is to pay for that coverage, and I’ll show you why when we break down the budget in a moment.
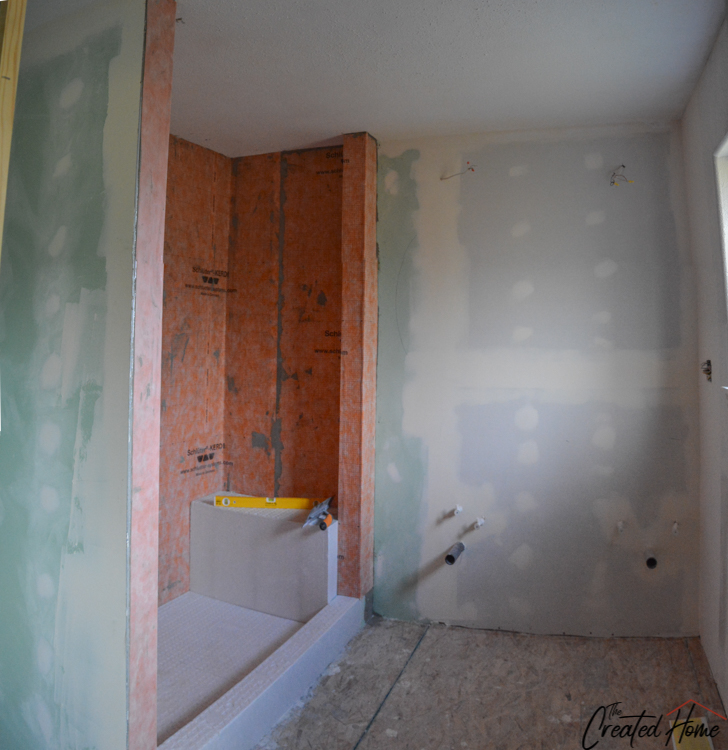
Thanks to a layer of asbestos tile the flooring in the bathroom and through to the master bedroom were all removed. Once the remediation team was finished up we completed demolition by removing the wall between the master bedroom and bathroom and pulling up the damaged subfloor, leaving us with a 10 foot hole in our house and revealing a mess of nearly cut through floor joists and structural issues.
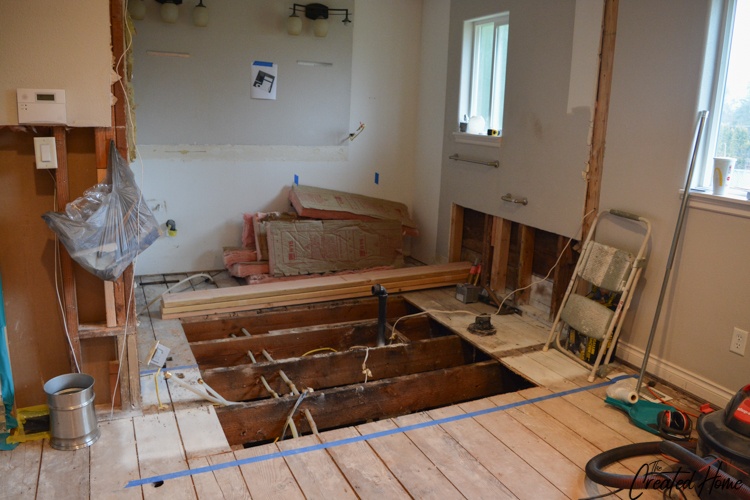
Long story short, we fixed it. We sistered new joists to the old, moved and ran new plumbing lines, and rerouted electrical. We then patched the hole and added a layer of 3/4″ ply to the entire area, including the bedroom, to build the flooring layers back up and make everything nice and firm. Old houses are like onions, folks.
We also decided to move that wall we tore down about 14 inches into the master bedroom. That was the most we could give up of that space without running into closets and windows and such. But it was just enough to make the new floor plan work. While everything was open we also realized we had enough space to widen our doorway and add double doors, which really makes the space feel masterful.
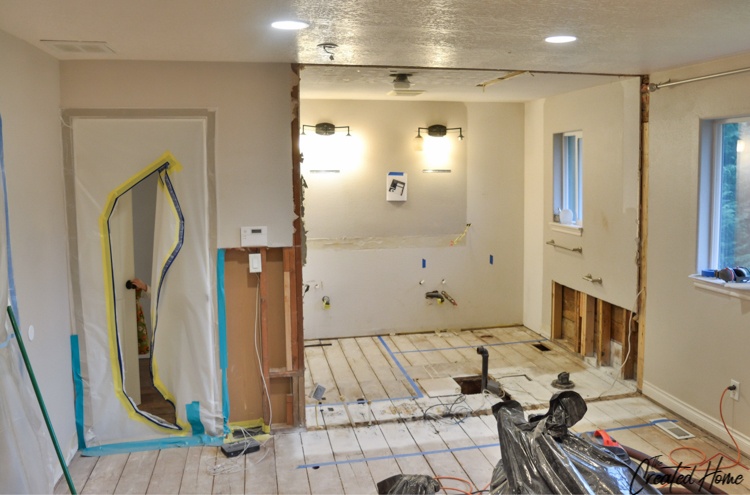
Or it will when I finish that transom window one day…

To give you an idea of the change, here’s what that space looked like before…
Don’t worry, there’s still room for a dog bed. That cabinet in the after photo is actually a dog murphy bed.
The Budget
When I first wrote about this bathroom renovation I said I would be completely open with our budget and not hold anything back. So here it is. A complete breakdown of the budget and precisely where all of the money went.
The remediation costs for this were $7,376.06, all of which was covered by insurance.
Our budget goal was about $6,600. That number being the estimated insurance reimbursement for rebuilding the bathroom. The estimate to have the work done by someone else, without accounting for structural work, moving of the wall and consequent changing of electrical, and not including the vanity, tile, fixtures, and hardware that I intended to provide, was $14,980. We estimated the actual costs of going that route would have come up to somewhere around $25,000. Making this a $32K bathroom renovation.
It’s not even very large, guys. Seriously, the finish size is just over 8×8 square feet.
So we did it ourselves. All of it. Except the shower glass installation. Word to the wise: Hire that out.
Here it is, then, the precise budget breakdown:
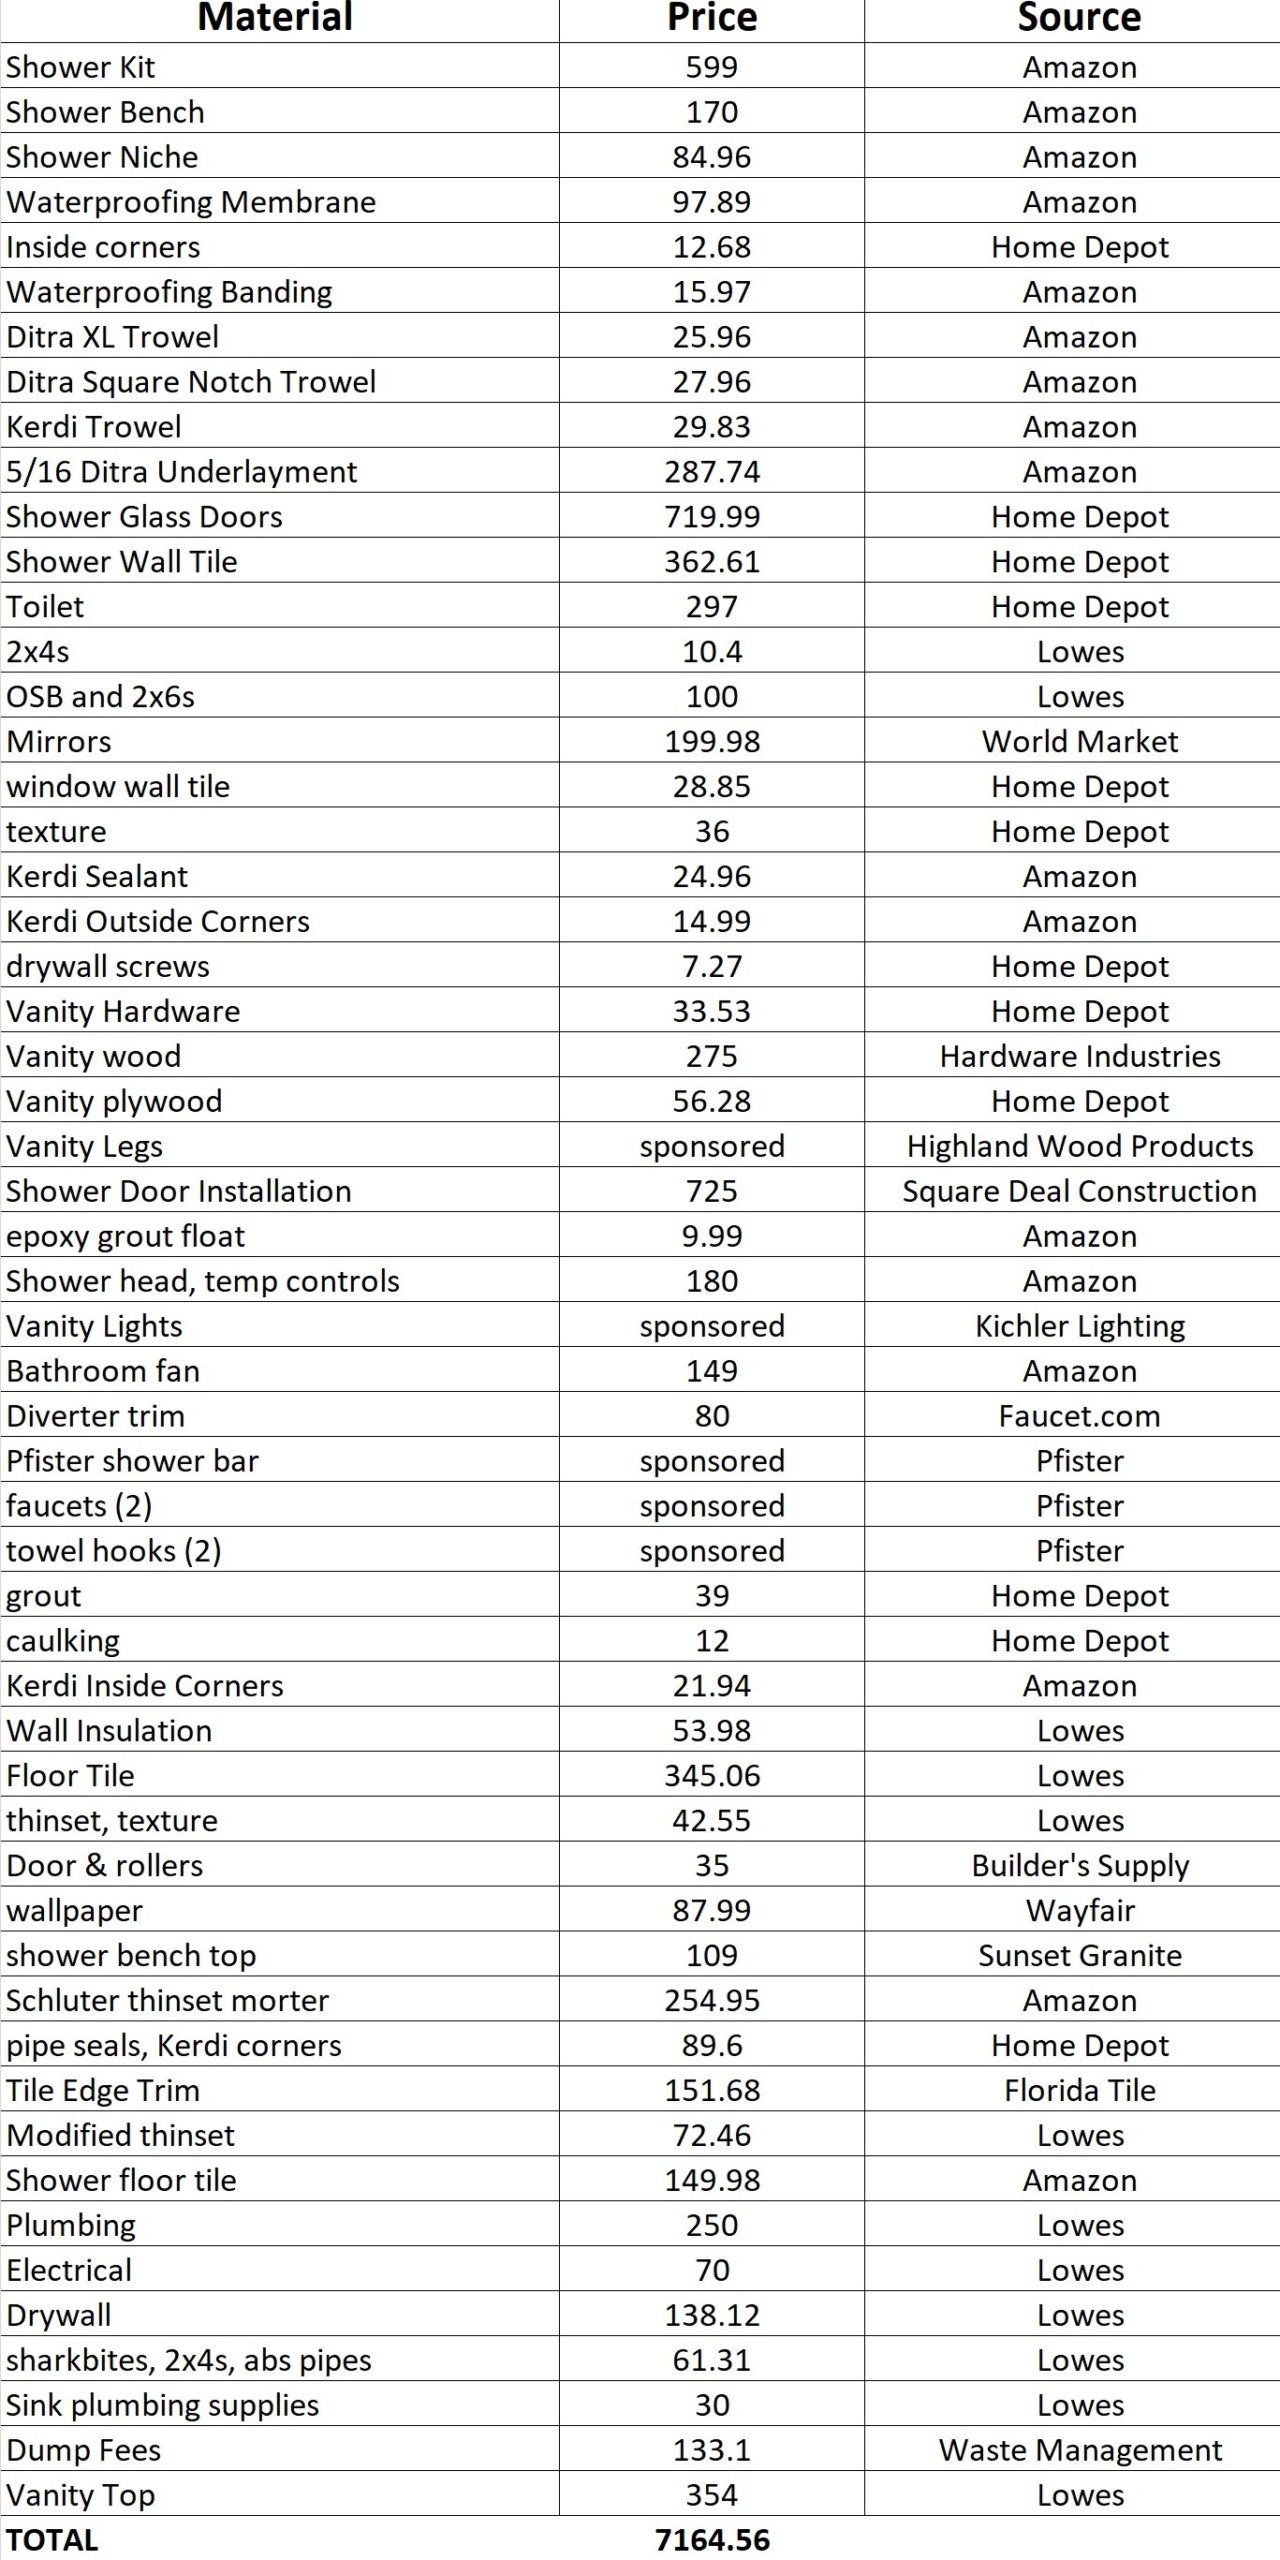
Look, I know it’s not typical to go into so much detail with the budget, but the point here is hopefully to inform you of what goes into a renovation like this so that you are better prepared for your own project.
That said, I will point out that this renovation was pretty extensive. All the structural work aside, we moved every last bit of plumbing and electrical. We are incredibly fortunate in that we can do those things ourselves, which saved a ton of money. Also, as you can see from the budget, as a blogger I do sometimes work with companies, and some supplies were provided.
Regardless of your skill set, the fact is that if you want to save money, you can put some of the work in yourself. Hopefully the breakdown also helps you account for things you might not otherwise have thought of.
Save some money, spend some money
I promise, we are getting back to the pretty pictures now. One last thing I want to point out is that with any renovation, you need to decide up front where you want to allocate the budget. Where can you save some money, and where is it worth spending some more.
We elected to spend a little more to use the highest quality waterproofing supplies we could. For obvious reasons, right? So we went with all Schluter materials for the shower and floor These came highly recommended by every contractor we talked with, and after researching the matter, we felt best going with quality. You may not be able to see it, but it sure feels good knowing it’s there!
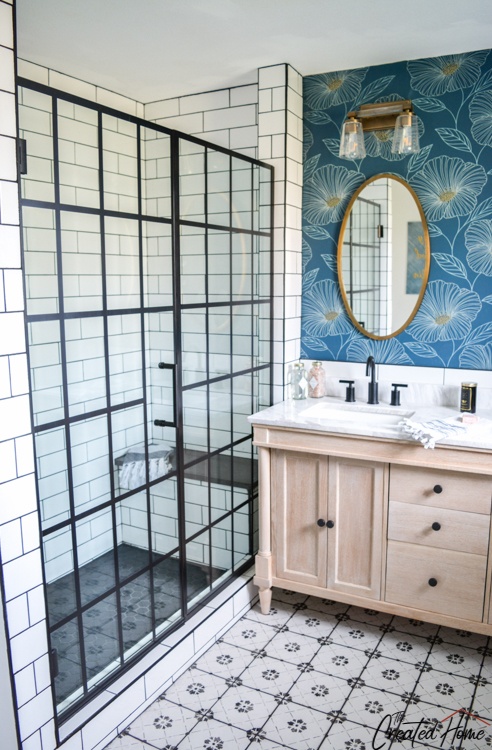
We then saved some money by going with more affordable shower tile. These 4×12 tiles are a classy subway look that is still visually interesting due to their larger size and the dark grout.
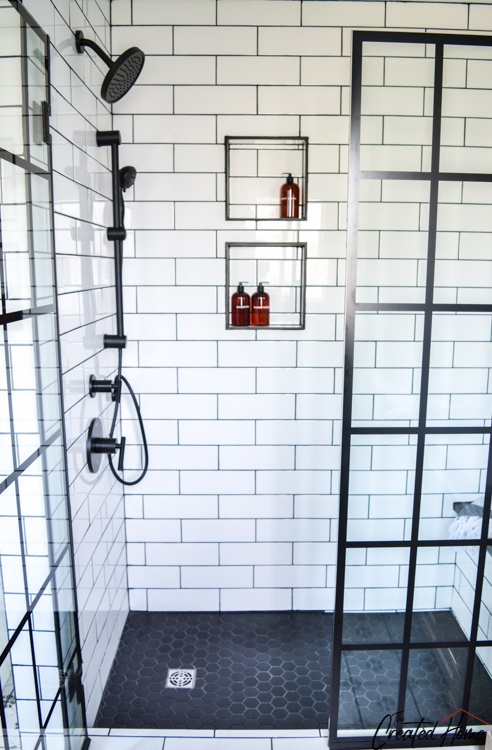
They are also affordable. We ended up using them not only on the shower walls, but half way up two of the other walls as well.
The porcelain floor tile cost a bit more, but was still affordable at $4.73 a square foot, as opposed to $14/sq ft. for some of the popular cement tile options we originally considered.
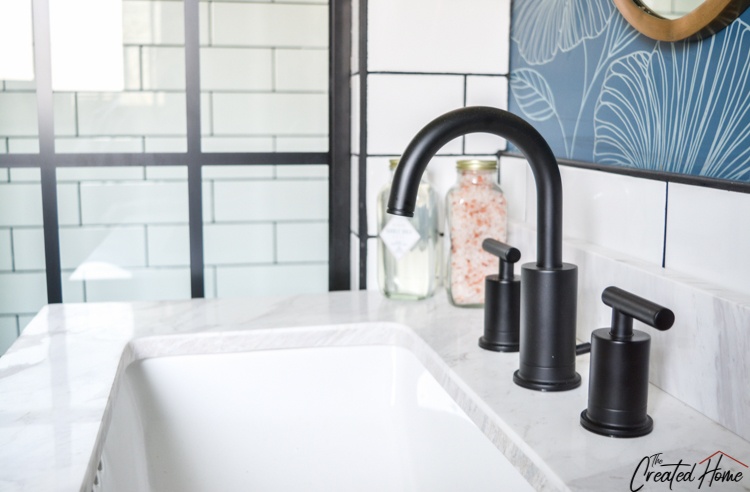
Fixtures
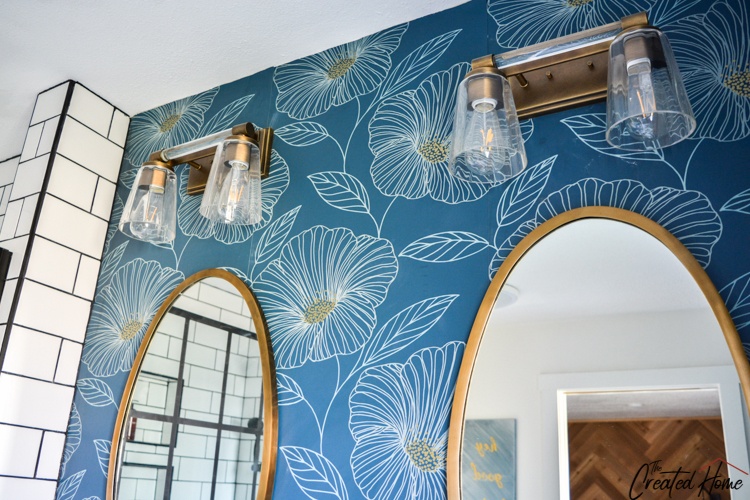
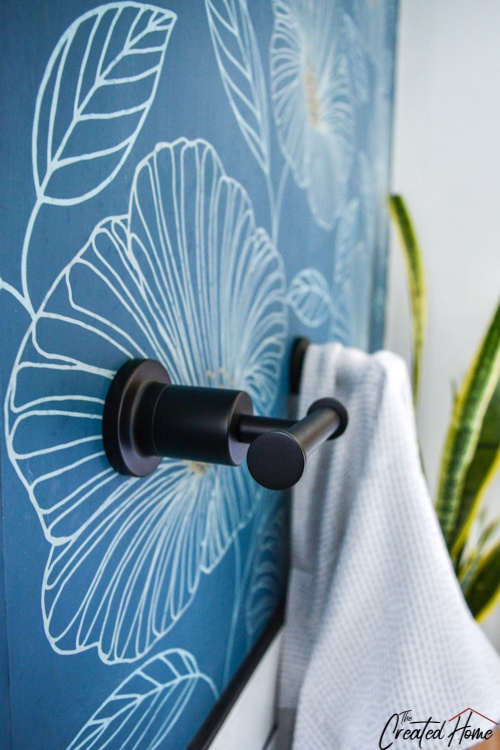
The other area I will spend a little more money on, typically, is the fixtures, both lighting and water-type. A good light can serve as the inspiration for an entire room. These lights by Kichler Lighting are no exception. I knew I wanted the bathroom to strike a cord somewhere between traditional and modern, and this was the first finish product that I chose. The lights have traditional flair with a modern edge that exemplifies the feeling I wanted. Good lighting is everything.

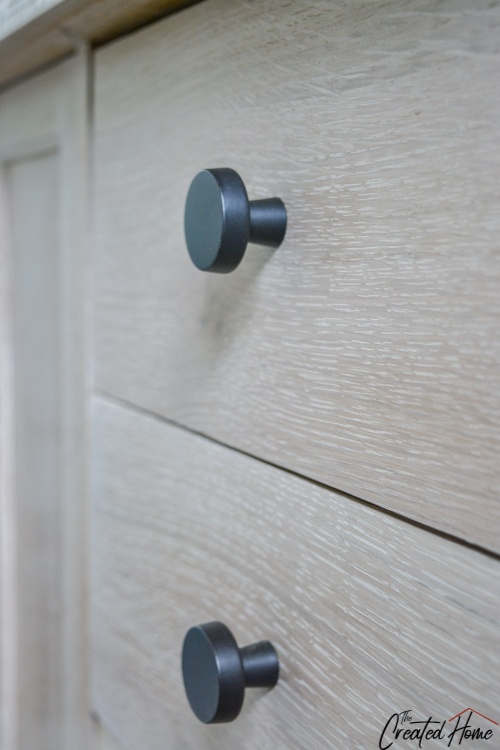
The faucets, by contrast, are sleek matte black and are more modern. And I adore how they work together.
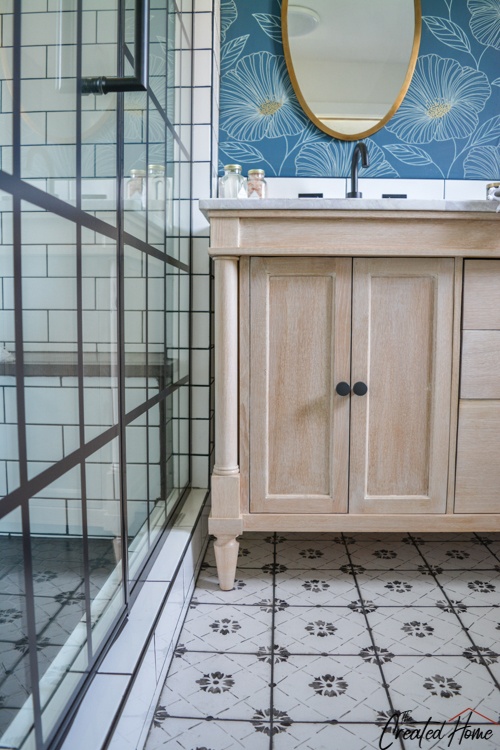
The Vanity
The vanity was another area we saved a lot of money. Where my husband took on the plumbing and electrical, this baby was my way to save major fundage.
I fell in love with this vanity some time ago:

See that price? That’s without the vanity top. It’s also more than a third of our overall budget. But I am no good with the lathe (which likely has something to do with not taking the time to learn how yet), and I needed a hand with those legs. I’m excited to share that I partnered with Highland Manor Wood Products to create these beautiful custom legs. They are now available on their website under “Cascadia Vanity Leg” and you can use the code TCH10 to save 10% on this or any other product on their site.
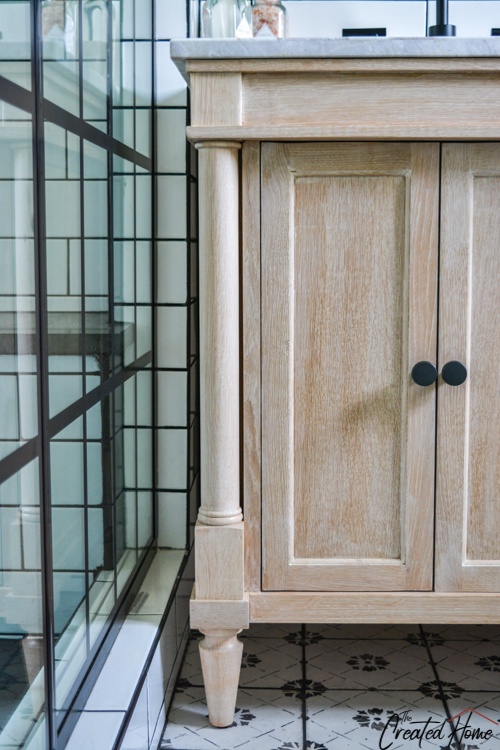
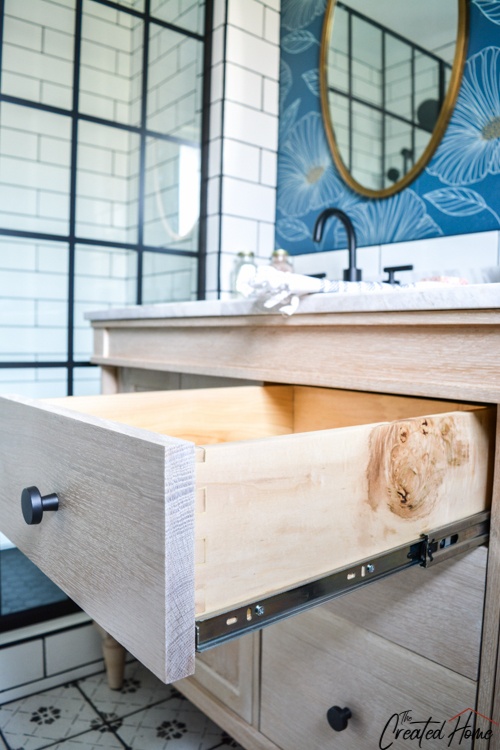
I love this vanity so much. It is constructed out of quarter sawn white oak and ended up costing me $718.81 including the vanity top.
One other note about the vanity, because frankly, I’m kind of giggle-happy pleased with it. The drawers are constructed from gorgeous curly maple wood. The wood came from a tree my arborist father took down a few years ago. No joke, it was a heck of an undertaking, but I milled up a few pieces of that wood and hand cut the dovetails to form these drawers. The dovetails are really not that great, but you know? They are strong and I did it.
Another way we saved money on our bathroom renovation was to make sure that our shower fit a standard sized door. I initially priced out a custom shower door when we were considering a slightly different configuration, and it was over $5000. This set cost $719.99. Installation was $725 and worth every penny. If it takes experienced professionals 4 hours to install a door, it will probably take you a whole lot more, right?
Bathroom Renovation Source List
Hopefully something in this has been usefully, particularly if you are planning your own bathroom renovation. I’m going to finish up with a source list and some more photos. If you have any questions, please don’t hesitate to reach out.
This list looks a little different than what you’ll find in most room reveals, because we are DIYers. And probably you are, too.
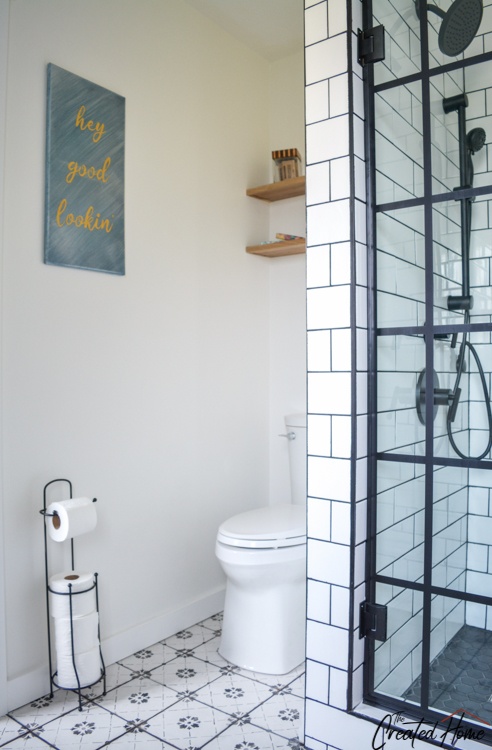
Toilet (Guys, it has smooth sides that are easy to clean. It’s amazing.)

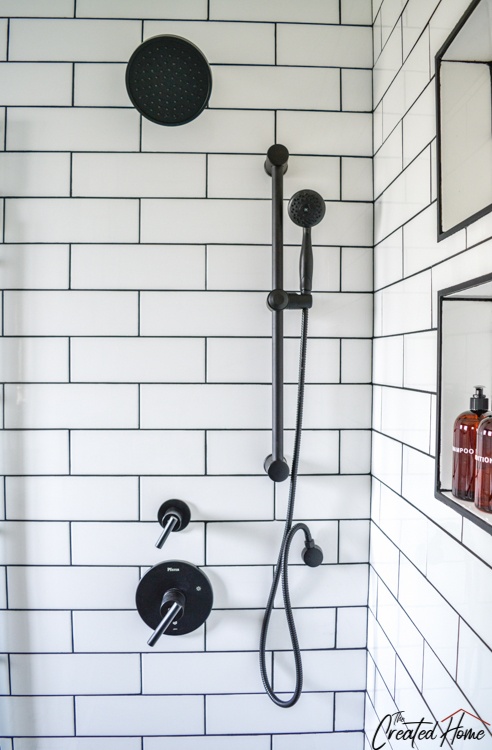
Shower fixtures
Shower slider bar
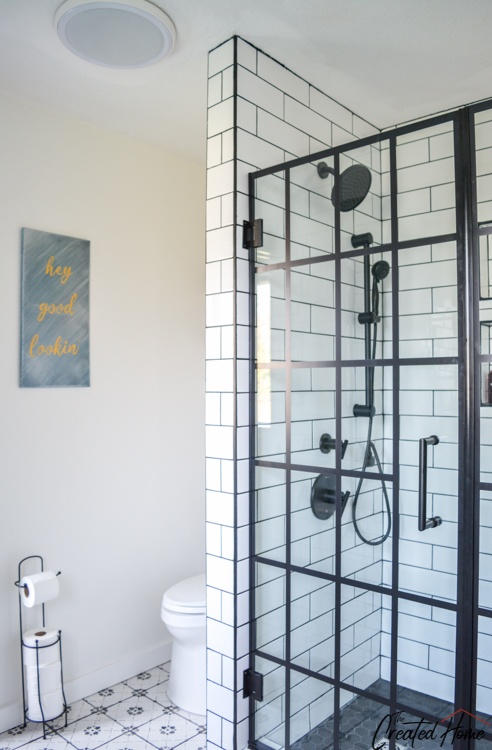
Bathroom fan (It’s also a bluetooth music speaker and is the greatest thing you never knew you needed.)
Thank you
A huge thank you to some of the amazing companies I got to work with on this project. Having flipped a few houses I can tell you that choosing materials for one’s own home is infinitely more difficult than for other houses. I’ve been honored to work with Kichler Lighting on this and projects in our mudroom and kitchen, as well as in a recent flip property. Pfister provided the beautiful hardware. And, of course, Highland Manor Wood Products not only created, but allowed me to design those beautiful vanity legs. Hopefully it goes without saying if you have read anything I write, that all opinions are my own, but no matter the sponsorship or material provided, they indeed always are.

joshua wienholt
Monday 13th of July 2020
Your blog is amazing it gives so much ideas and information.
Sarah
Thursday 1st of April 2021
Thank you!
Nippon
Tuesday 10th of December 2019
The best I read till date!!
The Cascadia Vanity: A DIY Turned Leg Double Vanity - The Created Home
Friday 6th of December 2019
[…] cost a LOT Of money. And, honesty, many of them really are not built that well. So when we recently remodeled our master bathroom I designed and built my own vanity. I call it the Cascadia Vanity, and I’ve got plans and a […]
Weekend Project: Creating a Guest Bedroom - The Created Home
Friday 22nd of November 2019
[…] makeovers, you know I love me a good light fixture. (Seriously, they were crucial to the recent bathroom reno, the mudroom build, and the kitchen […]