
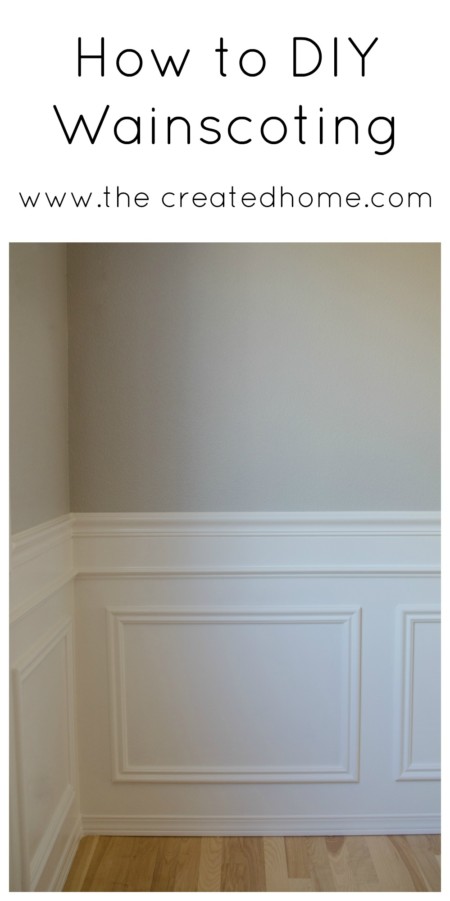
Wainscoting is an elegant and timeless way to add dimension to a space. Done right, it should look as though it has always been there. It also doesn’t have to be terribly expensive. Case in point, we were able to do this for just over $200.
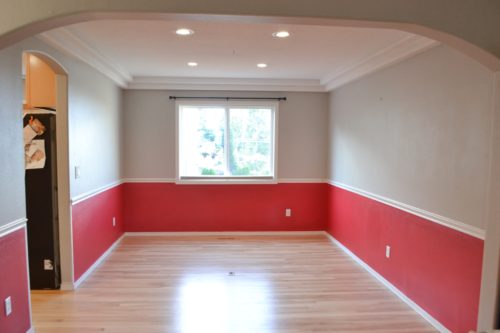
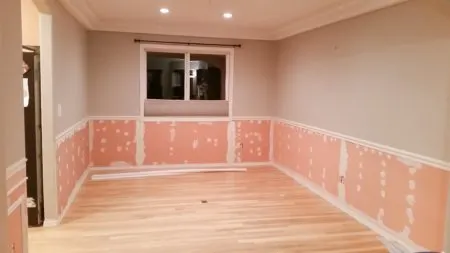
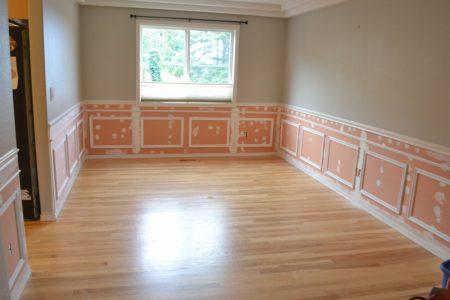
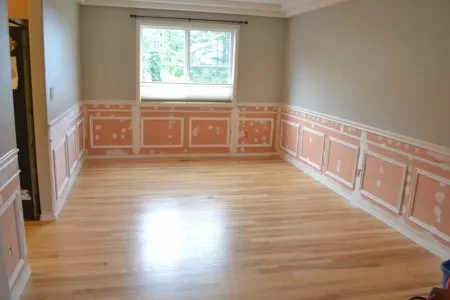
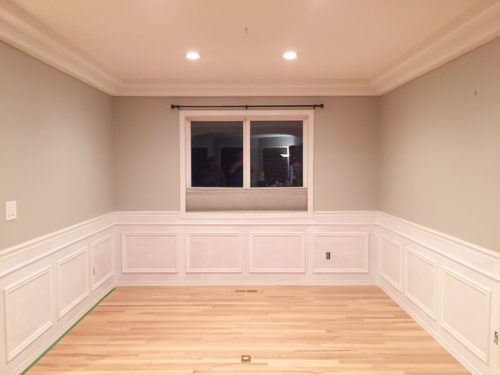
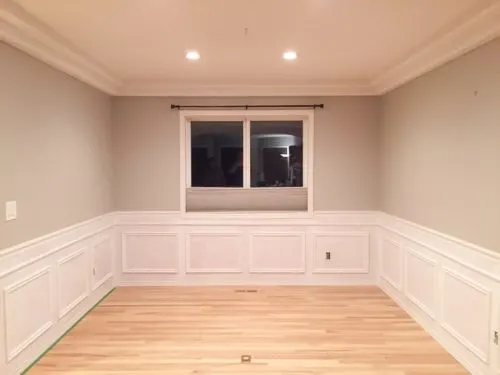
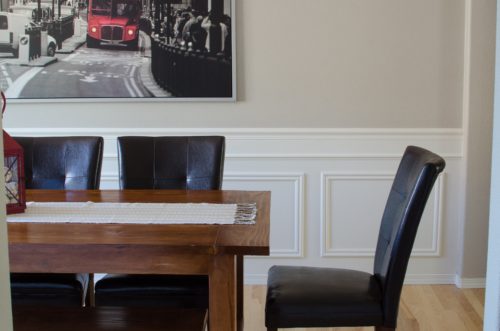
This dining room was a great space, but the red was dated and unfinished.

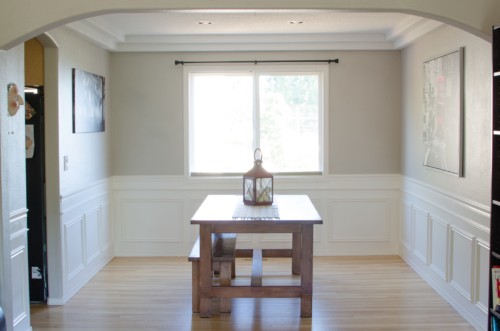
Just look at that before and after!
Here’s how to create your own wainscoting. Many of these steps are applicable to a board and batten look as well.
Materials and Tools
*This post contains affiliate links for your convenience. You can read my disclosure policy here.
1/4″ plywood (also called luan or underlayment)
trim (you can go for whatever look you like here, but my recommendation is to go for wood, not the composite material)
pencil trim, if you want to include that in your look
*optional* You may find that you need to cut your outlet covers depending on where the boxes fall. If so the easiest fix I have found is to cut a wooden plate, like this one.
joint compound
caulk and a caulking gun
Table saw (we have this one)
Miter saw (we have this one)
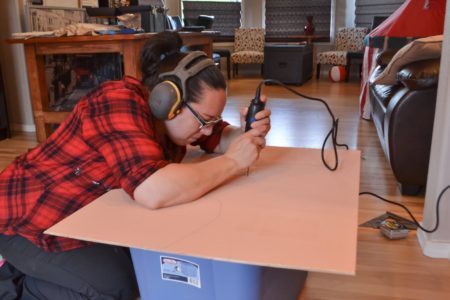
Dremel (for cutting outlet holes in the plywood)
sanding sponge
white semi-gloss paint
*optional* Floetrol to aid in getting a smoother finish
Finish nailer and nails
Compressor (we have this one)
How to DIY Wainscoting
Measuring for the trim
You can use pre-manufactured picture frame moulding. It is here if you want to go that route. We were rushing to get the wainscoting in before a family party later that week, so this was a consideration. However, we favored a more custom look, and the pre-made squares would have cost about $250 alone.
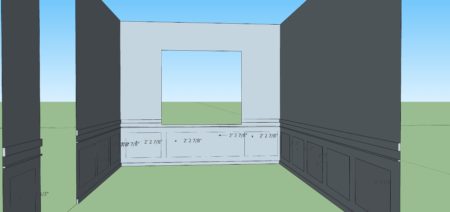
Planning the squares can be tricky. My go-to solution is to use Google Sketch-up. It takes a little getting used to, but it is a great program for planning designs such as this one. I modeled the walls precisely, and from there I was able to play around with with box sizes until I found a standard size that worked for two of the walls. I had to adjust the three boxes on one wall down by 1/8″ to keep the spacing consistent, and that is better than I was hoping for. It is okay for box sizes to change by a small amount. You want your spacing to look good to the eye.
A smaller wall, such as the one you can sort of see on the left side in the foreground, will require a different size box. In this case I simply kept the spacing from the trim and wall sides consistent with what I used on the other walls, and created the box with what was left.
The great thing about Sketch Up is that you can play with it before you even buy supplies – actually, that is exactly when you should do this step. That way you don’t have to waste any materials or drive yourself nuts drawing all over the wall.

Installing the backer board for the wainscoting: Day 1
You will have to decide whether to remove the existing baseboard. In our case the time constraint factored into determining to fit the backer board between the existing baseboard and chair rail. In hindsight, this may not have saved us any time, since we then had to account for gaps where the existing trim wasn’t precisely level.
If you have smooth walls (as opposed to textured) you could skip this step. These walls are textured, and we judged that it would look that much better to work with a smooth finish.
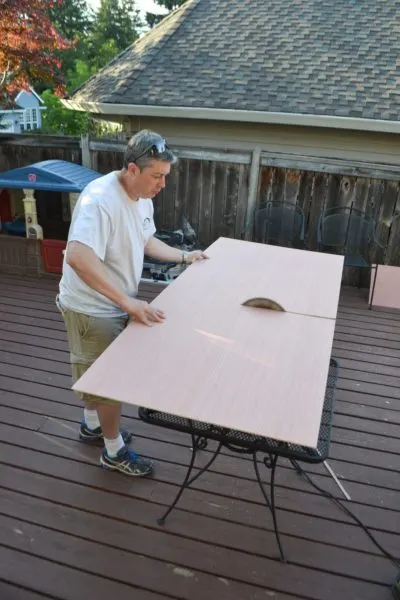
Rip the backer boarding using a table saw. On the larger cuts we could not use the fence, so my husband free handed it. Guys, he’s really good at free handing. Probably the better solution is a circular saw, though.

This dining room has three outlets. Someday homes are going to be built without electrical outlets and cabling. Until that day comes, this unfortunate reality has to be dealt with. We used a Dremel to cut out the boxes. They should be close, but they do not have to be perfect, as they will be covered with a wall plate.
Just look at that focus. My husband may be good at freehand cutting with the table saw, but this is my territory.

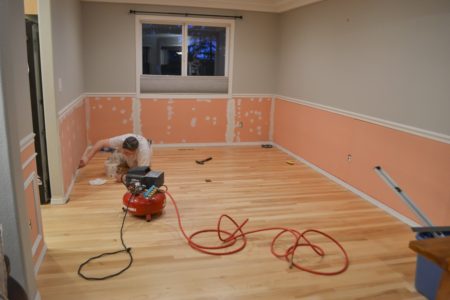
We attached the board with finish nails. There are seams where the window is, and another along the 13 foot long wall on the left side. We filled those with joint compound and sanded them smooth. Twice – fill, let dry, sand, fill, let dry, sand. You’ll want to feather the compound (or “mud”) quite a bit to hide the seam. We also used mud to fill all the nail holes and gaps between the existing trim and the plywood. It won’t look very pretty at this stage.

And that was a wrap on the first night. Altogether it was somewhere around 4 hours. Time to let it dry.
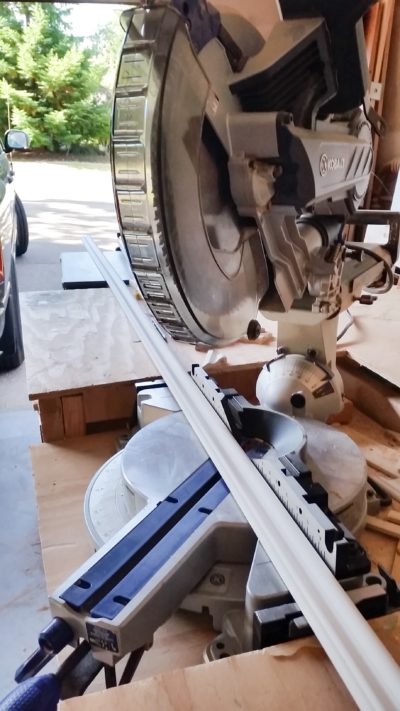
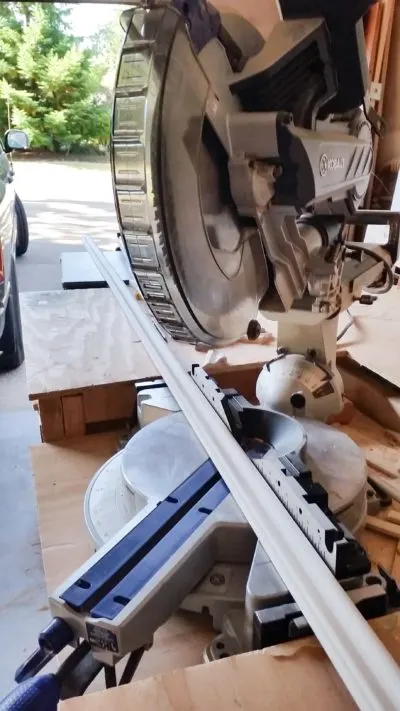
Cutting and installing the trim board: Day 2
I actually did this part first, which is rather backwards. As I mentioned, this was a case of needing to work fast. Against my better judgment, and with a whole lot of trepidation, I cut all of the wood for the squares before we started this job. This saved me a lot of time once we got started, but it was risky. Fortunately for us it worked out well, which was really due to having modeled it all out in 3D first.
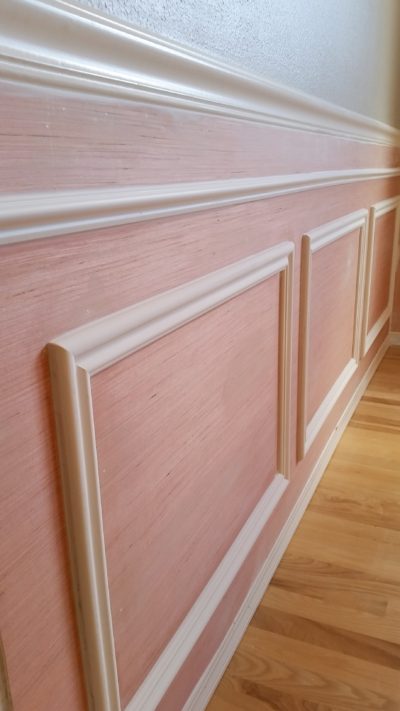
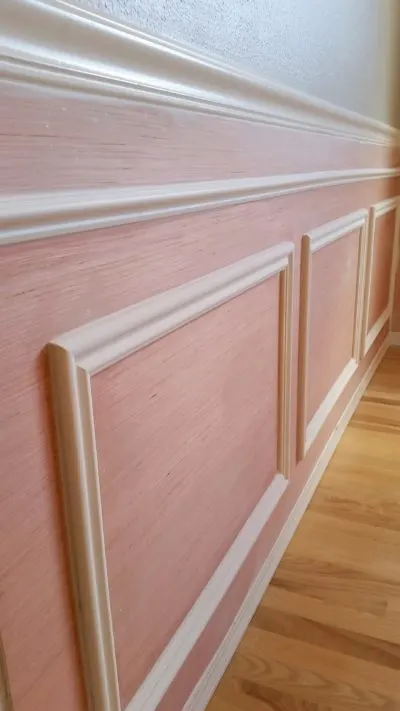
Beware that when you are cutting decorative moulding you will need to make sure your angles take into account the direction of the moulding design. So in this case I couldn’t just cut identical 45 degree angles. I had to made sure the trim was turned the correct direction for each side of the box. My advice is to take your time and make one complete box first, then once you have your cuts figured out, production line it.
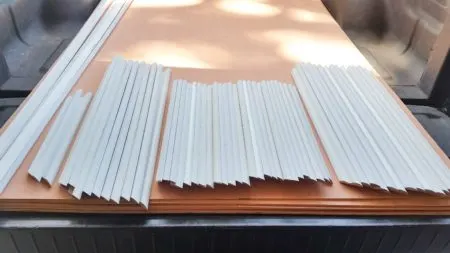
The moulding all cut and ready to install:

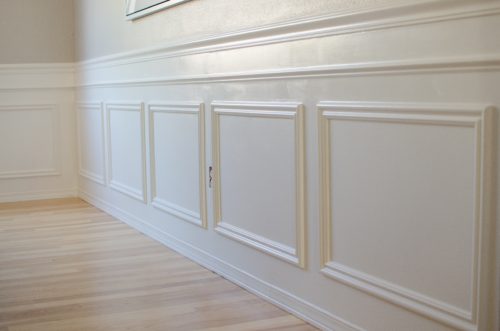
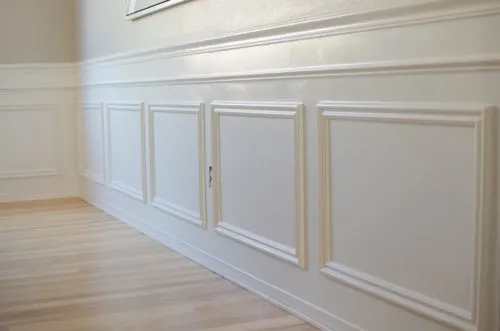
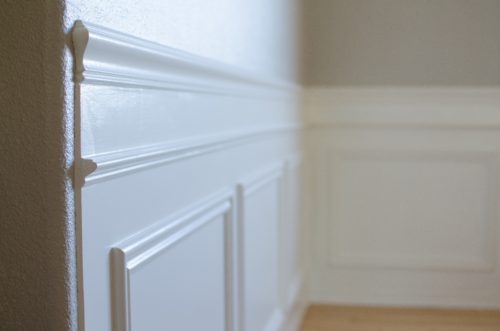
Day two was solo, as I worked while my husband was at his full time job. I started by installing the pencil trim three inches below the chair rail. We elected to add this trim to jazz up the overall look a little, and we think it turned out great. If time had allowed I would have added an additional layer of small trim to the inside of the boxes, which would have bulked them up and looked really great. But, once again, time was a major factor.
I spent day two measuring and nailing the trim in place. My memory is foggy, but I think that was about three hours.
Finish Work: Day 3
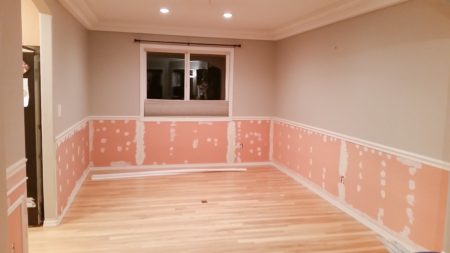
The boxes fit together fairly well, considering the necessity of pre-cutting them. Day three was spent re-mudding where necessary, and caulking everything. Around every piece of trim, inside and outside of each box. The caulking is what makes it all look finished. It is the factor that makes your work look like it belongs and has always been there. It can take some time, but it is worth it.
We spent about two hours the third day, and then handed it off to the home owners to paint their new wainscoting. That put our time investment at somewhere around 9 hours.
My final tip on installing any sort of trim or dimensional wall treatment like wainscoting is to take your time, measure over and over, and not rush. That last part is a bit of a hypocritical thing to say, since that is exactly what we did. It will pretty well always take you more time than you think. One of the reasons this is the case is that rooms – and trim, etc. – are rarely perfectly level, or true. In this case we found that the bottom window trim was 3/8″ out of square, and that fact ended up costing us a lot of time to work around since fixing it right then was not in the cards. It happens. Take a deep breath, roll with it, and carry on.
Painting
There are few things more gratifying than putting up that first coat of paint. Trim is generally painted with a semi-gloss, which makes it pop next to your walls.
First coat.
And finished! (Well, mostly. The outlet covers still need to go up.)
We dealt with the rounded corners by stopping a bit shy, where the chair rail ended, and cutting the plywood at a 45 degree angle. This made it less abrupt more finished looking.
That’s it! The homeowners are happy, their friends think it looks amazing, and we think it turned out pretty well, too.

Are you getting ready to tackle your own wainscoting job? If so I would love to see how it turns out. And as always, please feel free to ask if you have any questions!
Happy building!
Kim
Sunday 21st of February 2021
When nailing the wainscoting, did you have to nail into studs?
Sarah
Wednesday 31st of March 2021
Yes. The thin material will flex otherwise.
Brian Pertman
Thursday 28th of January 2021
I am not going to use the plywood, and I plan to attach the trim directly onto the smooth existing drywall. For the vertical pieces of trim, do you recommend glue, since there is unlikely to be a stud behind all of them? Thank you.
Sarah
Thursday 1st of April 2021
Glue never hurts!
Tam
Friday 29th of May 2020
Hi I know this is a long shot but where did u purchase the decorative molding because I like that specific one. Or do u have the link for it.
Sarah
Tuesday 16th of June 2020
I think it was at Lowes. I don't think they have a lot of options for molding, so it's likely whatever they still have on hand. :) Good luck!
Dining Room Pictures With Wainscoting – Homepedia
Saturday 18th of January 2020
[…] View Image More Like This […]
Dining Room Wainscoting - Home Designs
Wednesday 4th of December 2019
[…] More @ thecreatedhome.com […]